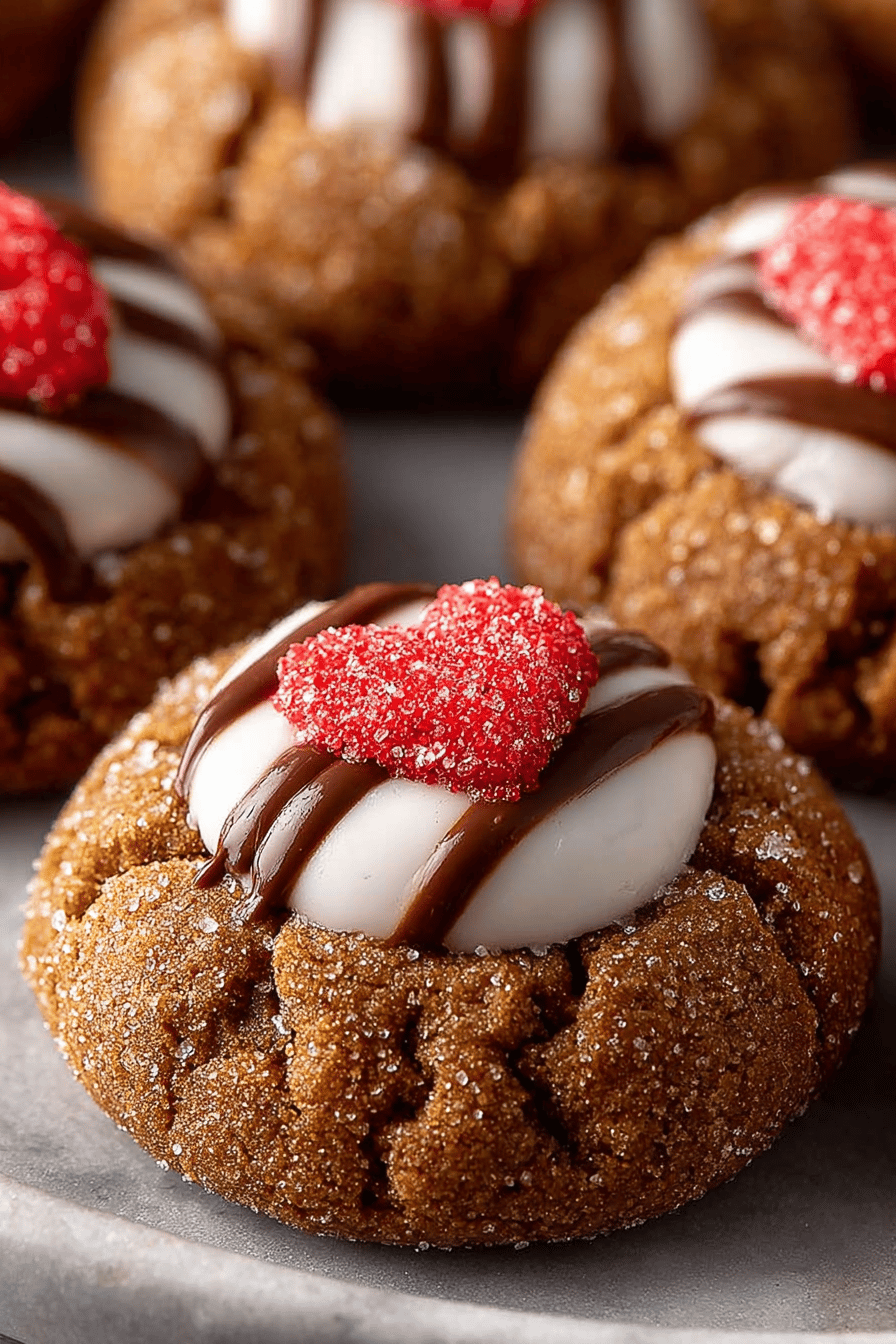
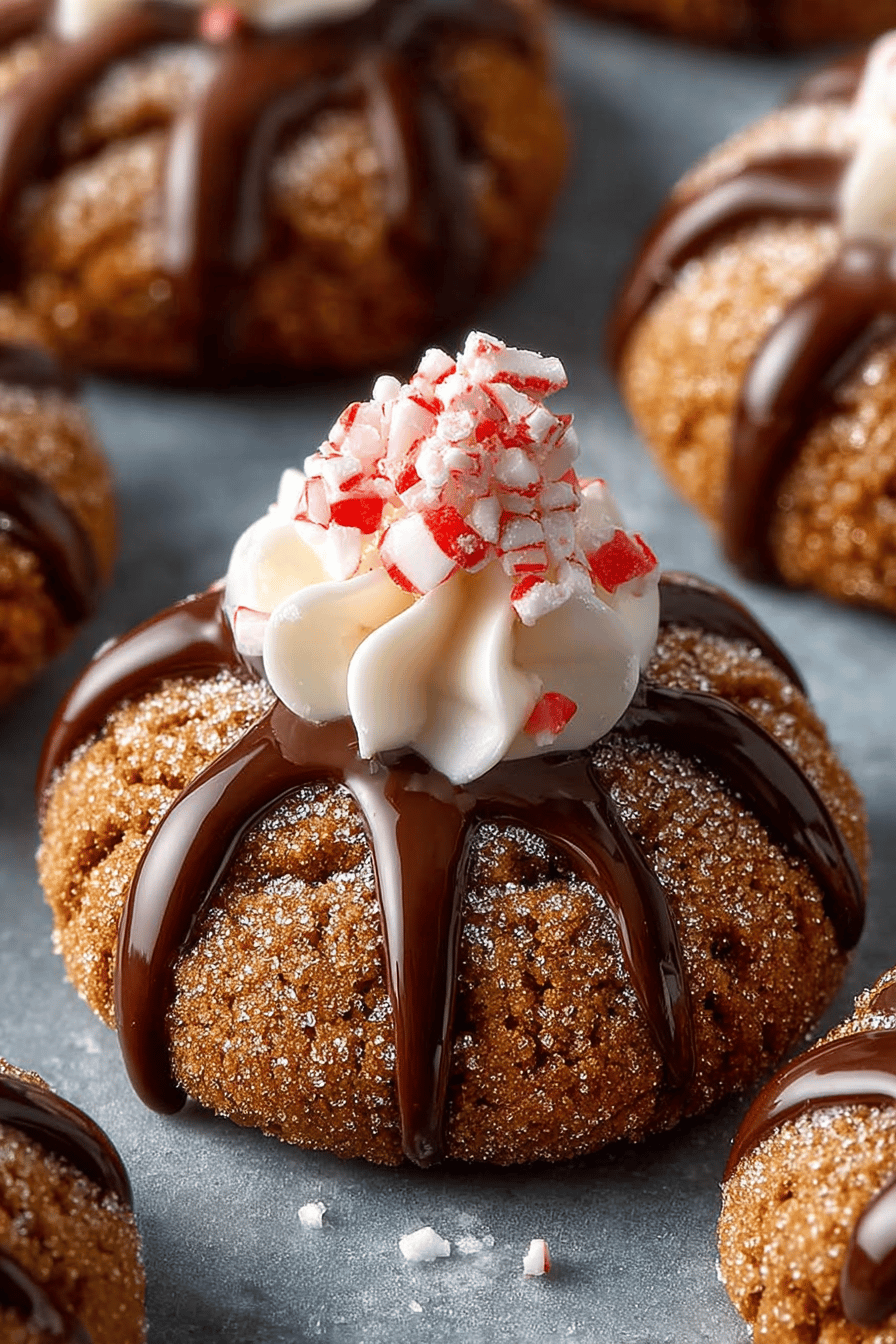
Easy Gingerbread Kiss Cookies Recipe
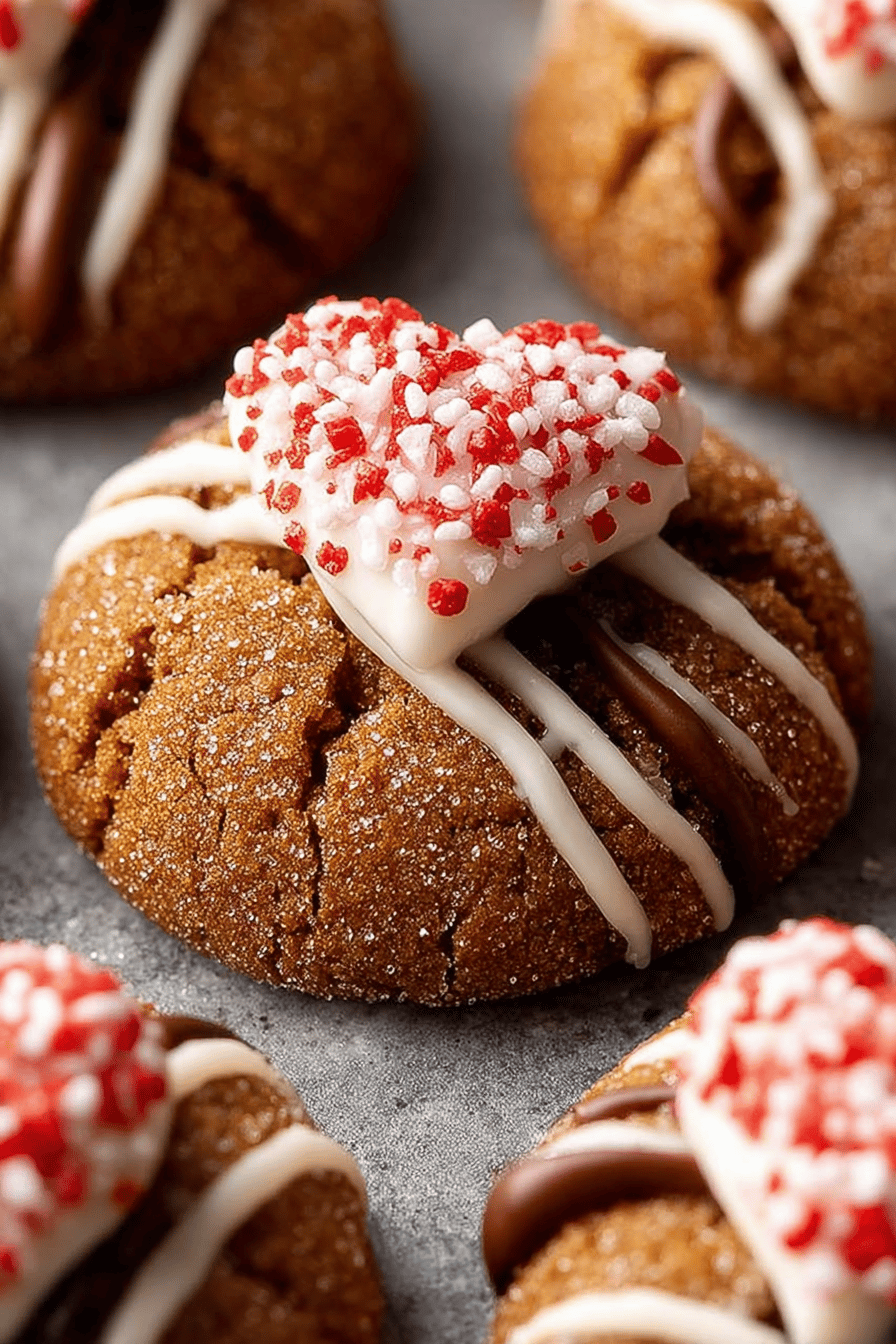
These are gingerbread cookies kissed with chocolate! Think slightly chewy, warmly spiced gingerbread that practically melts in your mouth, topped with a little chocolate kiss of happiness. It’s the perfect bite-sized holiday treat, easy enough to whip up with the kiddos, and ALWAYS a crowd-pleaser. Trust me, you need these in your life! Easy Gingerbread Kiss Cookies Recipe
My husband, bless his heart, isn’t the biggest dessert person. But these? He sneaks them. Like, I’ll catch him going back to the cookie jar (yes, we have a cookie jar!) multiple times a day. Last Christmas, I made a double batch, thinking we’d have leftovers for days…GONE. All gone. The kids helped, sure, but I saw him polishing off the last few while “doing the dishes.” No regrets. These cookies have become a holiday staple, a little bit of magic we look forward to every year. One year, I forgot the molasses. Don’t do that. Just don’t. The family noticed.
Why You’ll Love This Easy Gingerbread Kiss Cookies Recipe
- They’re seriously easy. Like, “I’m-not-a-baker-but-I-can-do-this” easy.
- The gingerbread flavor is on point – warm, spicy, and comforting.
- Chocolate kisses. Need I say more?
- They’re perfect for gifting (if you can resist eating them all first!).
- Kids LOVE helping make them (and eating them, obviously).
- They make your kitchen smell AMAZING.
- They will bring you some holiday cheer and joy.
How to Make It
Okay, so first things first, cream together the butter and brown sugar. Get it nice and fluffy, you know? Like, you could take a nap on it. Then, beat in the egg and molasses. Don’t skip the molasses – it’s what gives these cookies that deep, rich gingerbread flavor. I almost forgot it one time, total disaster averted!
In a separate bowl, whisk together all the dry stuff – flour, ginger, cinnamon, cloves, baking soda, and salt. I usually just dump it all in and hope for the best. No, just kidding! Whisk it, so you don’t get pockets of baking soda. Nobody wants that.
MORE OF OUR FAVORITE…
Now, slowly add the dry ingredients to the wet ingredients, mixing until just combined. Don’t overmix! It’s better to have a few streaks of flour than to end up with tough cookies.
Wrap the dough in plastic wrap and chill it in the fridge for at least 30 minutes. This is important! It helps the cookies hold their shape. Although one time I was impatient and only chilled it for 15 minutes… they spread a little more, but they still tasted great!
While the dough is chilling, unwrap all your Hershey’s Kisses. This is the hardest part of the whole recipe because you will be tempted to eat them all.
When the dough is chilled, preheat your oven to 375°F (190°C) and line a baking sheet with parchment paper. Roll the dough into small balls (about 1 inch) and place them on the baking sheet.
Bake for 8-10 minutes, or until the edges are lightly golden brown.
As soon as the cookies come out of the oven, gently press a Hershey’s Kiss into the center of each cookie. Let them cool completely on the baking sheet before transferring them to a wire rack. Or just eat them warm. I won’t judge.
Ingredient Notes
- All-Purpose Flour: This is the base, baby. Don’t try to get fancy with bread flour or something. Unless you want hockey pucks. Then go for it.
- Brown Sugar: Light or dark, it doesn’t really matter. I usually use light because that’s what I have on hand. If you only have white, add a tablespoon of molasses to it. Boom! Brown sugar.
- Unsalted Butter: Make sure it’s softened! I always forget to take it out of the fridge and then I’m microwaving it and it’s all melty. Don’t be like me.
- Molasses: This is what gives the cookies that classic gingerbread flavor. Don’t skip it! I already told you about the year I forgot, it was a disaster.
- Egg: Just one! And make sure it’s a good one.
- Ground Ginger, Cinnamon, Cloves: The spice trifecta! Don’t skimp. I like to add a little extra cinnamon because I’m obsessed.
- Baking Soda: This helps the cookies rise. Make sure it’s not expired, or your cookies will be flat.
- Salt: Just a pinch! It balances out the sweetness.
- Hershey’s Kisses: Obviously. Milk chocolate is classic, but you could also use dark chocolate or even those caramel-filled ones!
Recipe Steps:
- Cream: Cream together softened butter and brown sugar until fluffy.
- Beat: Beat in egg and molasses until well combined.
- Whisk: Whisk together flour, ginger, cinnamon, cloves, baking soda, and salt.
- Combine: Gradually add dry ingredients to wet ingredients, mixing until just combined.
- Chill: Wrap dough and chill for at least 30 minutes.
- Preheat: Preheat oven to 375°F (190°C) and line baking sheet with parchment paper.
- Roll: Roll dough into small balls and place on baking sheet.
- Bake: Bake for 8-10 minutes, or until edges are lightly golden brown.
- Press: Immediately press a Hershey’s Kiss into the center of each cookie.
- Cool: Let cool completely on baking sheet.
What to Serve It With
- A big glass of milk (duh!).
- Hot chocolate with marshmallows.
- A cup of coffee or tea.
- Eggnog (if you’re feeling festive).
- More cookies!
Tips & Mistakes
- Don’t overmix the dough! Overmixing leads to tough cookies.
- Make sure your butter is softened, but not melted.
- Chill the dough! It’s important for preventing the cookies from spreading too much.
- Don’t overbake the cookies! They should be lightly golden brown around the edges.
- Press the Hershey’s Kisses into the cookies as soon as they come out of the oven, while they’re still soft.
- If your cookies are spreading too much, chill the dough for longer.
- If your Hershey’s Kisses are melting too much, pop the cookies in the fridge for a few minutes after pressing in the kisses.
- Don’t be afraid to experiment with different flavors! Try adding different spices, like nutmeg or cardamom.
Storage Tips
Store these bad boys in an airtight container at room temperature. They’ll stay good for about 3-4 days… if they last that long. I mean, let’s be real. They’re usually gone in a day or two at my house. And yeah, you can totally eat them cold straight from the container. They’re still delicious. Especially for breakfast. Don’t judge me.
Variations and Substitutions
- Different Chocolate: Use different flavors of Hershey’s Kisses, like dark chocolate, caramel-filled, or even the candy cane ones!
- No Hershey’s Kisses: Top with a dollop of frosting or a sprinkle of powdered sugar.
- Different Spices: Add a pinch of nutmeg, cardamom, or allspice to the dough.
- Gluten-Free: Use a gluten-free all-purpose flour blend. I’ve tried it with Bob’s Red Mill and it worked pretty well.
- Vegan: Use a vegan butter substitute and a flax egg (1 tablespoon flaxseed meal mixed with 3 tablespoons water). I haven’t tried this myself, but I’m sure it would work!
- No Molasses: Okay, I really don’t recommend this, but if you’re desperate, you could try honey or maple syrup. But they won’t taste like gingerbread. Just warning you.
- Added nuts: Put some nuts into the cookie dough if you like that sort of thing
Frequently Asked Questions

Easy Gingerbread Kiss Cookies Recipe
Ingredients
Main Ingredients
- 2.25 cups all-purpose flour
- 1.5 teaspoons ground ginger
- 1 teaspoon ground cinnamon
- 0.25 teaspoon ground cloves optional
- 0.25 teaspoon ground nutmeg optional
- 1 teaspoon baking soda
- 0.25 teaspoon salt
- 0.75 cup unsalted butter softened
- 0.75 cup brown sugar packed
- 1 egg large egg
- 0.25 cup molasses
- 1 teaspoon vanilla extract
- 24 pieces chocolate kisses unwrapped
Instructions
Preparation Steps
- Preheat oven to 350°F (175°C). Line baking sheets with parchment paper.
- In a medium bowl, combine flour, ginger, cinnamon, cloves, nutmeg, baking soda, and salt. Set aside.
- In a large bowl, beat together the butter and brown sugar until light and fluffy. Add egg, molasses, and vanilla extract; mix well.
- Gradually add the flour mixture to the wet ingredients, mixing until combined.
- Roll the dough into 1-inch balls and place them 2 inches apart on the prepared baking sheets.
- Bake for 8-10 minutes, or until the edges are set. Remove from oven and immediately press a chocolate kiss into the center of each cookie.
- Allow cookies to cool on the baking sheet for 5 minutes, then transfer to a wire rack to cool completely.
Notes
Nutrition
Featured Comments
“New favorite here — family favorite. creamy was spot on.”
“Super easy and so flavorful! My family asked for seconds. Saving this one.”
“Made this last night and it was turned out amazing. Loved how the effortless came together.”
“This flavorful recipe was so flavorful — the bite-sized really stands out. Thanks!”
“This crunchy recipe was turned out amazing — the flavorful really stands out. Thanks!”
“New favorite here — absolutely loved. guilt-free was spot on.”
“New favorite here — turned out amazing. balanced was spot on.”
“Made this last night and it was will make again. Loved how the comforting came together.”
“Super easy and so flavorful! My family asked for seconds. Saving this one.”
“New favorite here — so flavorful. picky-eater approved was spot on.”