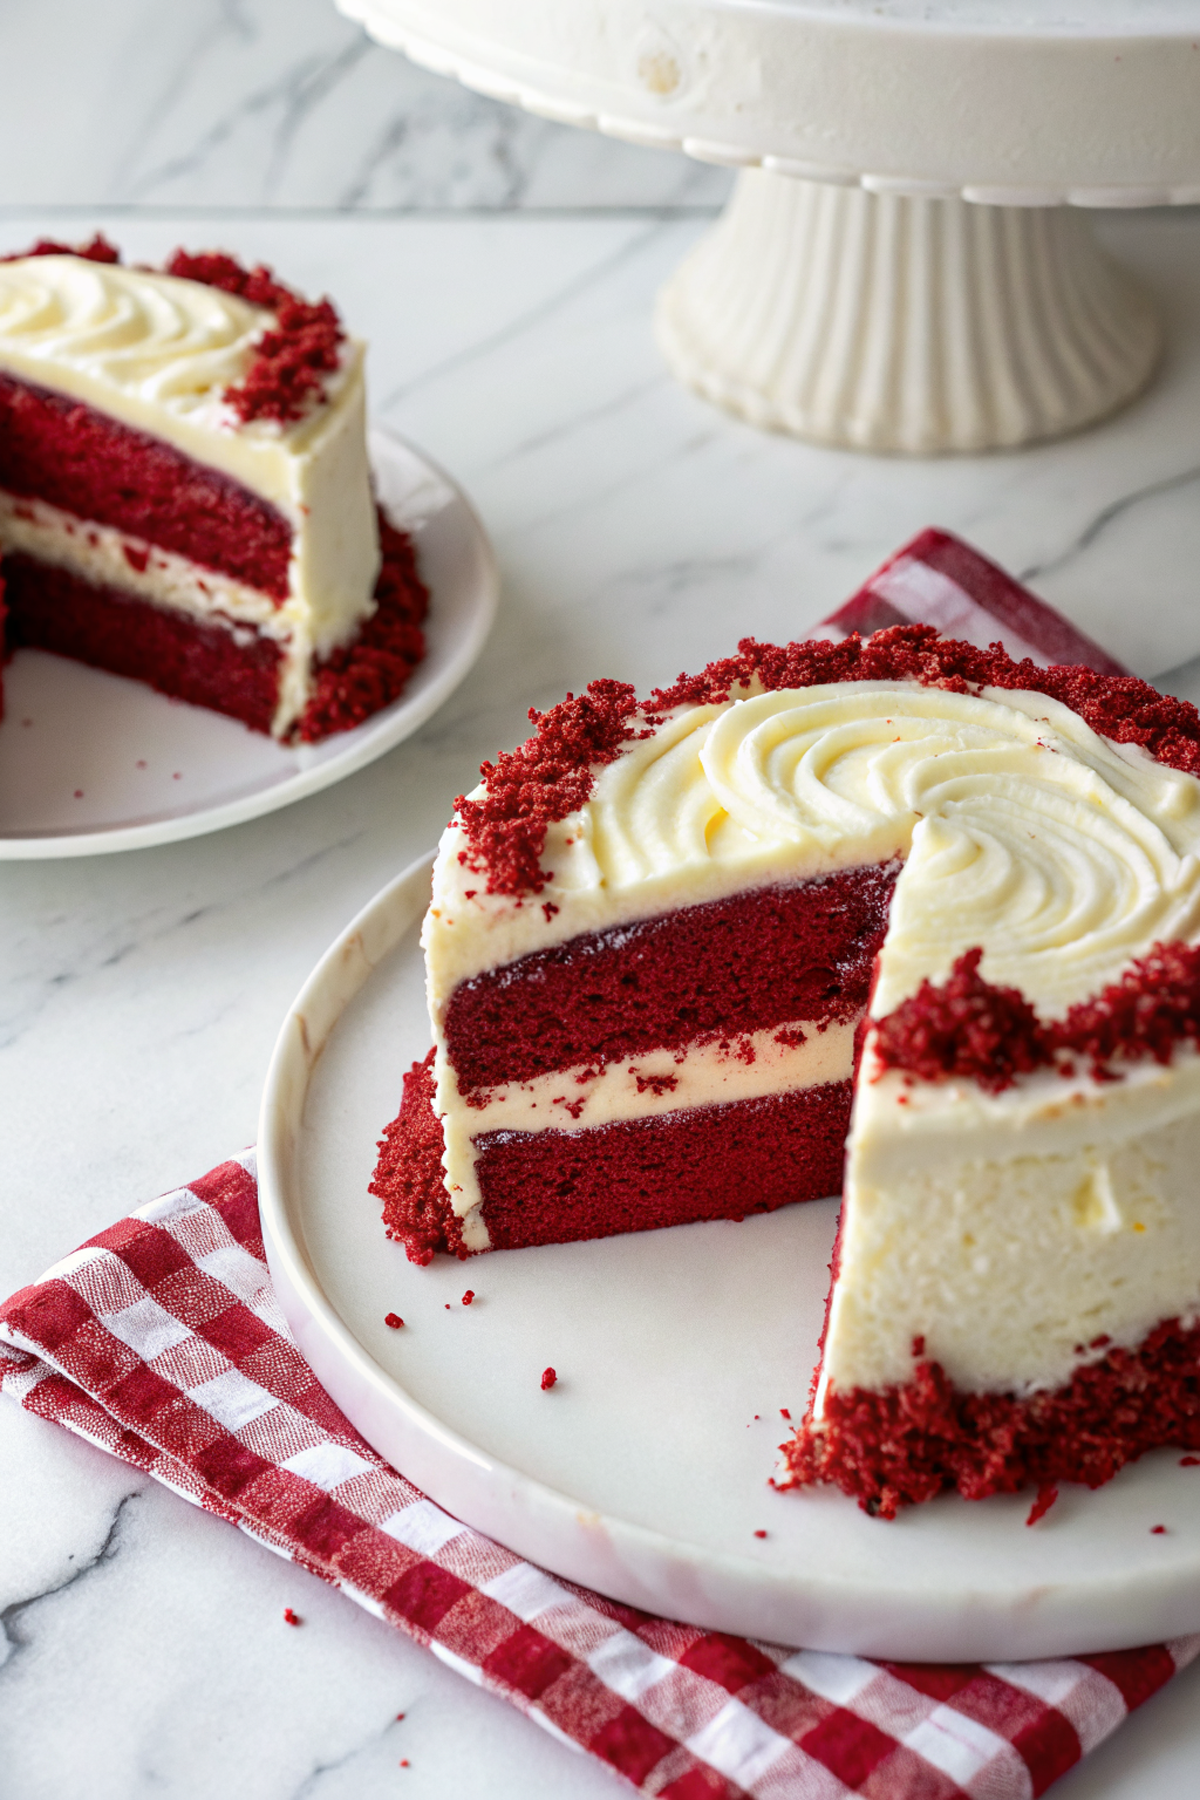
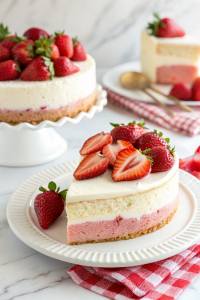
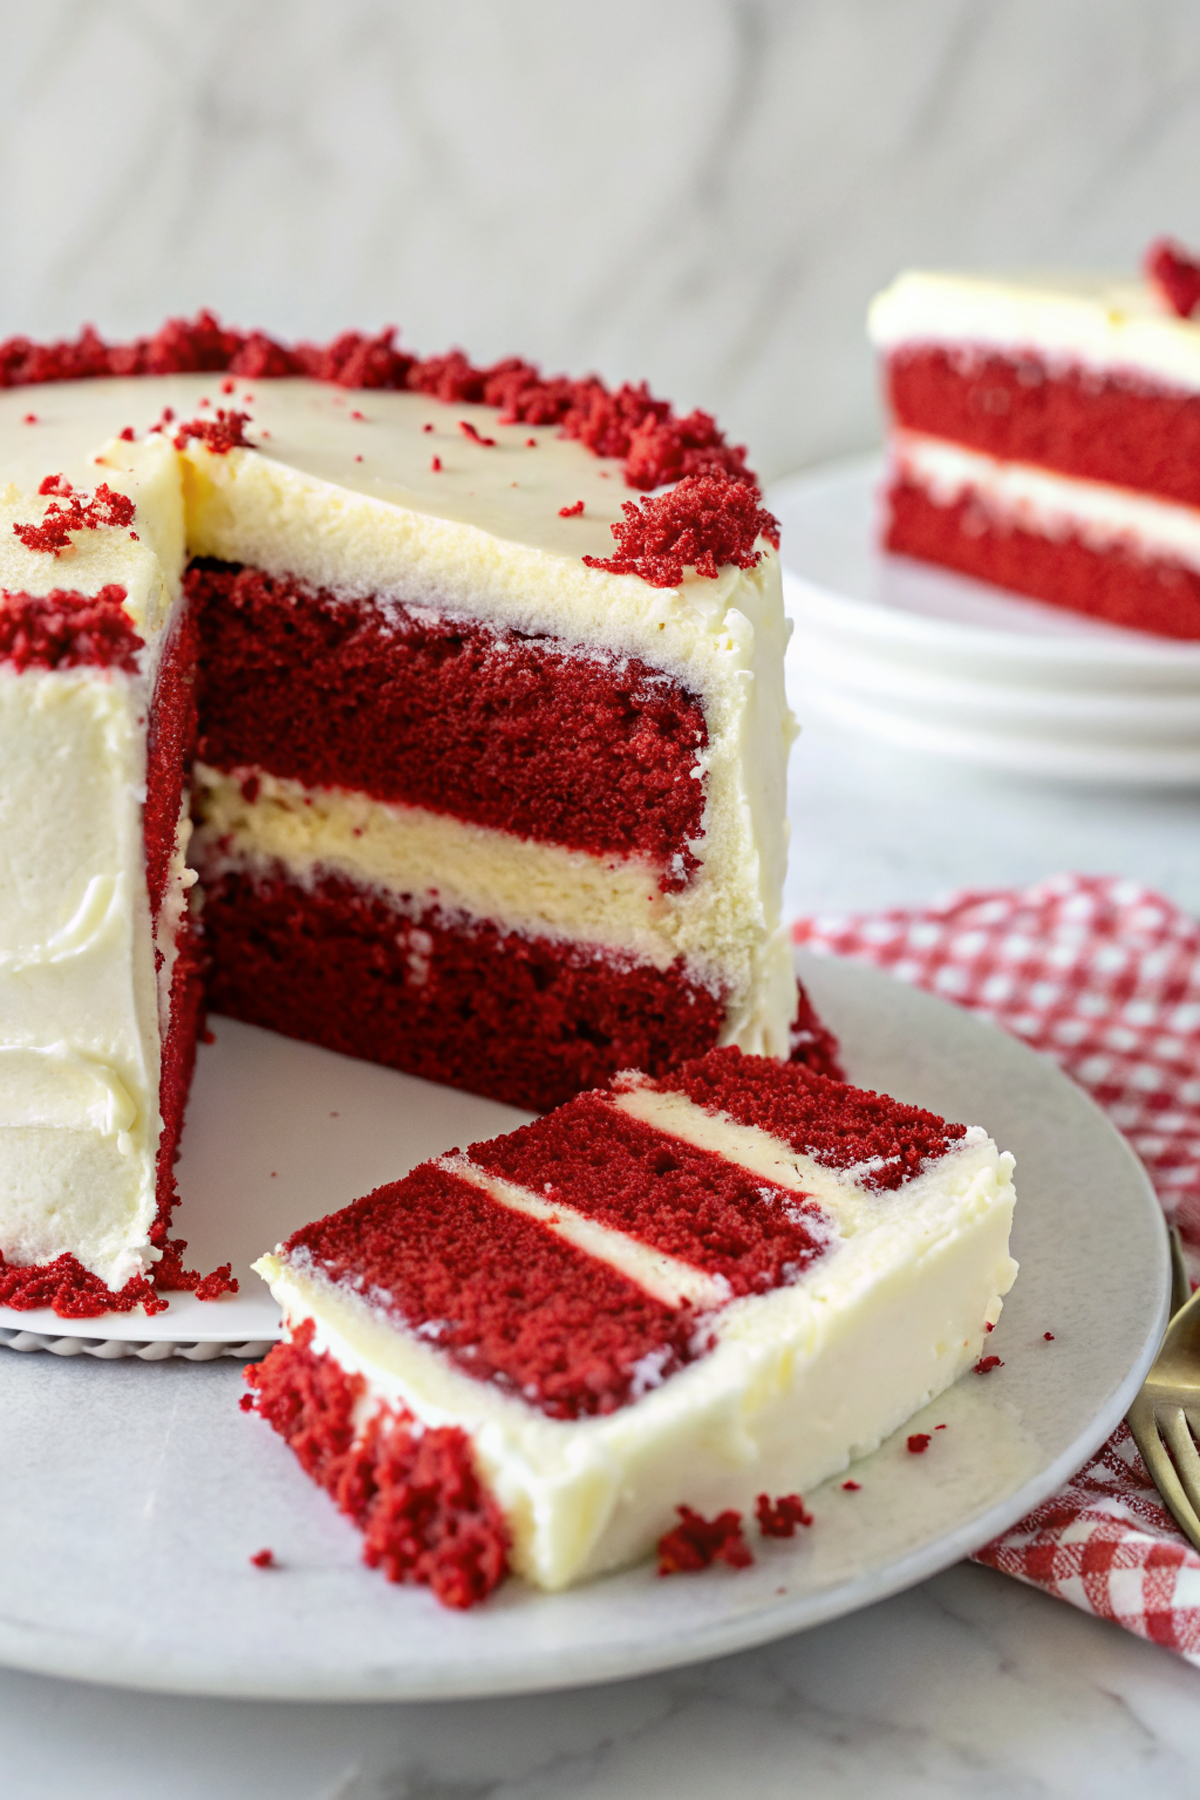
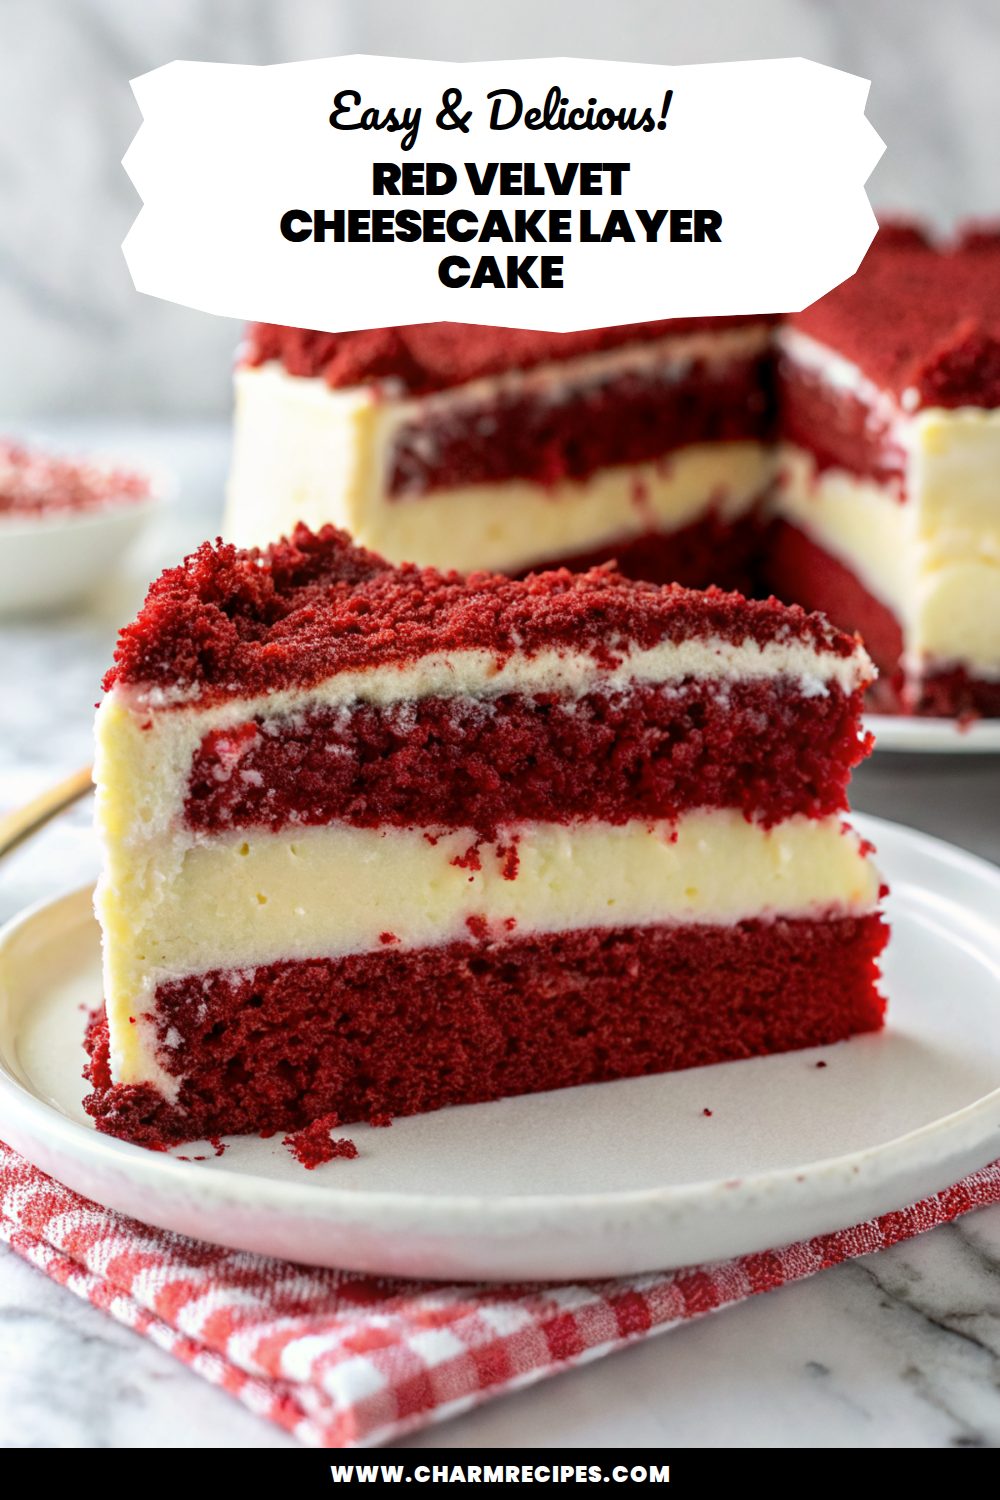
Red Velvet Cheesecake Layer Cake
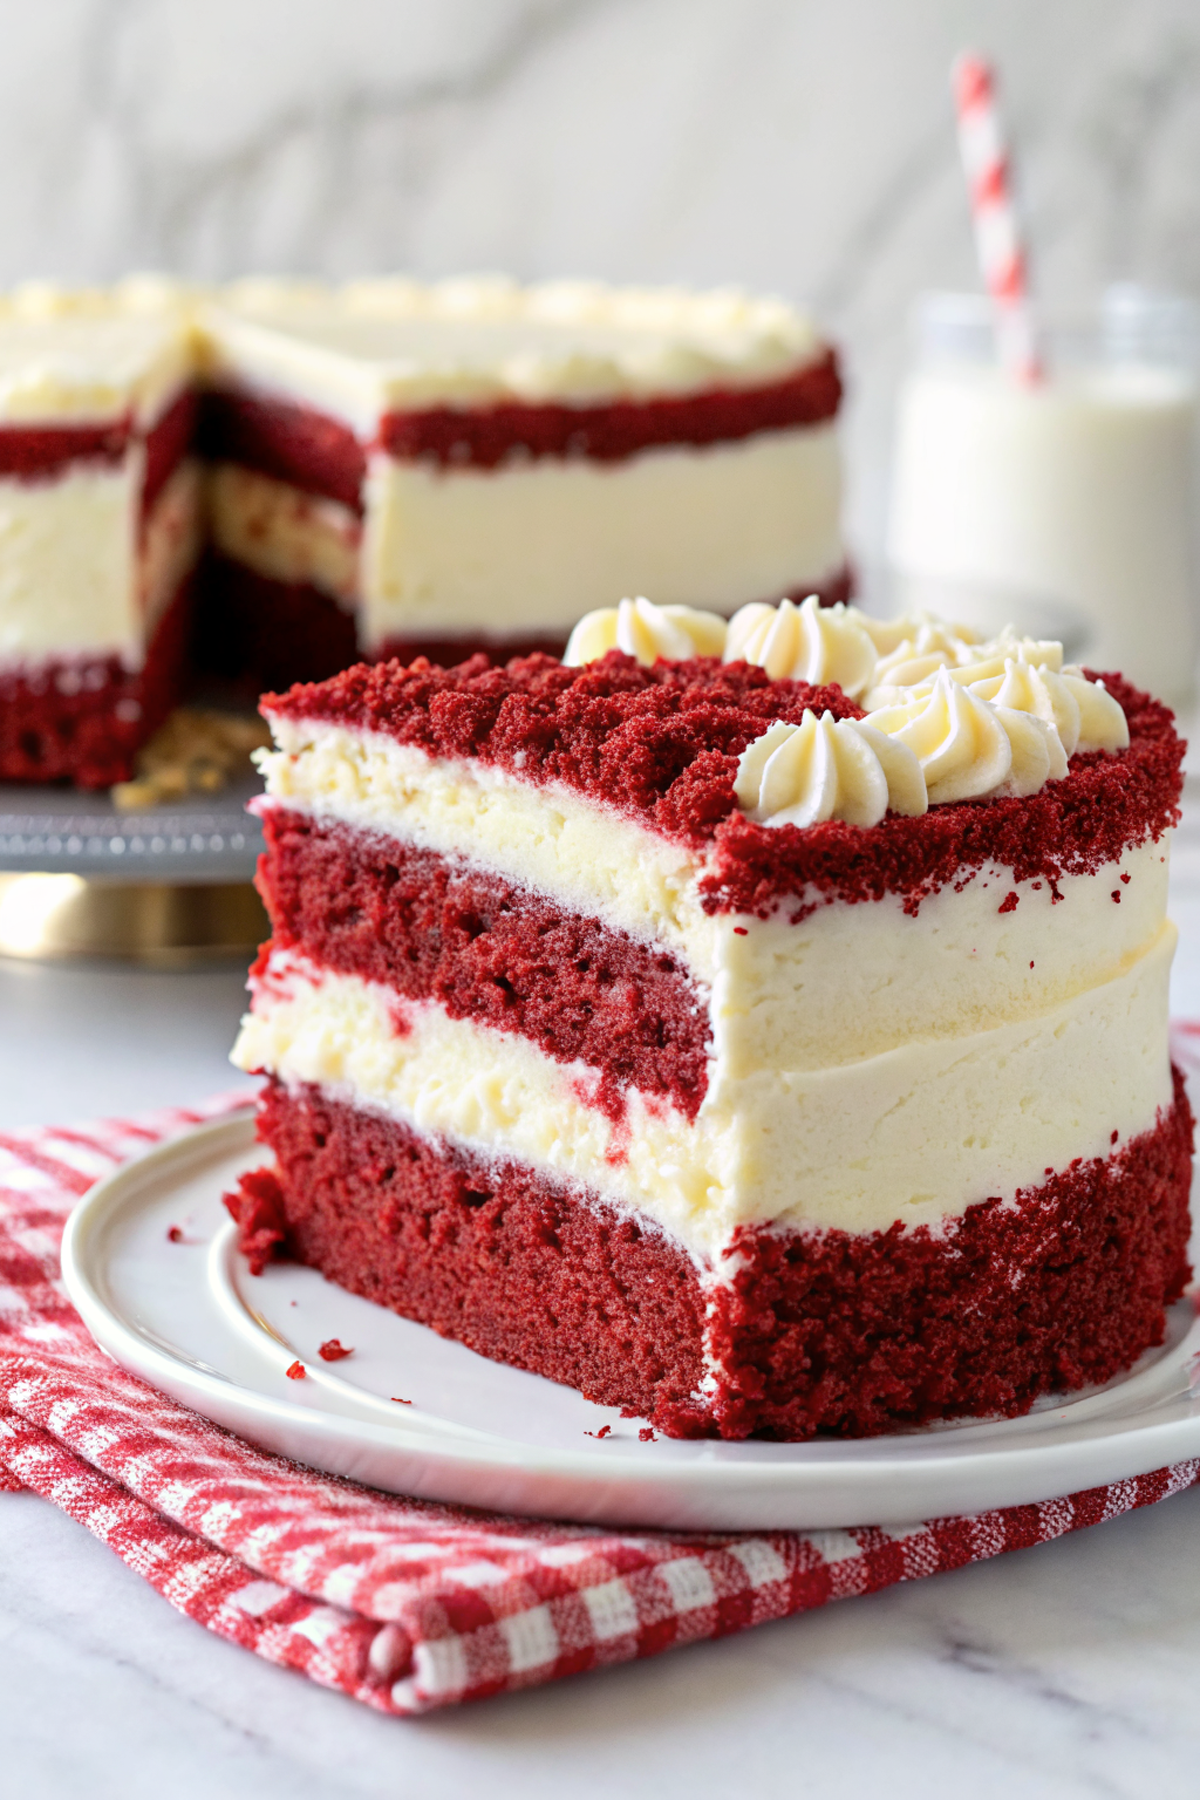
A Red Velvet Cheesecake Layer Cake pairs tender, cocoa-scented red velvet layers with a smooth baked cheesecake center and a classic cream cheese frosting — creamy, slightly tangy, and pleasantly rich. It’s worth making when you want a dessert that feels a bit special but stays straightforward to pull together.
I like this for celebrations because the cheesecake adds decadence without adding much extra hands-on time. You can bake the cake layers and the cheesecake separately, chill, then assemble the layers and frost for a neat, stable result.
Why This Red Velvet Cheesecake Layer Cake Works
1. The baked cheesecake layer gives a creamy, stable middle that slices cleanly and contrasts the soft cake.
2. Red velvet’s mild cocoa and tangy vinegar/buttermilk balance the sweet cream cheese frosting.
3. Simple techniques (separate bakes, chill before frosting) keep assembly easy and reduce cracking.
4. Uses familiar pantry ingredients and classic cream cheese frosting so it’s approachable for home bakers.
Ingredients
These are the main components to have on hand — the full recipe card lists exact amounts.
MORE OF OUR FAVORITE…
– Cream Cheese (for the cheesecake): Full-fat blocks are best for stability and flavor; bring to room temperature before mixing.
– Cream Cheese and Butter (for the frosting): Use full-fat cream cheese and unsalted butter for a smooth, spreadable frosting.
– All-purpose or Cake Flour: Cake flour gives a lighter crumb; APF works fine if you don’t have cake flour (slightly denser).
– Cocoa Powder: Unsweetened cocoa adds the red velvet’s subtle chocolate note—use Dutch-processed with adjusted leavening if needed.
– Buttermilk: Adds tang and moisture; helps the cake’s tender crumb. Regular milk plus a tablespoon of vinegar can substitute in a pinch.
– Baking Soda & Vinegar: React for lift and the classic velvet texture; don’t skip the acid.
– Red Food Coloring: Gel or paste gives vivid color with less liquid; adjust amount for preferred shade.
– Eggs & Sugar: Provide structure and sweetness in both cake and cheesecake components.
Substitutions and Variations
– Use sour cream instead of some buttermilk for a richer, slightly denser cake texture.
– Replace part or all-purpose flour with a 1:1 gluten-free blend—cake will be more delicate.
– Swap gel red coloring for beet powder (natural), but expect a milder color and a faint earthy note.
– Use plain Greek yogurt for some buttermilk substitution; texture will be similar but slightly tangier.
– Light cream cheese or Neufchâtel will make the cheesecake and frosting softer and less stable when warm.
How to Make Red Velvet Cheesecake Layer Cake
This is a summary—refer to the full recipe card for exact amounts, oven temps, and timings.
1. Preheat oven and prepare two cake pans (8- or 9-inch): grease and line bottoms with parchment.
2. Whisk dry cake ingredients; separately mix wet ingredients (including buttermilk and red food coloring), then combine until just smooth.
3. Divide batter between pans and bake until a toothpick comes out with a few moist crumbs; cool on racks and level if needed.
4. While cakes bake or cool, beat cream cheese with sugar and eggs for the cheesecake filling until smooth; pour into a small springform or a lined pan and bake until set but slightly jiggly in the center.
5. Chill the baked cheesecake completely (at least 2 hours) to firm it for stacking.
6. Make cream cheese frosting: beat room-temperature cream cheese and butter until smooth, add powdered sugar and vanilla, chill briefly to firm if needed.
7. Assemble: place one cake layer, add the chilled cheesecake layer, top with the second cake layer, crumb-coat and chill, then finish with a smooth final coat of frosting and decorate as desired.
Tips for the Best Results
1. Bring cream cheese and eggs to room temperature to avoid lumps in cheesecake and frosting.
2. Bake the cheesecake in a water bath or at a low temperature for a smoother top; avoid overbaking to prevent cracks.
3. Chill the cheesecake fully before assembling to make stacking easier and reduce sliding.
4. Use an offset spatula and a chilled crumb coat—chill 20–30 minutes between crumb coat and final frosting for cleaner finish.
5. If using Dutch-processed cocoa, reduce or omit baking powder and rely on baking soda with an acid (buttermilk/vinegar) for lift.
Common Mistakes
– Cheesecake overbaked (dry, cracked top): remove when center still has a slight wobble and cool gradually, then chill.
– Assembling with warm components (smeared frosting or sliding layers): always cool cakes and cheesecake completely before stacking.
– Overmixing cake batter (tough crumb): mix until ingredients are just combined.
– Using low-fat cream cheese for the cheesecake or frosting (runny texture): stick with full-fat for best structure.
– Not leveling cake layers (wobbly stack): trim domes for even layers and a professional look.
Storage
Storing: Keep the assembled cake covered and refrigerated for up to 3–4 days. Store on a cake stand with a dome or wrapped lightly in plastic wrap to prevent drying.
Freezing: You can freeze slices wrapped tightly in plastic and foil for up to 2 months. Thaw overnight in the refrigerator before serving. Freezing a whole assembled cake is possible but trickier—freeze uncovered briefly to firm, then wrap well.
Reheating or serving later: Serve chilled or bring slices to just below room temperature (15–20 minutes at room temp) for softer texture and best flavor.
How to Serve Red Velvet Cheesecake Layer Cake
– Serve simply with a dusting of cocoa or a few fresh berries for brightness.
– Add a drizzle of salted caramel for a contrasting flavor if you like richer sweets.
– Pair with lightly sweetened whipped cream instead of extra frosting for a lighter slice.
– Serve with coffee or a milk-based drink to balance richness.

More Helpful Notes
– Use a thin, chilled cheesecake layer (about 1–1.5 inches) for better balance between cake and filling.
– If the frosting seems too soft, chill it 15 minutes and re-whip briefly before spreading.
– For cleaner slices, chill the cake for 30–60 minutes after frosting and use a hot, wiped knife for each cut.
– Label your pans when baking multiple layers to keep track of which is which and prevent overbaking.
Frequently Asked Questions
Red Velvet Cheesecake Layer Cake
Ingredients
Baked Cheesecake Center
- 24 ounces cream cheese, room temperature
- 3/4 cup granulated sugar
- 2 tablespoons cornstarch
- 2/3 cup sour cream, room temperature
- 1 1/2 teaspoons vanilla extract
- 1/8 teaspoon fine salt
- 3 large eggs, room temperature
Red Velvet Cake Layers
- 2 1/4 cups all-purpose flour
- 1 3/4 cups granulated sugar
- 1 teaspoon baking soda
- 3/4 teaspoon baking powder
- 1 tablespoon natural unsweetened cocoa powder
- 3/4 teaspoon fine salt
- 1 cup buttermilk, room temperature
- 1/2 cup neutral oil (canola or vegetable)
- 2 teaspoons vanilla extract
- 2 large eggs, room temperature
- 1 1/2 teaspoons white vinegar
- 1 1/2 tablespoons red liquid food coloring
- 3/4 cup very hot water
- 1/2 teaspoon instant espresso powder optional, for depth of cocoa flavor
Cream Cheese Frosting
- 18 ounces cream cheese, cold
- 1/2 cup unsalted butter, room temperature
- 6 cups powdered sugar
- 2 teaspoons vanilla extract
- 1 teaspoon fresh lemon juice
- 1/8 teaspoon fine salt
To Finish
- 1 handful red velvet cake crumbs (from trimmings)
Instructions
Preparation Steps
- Day 1 – Bake the cheesecake: Heat oven to 315°F (157°C). Line the base of an 8-inch springform pan with parchment and lightly grease the sides. Place a rimmed pan filled with hot water on the lower oven rack to create a steamy environment (no direct water bath needed).
- In a mixer on low speed, blend cream cheese, sugar, cornstarch, sour cream, vanilla, and salt until silky with no lumps, scraping the bowl. Add eggs one at a time, mixing on low just until incorporated; avoid whipping in air.
- Pour into the pan and bake 55–65 minutes, until the edges are set and the center still wobbles slightly. Cool 10 minutes, run a thin knife around the edge, then rest in the oven with the door cracked for 45 minutes. Cool to room temperature, cover, and refrigerate at least 6 hours or overnight.
- Day 2 – Prepare the cake layers: Heat oven to 345°F (174°C). Grease two 9-inch round cake pans, line bottoms with parchment, and grease the parchment. Whisk together flour, sugar, baking soda, baking powder, cocoa, and salt in a large bowl.
- In a second bowl, whisk buttermilk, oil, vanilla, and eggs until smooth. In a cup, stir instant espresso into the hot water to dissolve; stir the red food coloring into this hot mixture to bloom the cocoa and color. Whisk the colored liquid into the wet mixture.
- Pour wet ingredients into dry and whisk just until evenly combined and fluid. Stir in vinegar last. Divide batter between pans and bake 24–28 minutes, until a toothpick comes out with a few moist crumbs. Cool 10 minutes in pans, then turn out to a rack to cool completely.
- Make crumbs for garnish: Level the cake tops if needed and reserve the trimmings. Crumble the trimmings onto a baking sheet and dry in a 250°F (121°C) oven for 8–10 minutes; cool and crush into fine crumbs.
- Frosting: With a mixer, beat the butter until creamy, 30 seconds. Add cream cheese and beat until completely smooth, 1–2 minutes. Mix in half the powdered sugar on low. Add vanilla, lemon juice, and salt, then beat in remaining sugar until fluffy, 1–2 minutes. If needed, adjust consistency with a few drops of milk or extra sugar.
- Unmold the cheesecake: Remove the ring, peel off the parchment, and place the cheesecake on a plate. Freeze it for 20–30 minutes to firm for easier stacking and cleaner edges.
- Assemble: Set one red velvet layer on a board and secure it with a small swipe of frosting. Spread about 1/2 cup frosting over the top. Center the chilled cheesecake on the cake and gently press to adhere. Spread about 3/4 cup frosting over the cheesecake. Top with the second cake layer, cut-side down.
- Crumb coat: Apply a thin layer of frosting over the top and sides to trap crumbs. Chill the cake for 20 minutes to set.
- Finish frosting: Add a generous final layer of frosting, smoothing the top and sides. Press red velvet crumbs along the lower half to full height of the sides and scatter some over the top for a classic look. Chill 30 minutes before slicing for the cleanest cuts.
- Serve: Let the cake sit at room temperature for 15–20 minutes before serving so the cheesecake and frosting are plush but not melty.
- Tip: For ultra-smooth frosting and minimal lumps, sift the powdered sugar and ensure the cream cheese is cool but pliable—not straight from the fridge and not warm.
Notes
Featured Comments
“Super easy and so flavorful! My family asked for seconds. Saving this one.”
“This versatile recipe was absolutely loved — the stacked really stands out. Thanks!”
“Impressed! Clear steps and absolutely loved results. Perfect for busy nights.”
“Super easy and family favorite! My family asked for seconds. Saving this one.”
“Impressed! Clear steps and so flavorful results. Perfect for busy nights.”
“This chilled recipe was so flavorful — the crunchy really stands out. Thanks!”
“This stacked recipe was will make again — the warm really stands out. Thanks!”
“Super easy and turned out amazing! My family asked for seconds. Saving this one.”
“Made this last night and it was absolutely loved. Loved how the clean came together.”
“Super easy and absolutely loved! My family asked for seconds. Saving this one.”