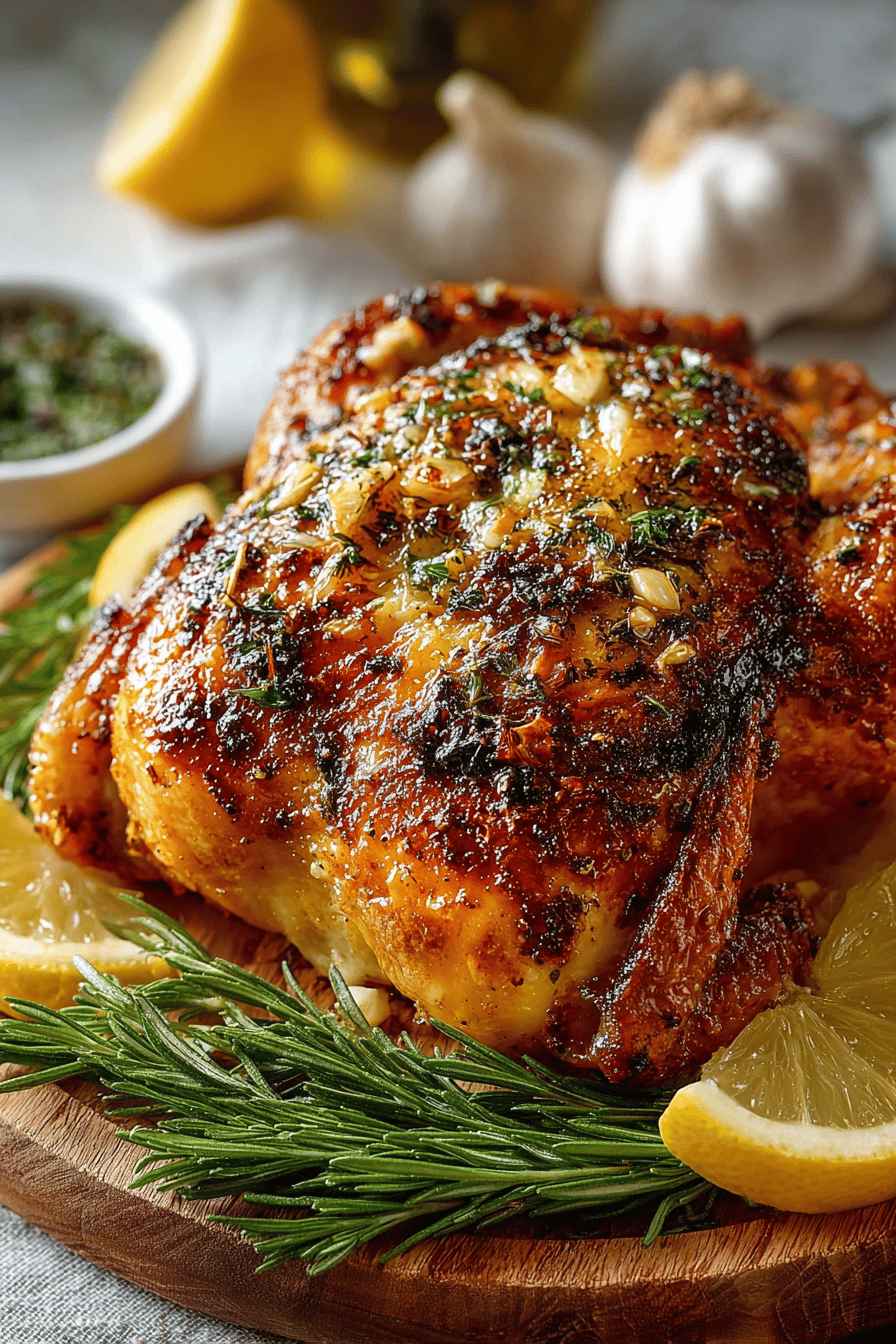
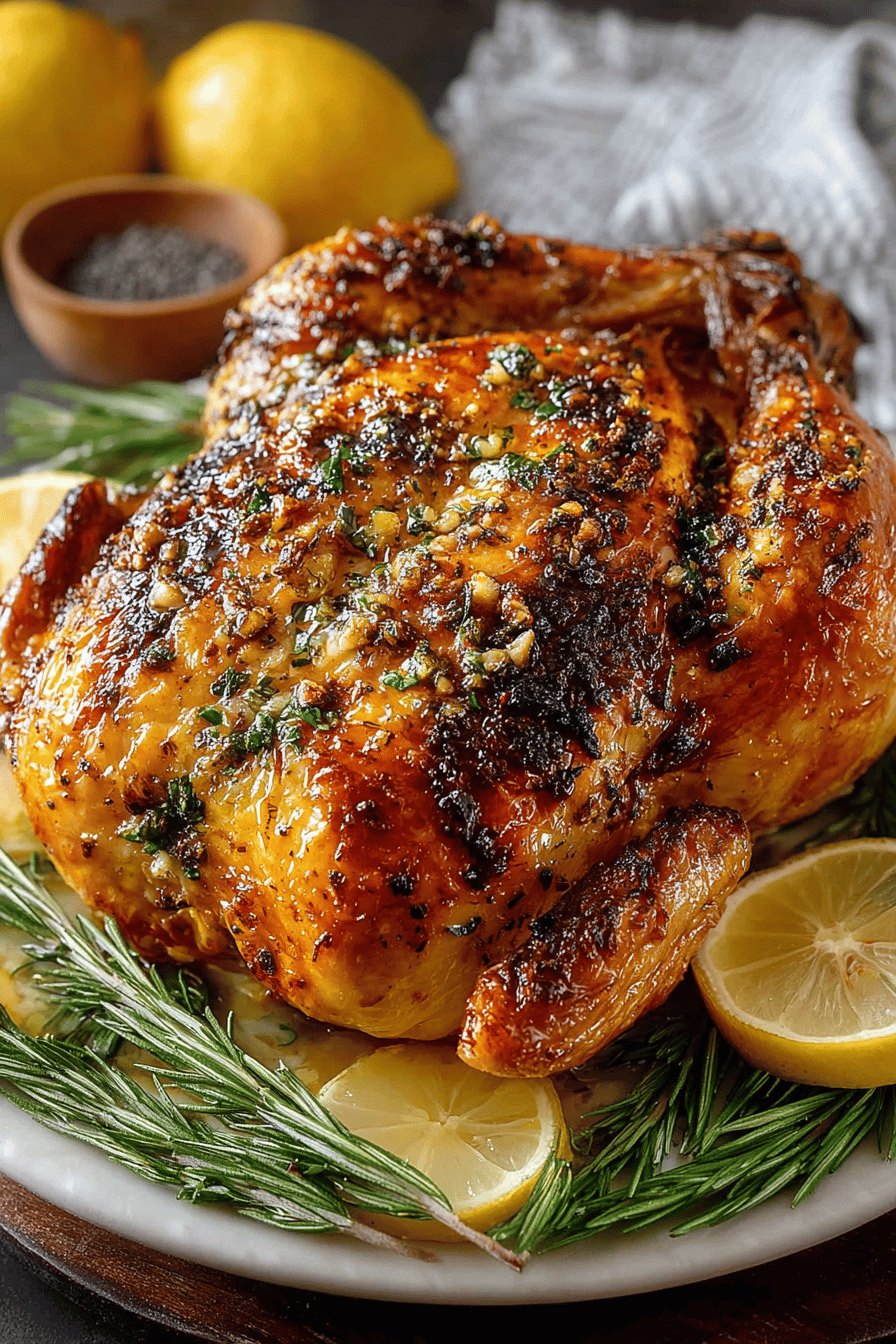
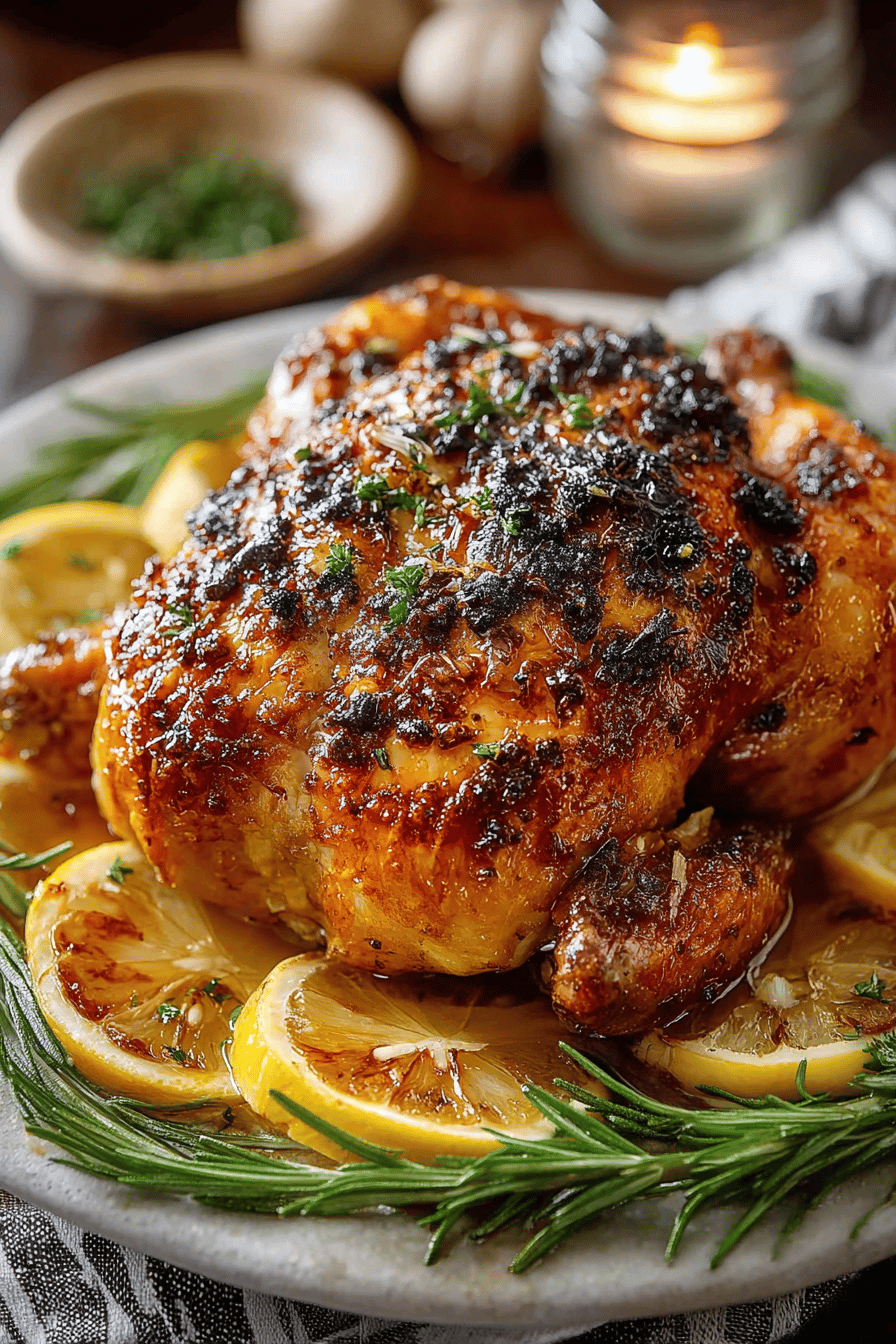
Delish Roasted Chicken with Garlic and Herbs
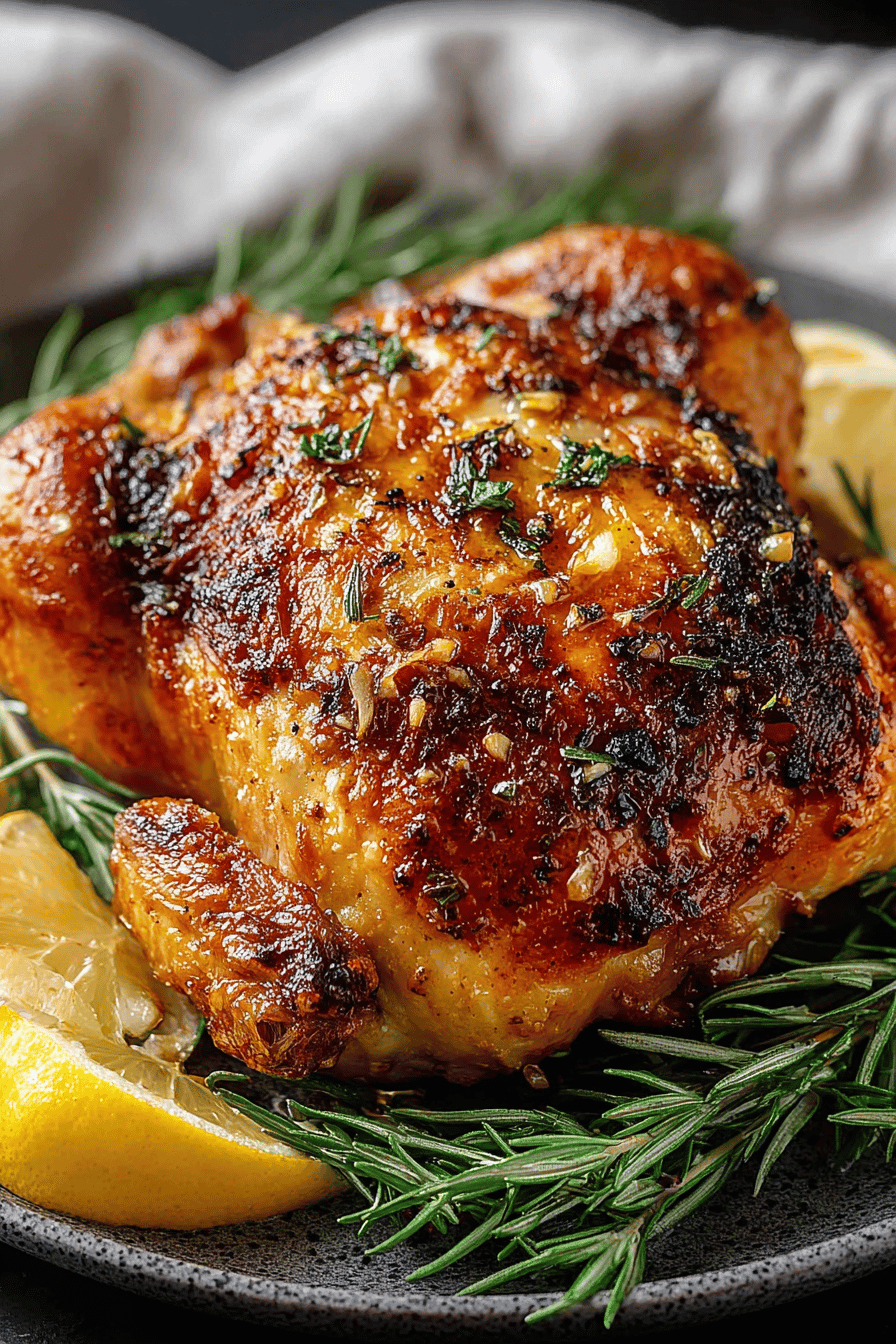
Roasting a whole chicken always feels fancy but somehow tastes like home, especially when you load it up with garlic and herbs. This Delish Roasted Chicken with Garlic and Herbs hits that perfect spot where crispy, golden skin meets juicy, flavorful meat underneath. The garlic gets mellow and sweet, the herbs add this fresh punch, and honestly, it’s like the cozy hug your weeknight dinners have been craving. It’s straightforward enough to pull off any night but special enough that everyone at the table will want your secret.
My family is kind of obsessed with this chicken—I mean, my husband claims it’s the best thing I’ve ever cooked, which, you know, I’m happily bragging about. We had one of those rainy Sunday afternoons where nothing sounded good until I pulled this recipe together. The smell filled the house, and by the time it was ready, even our picky kid was sneaking extra bites. We started making it every couple of weeks because it’s just that easy and reliably delicious, plus it makes the whole kitchen smell like a little herb garden.
Why You’ll Love This Delish Roasted Chicken with Garlic and Herbs
– You get that crispy, crackly skin everyone raves about without any weird tricks or extra pans.
– Garlic lovers, this one is for you—roasting it softens the harshness but leaves all that flavor gold.
– Herbs aren’t just an afterthought; they soak into the chicken, giving every bite a fresh, earthy boost.
– The whole thing comes together in under two hours with almost no fuss, even on busy weeknights.
– Leftovers are ridiculously good cold or reheated for a lazy lunch the next day.
How to Make It
MORE EASY DINNER RECIPES...

Alright, here’s the deal: first, you’ll want to give your chicken a good pat down—dry skin is the secret to crispy skin, no joke. Then, grab a handful of fresh herbs (think rosemary, thyme, whatever feels right), and smash up a serious amount of garlic cloves—yes, you can never have too much garlic with this dish. Rub everything all over the bird, and get some under the skin too if you’re feeling gutsy.
This roasted chicken turned out absolutely delicious—juicy on the inside with perfectly crispy skin and a lovely garlic-herb flavor. The recipe was super easy to follow, and my whole family went back for seconds. It’s definitely becoming a Sunday dinner favorite!
MORE OF OUR FAVORITE…
Pop the chicken breast-side up in your roasting pan, then set it loose in the oven. Keep an eye on it but don’t obsess. The skin should get golden, bubbly, and perfect by the time the chicken’s cooked through—juices running clear is your “done” sign. Rest it for 10-15 minutes before carving; that’s when all the magic happens with juicy, tender meat. Try not to snoop too much while it’s resting; I swear it makes a big difference.
Ingredient Notes
– Whole Chicken: The star of the show, obviously. I always grab one around 4-5 pounds—perfect size for a family of 4-ish, and it roasts evenly.
– Garlic: The more the merrier here. Roasted garlic gets this mellow, buttery vibe, like magic on the tongue. Don’t even think about skipping it.
– Fresh Herbs: Rosemary and thyme are my go-tos because they hold up well in the oven and give that herby country kitchen feeling.
– Olive Oil: Helps with crispness and carries the garlic/herb flavors all over the skin. Cheap oil here? You’ll notice.
– Salt & Pepper: Season like you mean it. Under-seasoned chicken is the worst, so don’t be shy.
Recipe Steps
1. Preheat your oven to 425°F (220°C) and set a rack in your roasting pan.
2. Pat the chicken dry with paper towels—this is your golden ticket to crispy skin.
3. Rub the chicken all over with olive oil, then generously season with salt and pepper.
4. Stuff the cavity with smashed garlic cloves and a few sprigs of herbs, and tuck some herbs under the skin if you can.
5. Place the chicken breast-side up on the rack and roast for 1 to 1¼ hours, or until the internal temperature hits 160°F (70°C).
6. Let it rest at least 10 minutes before carving—this keeps all the juices locked in.
What to Serve It With
Honestly, this chicken plays nice with just about anything. Roasted veggies, mashed potatoes, simple green salads, or even buttery dinner rolls—anything that can sop up all the garlicky, herby drippings. If you’re feeling lazy, some crusty bread and a quick slaw do the trick just fine.
Tips & Mistakes
Don’t rush the drying step. Wet chicken skin = sad, soggy skin. Also, keep an eye on the garlic—too little and you miss the point; too much and someone might complain about garlic breath the next day. Resting is not a suggestion; it’s a must. Oh, and don’t forget to check internal temp here, no one likes undercooked chicken.
Storage Tips
Wrap leftovers tight and toss ’em in the fridge. Reheated chicken is still yummy, but cold chicken chunks in a salad the next day? Totally legit and sometimes even better. No shame in that late-night snack straight from the fridge, I won’t judge.
Variations and Substitutions
If you’re out of fresh herbs, dried rosemary and thyme can work in a pinch—just use less and add them earlier so they bloom in the oven. Want it extra garlicky? Roast whole garlic cloves separately and mash into a quick garlic butter to smear on after it’s done. Lemon slices under the skin can brighten up the whole thing, turning it slightly tangy and fresh. I’ve also swapped olive oil for melted butter for a richer crust, but watch it so it doesn’t burn.
Frequently Asked Questions
Delish Roasted Chicken with Garlic and Herbs
Ingredients
Main Ingredients
- 1 whole Whole Chicken
- 4 cloves Garlic minced
- 2 tablespoons Fresh Rosemary chopped
- 2 tablespoons Fresh Thyme chopped
- 3 tablespoons Olive Oil
- 1 teaspoon Salt
- 0.5 teaspoon Black Pepper freshly ground
Instructions
Preparation Steps
- Preheat the oven to 375°F (190°C).
- In a small bowl, combine minced garlic, chopped rosemary, thyme, olive oil, salt, and pepper.1 whole Whole Chicken
- Rub the garlic and herb mixture all over the chicken, including inside the cavity.1 whole Whole Chicken
- Place the chicken breast side up on a roasting pan and roast for 75 minutes or until the internal temperature reaches 165°F (74°C).1 whole Whole Chicken
- Let the chicken rest for 10 minutes before carving and serving.
Notes
Nutrition
Featured Comments
“Impressed! Clear steps and family favorite results. Perfect for busy nights.”
“Made this last night and it was turned out amazing. Loved how the speedy came together.”
“This weeknight saver recipe was turned out amazing — the clean really stands out. Thanks!”
“Impressed! Clear steps and turned out amazing results. Perfect for busy nights.”
“Impressed! Clear steps and will make again results. Perfect for busy nights.”
“Super easy and so flavorful! My family asked for seconds. Saving this one.”
“New favorite here — so flavorful. crusty was spot on.”
“Super easy and will make again! My family asked for seconds. Saving this one.”
“Impressed! Clear steps and absolutely loved results. Perfect for busy nights.”
“Impressed! Clear steps and absolutely loved results. Perfect for busy nights.”