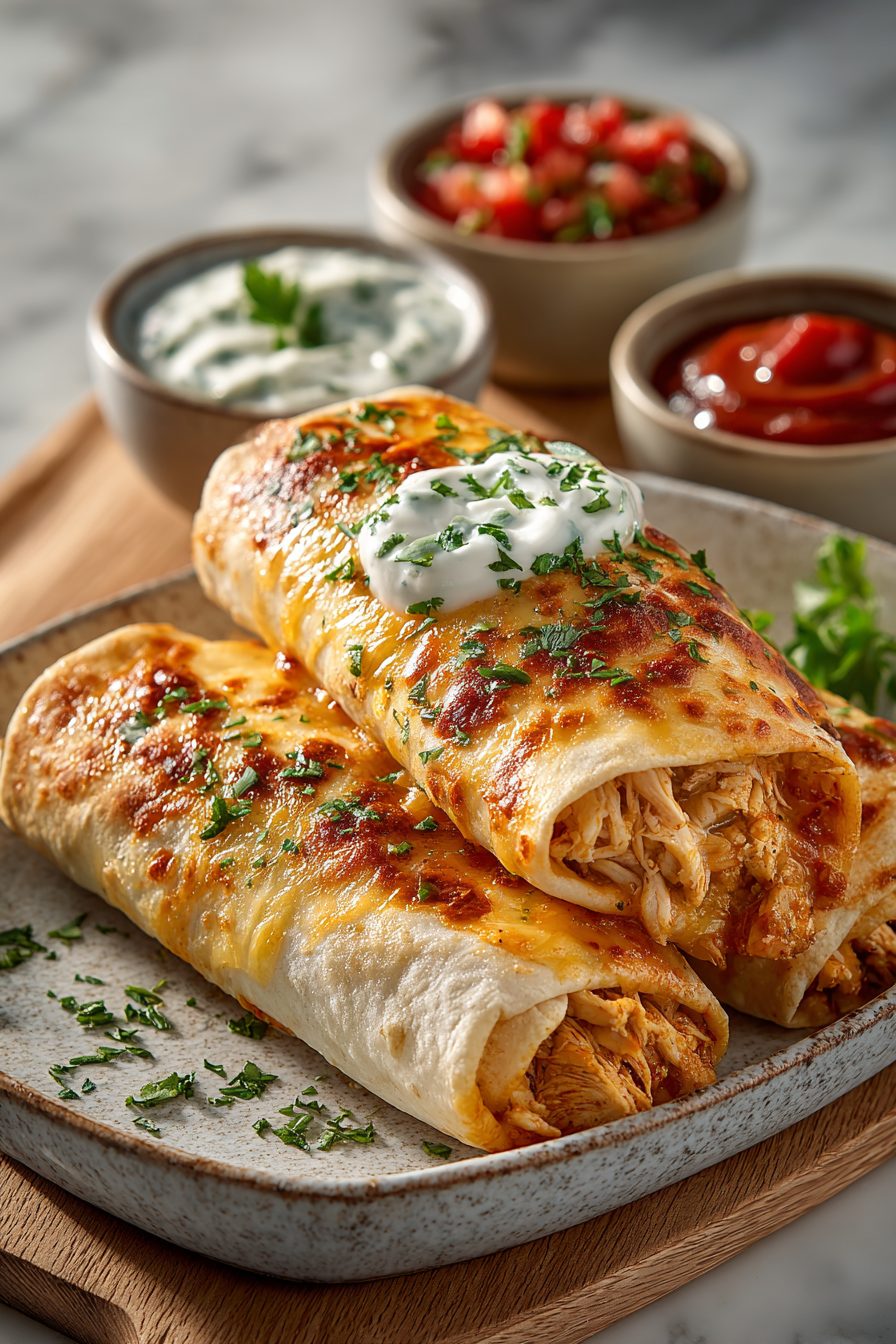
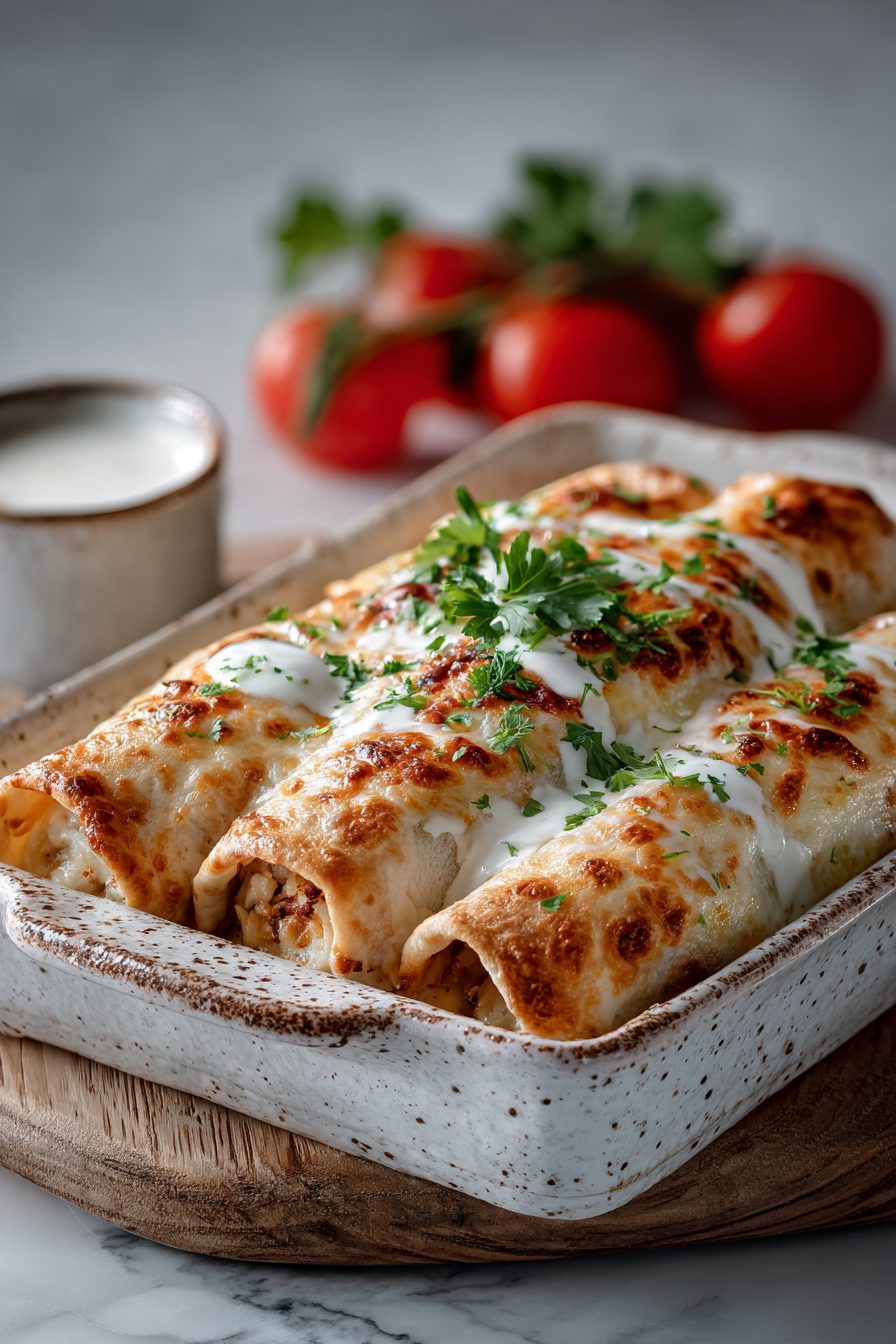
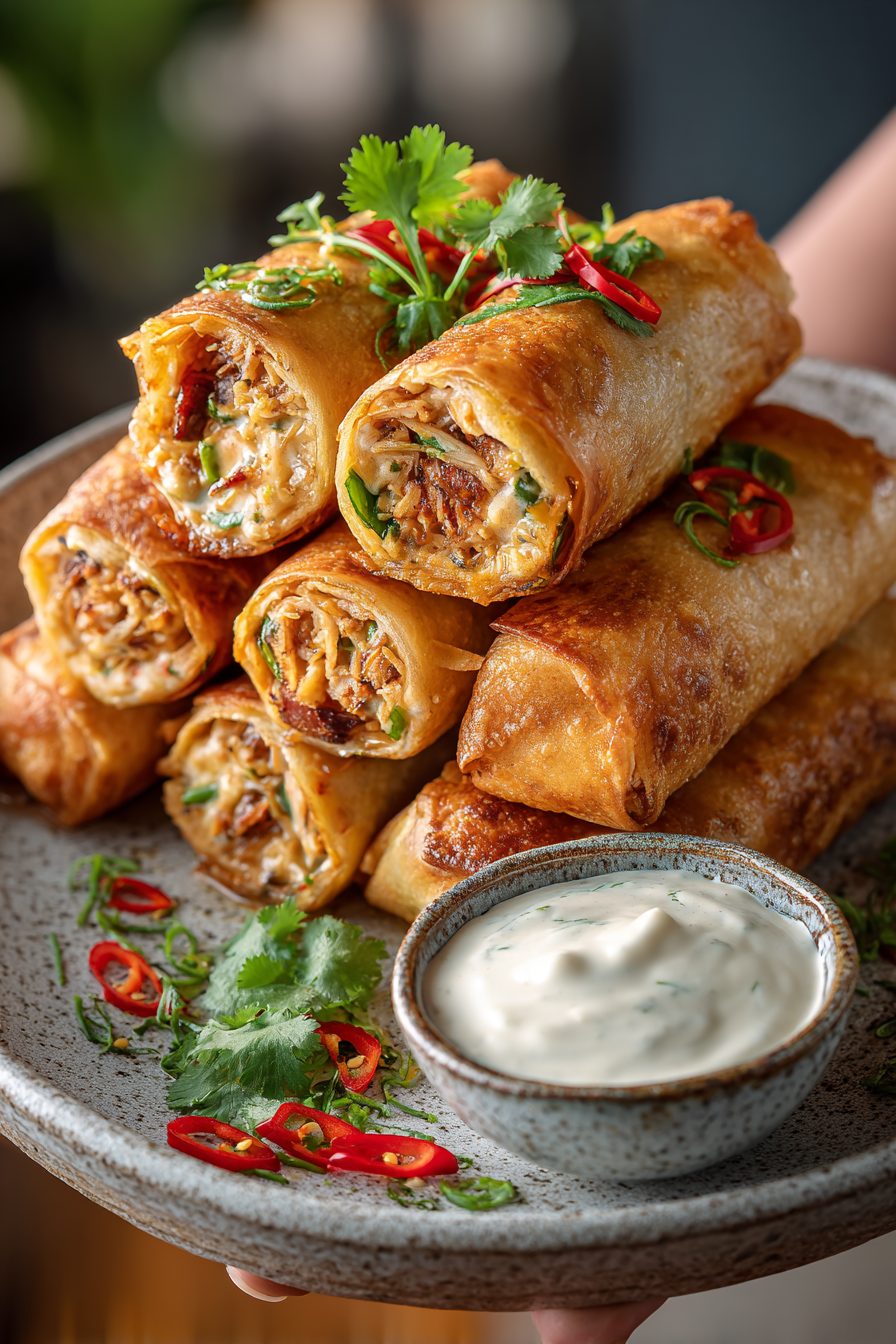
Creamy Baked Chicken Chimichangas
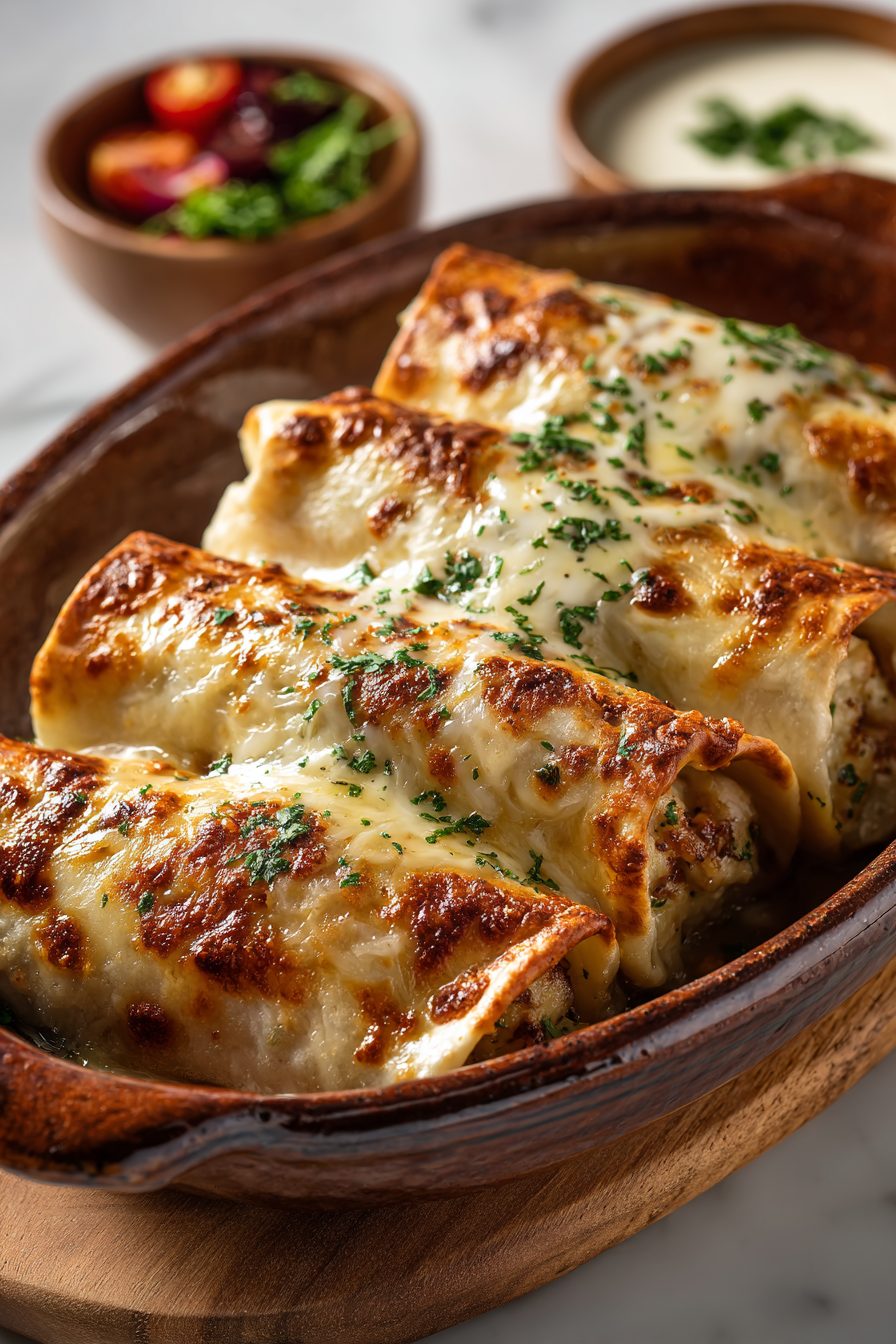
I make these creamy baked chicken chimichangas when I want crunchy comfort food without the grease circus of deep-frying — they’re loaded with tender shredded chicken, melty cheese, and a dreamy creamy sauce, all rolled into tortillas and baked until golden. They somehow feel both indulgent and harmless, which is the exact energy I want on a chaotic weeknight.
My little family eats these like it’s our national dish. My husband will happily demolish two and then ask for leftovers the next day like it’s a prize. Once I made them for a lazy Sunday and my kiddo announced they were “officially the best brown-bag lunch ever,” and then proceeded to trade away an apple to bring home two chimichanga halves. They’re the recipe that lives in my head for game nights, last-minute guests, and the rare time I want to impress without too much fuss.
Why You’ll Love This Creamy Baked Chicken Chimichangas
– Baked not fried: all the satisfying crunch with less oil and less guilt.
– Creamy sauce holds everything together so every bite is cheesy, tangy, and saucy, not dry.
– Hands-off oven finish — assemble, bake, and pretend it took effort.
– Flexible: great with leftover rotisserie chicken, canned beans, or a fast store-bought salsa topper.
Kitchen Talk
MORE EASY DINNER RECIPES...

I once went rogue and stuffed these with double the filling because I was feeling dramatic. The tortillas protested and split on me, but a quick brush of oil and a higher rack in the oven saved them. Also: cream cheese is a glorious quiet hero here — it turns the filling from “meh” to “please pass the napkins.” If you like things spicy, add jalapeños to the filling and cool with a dollop of sour cream on top. Pro tip: let the filled chimichangas rest a few minutes before baking so they seal up better; impatience equals leaky filling and sad trays.
These creamy baked chicken chimichangas were such a hit at my house—crispy on the outside, creamy and cheesy inside, and way less messy than frying. I loved that I could throw them together quickly and still have something that felt special for dinner.
MORE OF OUR FAVORITE…
Shopping Tips
– Protein: Rotisserie chicken is the lazy champ here — grab a whole bird for extra value, or use boneless skinless breasts or thighs and shred after cooking.
– Cheese: Pick a melty blend like Monterey Jack, cheddar, or pepper jack for heat; pre-shredded is fine but freshly shredded melts creamier.
– Dairy: Cream cheese and sour cream are the sauce backbone; full-fat will taste best, but light versions work in a pinch.
– Canned Goods: Look for diced green chiles and a good enchilada sauce or salsa verde; low-sodium cans let you control the salt.
– Spices: Chili powder, cumin, and smoked paprika make the filling taste like it actually tried — use a fresh jar if the label still smells like yesterday.
– Fresh Herbs: Cilantro is optional but brightens everything; buy a small bunch if you plan to garnish.
Prep Ahead Ideas
– Shred the chicken the day before and store in an airtight container; toss with a little lime juice to keep it bright.
– Mix the creamy filling/sauce early and refrigerate; you’ll save 15–20 minutes when assembling.
– Assemble chimichangas and place them seam-side down on a baking sheet, then cover and refrigerate for up to 24 hours; bake straight from chilled (add a few minutes to bake time).
– Use shallow plastic containers or a parchment-lined baking sheet for stacking in the fridge so they don’t stick.
Time-Saving Tricks
– Use rotisserie chicken and pre-shredded cheese to shave off tons of time.
– Swap in store-bought salsa or enchilada sauce instead of making a sauce from scratch.
– Bake on a rimmed sheet pan for batches; foil or a silicone mat = easy cleanup.
– If you have an air fryer, 8–10 minutes at 375°F will crisp single chimichangas quickly — keep an eye so they don’t blow open.
Common Mistakes
– Overfilling: I overstuffed once and ended up with chimichanga rubble. Fix it by using slightly less filling and tucking the ends tightly.
– Soggy tortillas: skipping the pre-bake or using too much watery salsa will make them limp; spoon off excess liquid from fillings and brush tortillas with oil.
– Underseasoned filling: taste before rolling — creamy mixtures can mask saltiness so go bold.
– Burning the edges while the middle stays cold: use a middle rack and rotate the pan halfway through baking.
What to Serve It With
– Cilantro-lime rice or simple Spanish rice.
– Quick crunchy slaw or a green salad for freshness.
– Black beans or refried beans for a cozy plate.
– Guacamole, pico de gallo, and extra sour cream for build-your-own toppings.
Tips & Mistakes
– Use medium-large flour tortillas so they wrap without tearing.
– Brush with oil or melted butter for extra golden color.
– Salt the filling as you go — cream cheese hides salt so taste twice.
– Don’t crowd the pan; give them space to crisp.
– If they split, bake seam-side down and press gently after 5 minutes to reseal.
Storage Tips
Leftovers refrigerate well for 3–4 days in an airtight container. Reheat in a 350°F oven or toaster oven to re-crisp — the microwave will work but makes things floppy. You can freeze baked chimichangas on a sheet until solid, then bag them for up to 2 months; reheat from frozen in the oven (add 10–15 minutes). Cold chimichanga for breakfast? Absolutely — chopped into eggs or folded into a breakfast burrito, no shame here.
Variations and Substitutions
– Vegetarian swap: use black beans, roasted sweet potato, or crumbled tempeh instead of chicken.
– Dairy-free: swap cream cheese for cashew cream and use dairy-free shredded cheese; the texture will change but still tasty.
– Tortilla switch: corn tortillas can work but are more fragile — soften them briefly in a damp towel to prevent cracking.
– Heat level: use chipotle in adobo for smoky heat or jalapeños for freshness.
– Lighter option: Greek yogurt instead of sour cream and less cream cheese — still creamy, slightly tangier.
Frequently Asked Questions
Creamy Baked Chicken Chimichangas
Ingredients
Main Ingredients
- 3 cup shredded cooked chicken rotisserie works great
- 6 oz softened cream cheese
- 0.5 cup sour cream
- 4 oz mild diced green chiles drained
- 1.25 cup shredded Monterey Jack cheese
- 0.5 cup shredded sharp cheddar
- 0.5 cup thick salsa
- 1 tbsp fresh lime juice
- 1.25 tsp ground cumin
- 1 tsp chili powder
- 0.75 tsp garlic powder
- 0.5 tsp onion powder
- 0.5 tsp smoked paprika
- 0.75 tsp kosher salt to taste
- 0.5 tsp black pepper
- 0.25 cup chopped fresh cilantro
- 2 tbsp thinly sliced green onions
- 8 count large flour tortillas (burrito-size)
- 2.5 tbsp melted butter or neutral oil for brushing
Instructions
Preparation Steps
- Preheat oven to 425°F. Line a sheet pan with foil and set a wire rack on top.
- Stir cream cheese and sour cream in a large bowl until smooth.
- Mix in salsa, green chiles, lime juice, cumin, chili powder, garlic powder, onion powder, paprika, salt, and pepper.
- Fold in chicken, Monterey Jack, cheddar, cilantro, and green onions until evenly combined.
- Warm tortillas in the microwave under a damp towel until pliable, about 30 to 45 seconds.
- Spoon filling across the lower third of each tortilla. Tuck sides and roll tightly into chimichangas.
- Place seam side down on the rack. Brush all sides with melted butter or oil.
- Bake 18 to 22 minutes, turning once, until golden and crisp. Broil 1 minute if you want extra crunch.
- Rest 5 minutes before serving. Add your favorite toppings and enjoy.
Notes
Featured Comments
“New favorite here — turned out amazing. cheesy was spot on.”
“This flavorful recipe was family favorite — the festive really stands out. Thanks!”
“Impressed! Clear steps and so flavorful results. Perfect for busy nights.”
“Impressed! Clear steps and absolutely loved results. Perfect for busy nights.”
“Made this last night and it was turned out amazing. Loved how the flaky came together.”
“Super easy and will make again! My family asked for seconds. Saving this one.”
“New favorite here — absolutely loved. grab-and-go was spot on.”
“Impressed! Clear steps and so flavorful results. Perfect for busy nights.”
“This satisfying recipe was so flavorful — the warming really stands out. Thanks!”
“This salty-sweet recipe was so flavorful — the balanced really stands out. Thanks!”