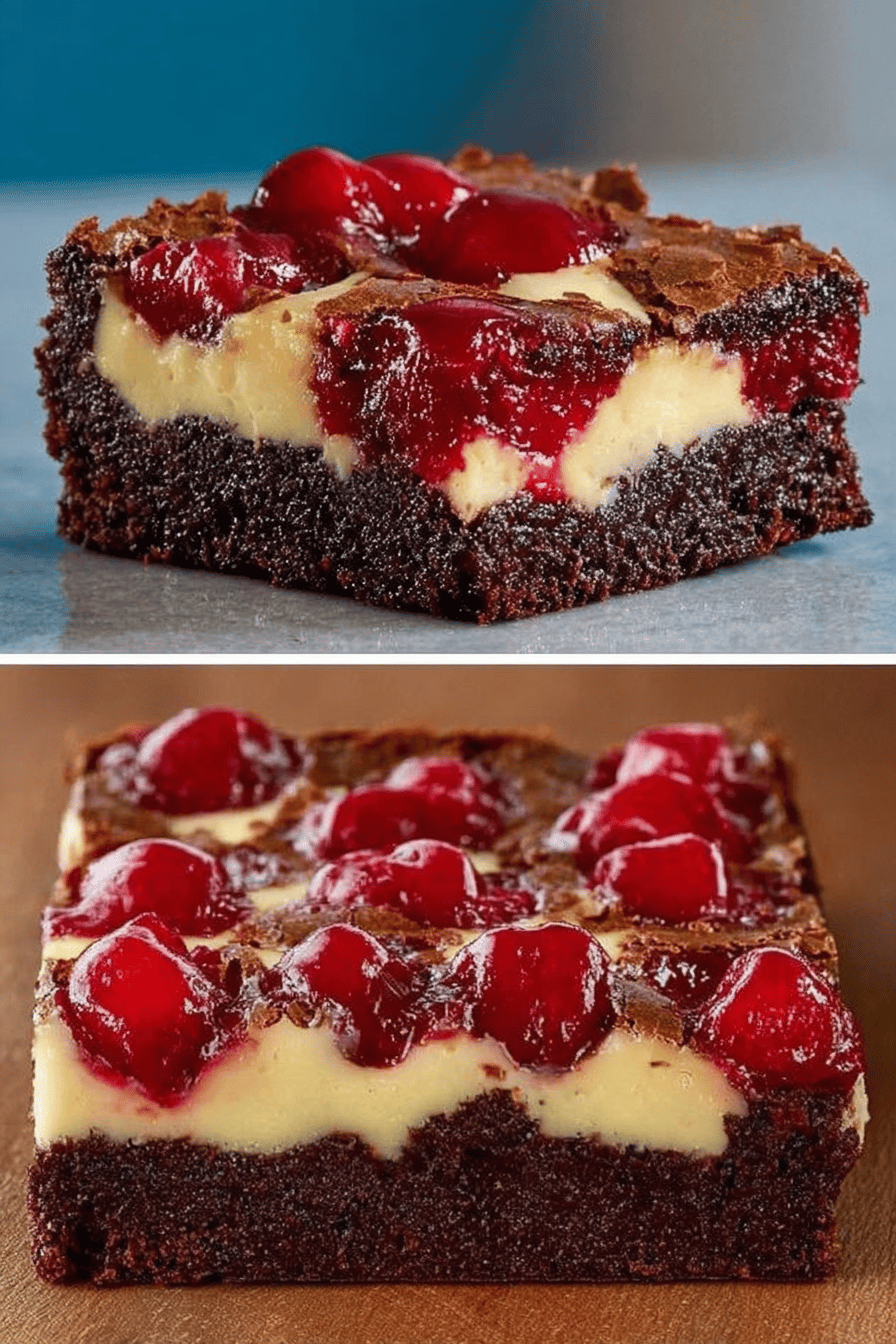
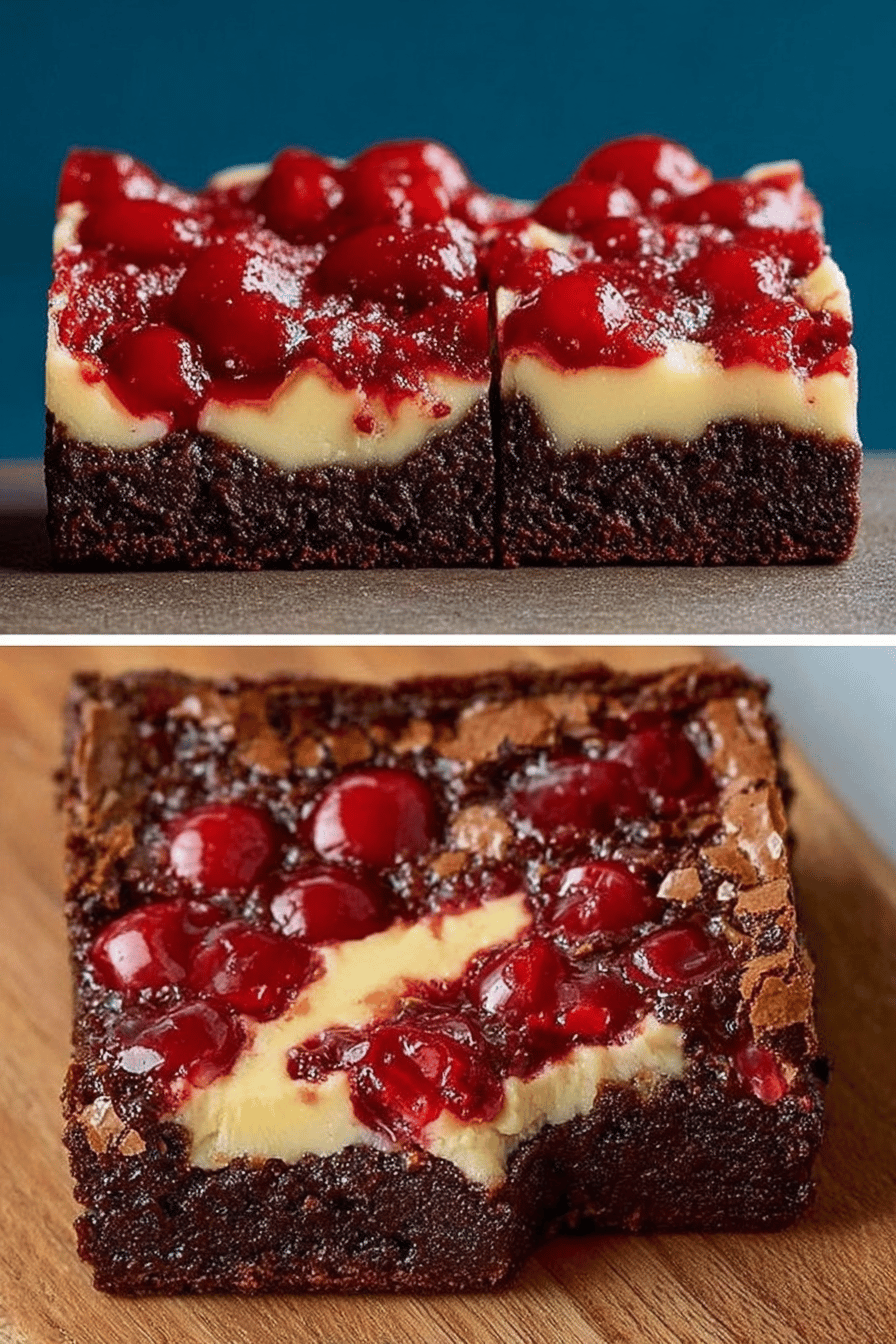
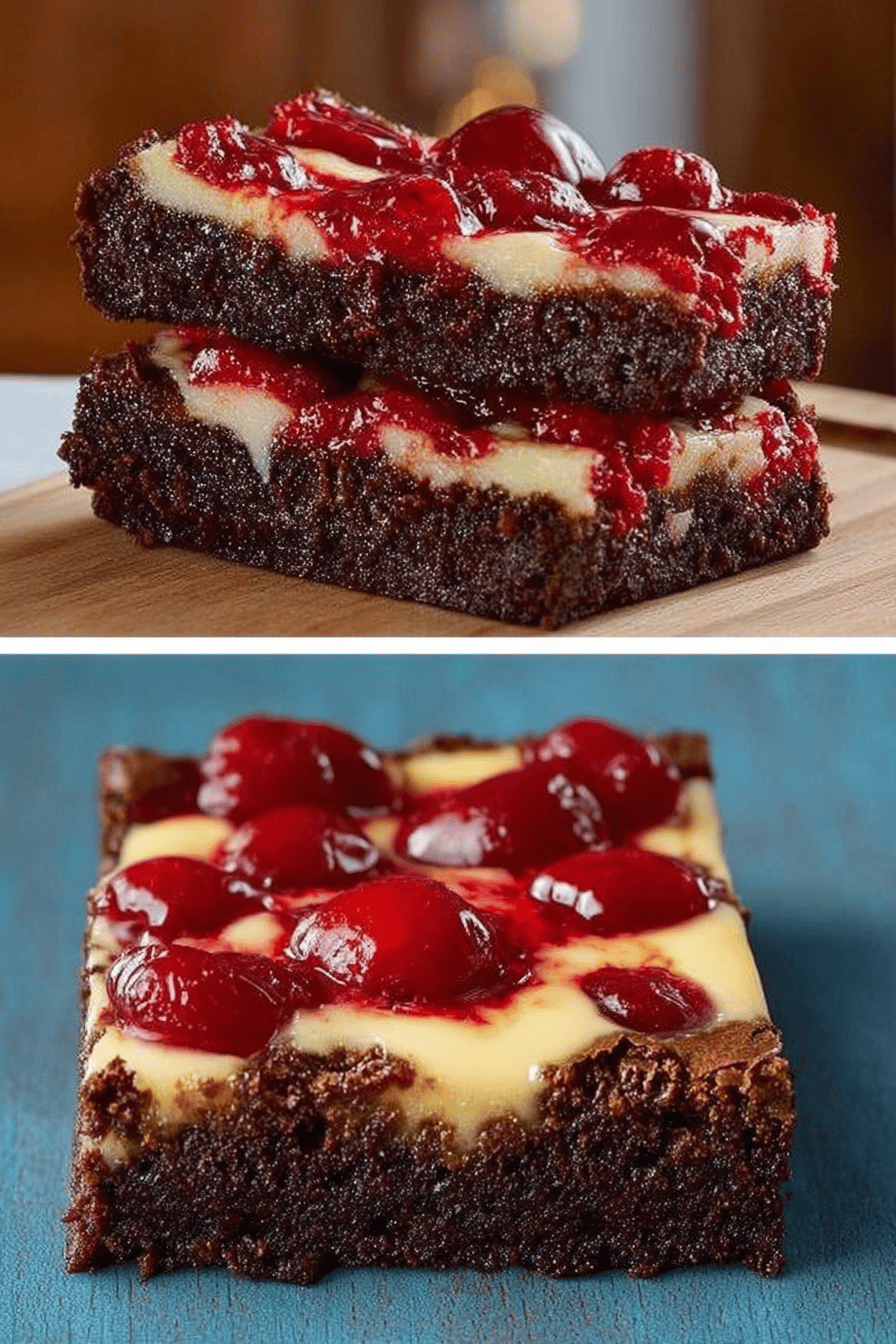
Cherry Cheesecake Brownie Recipe
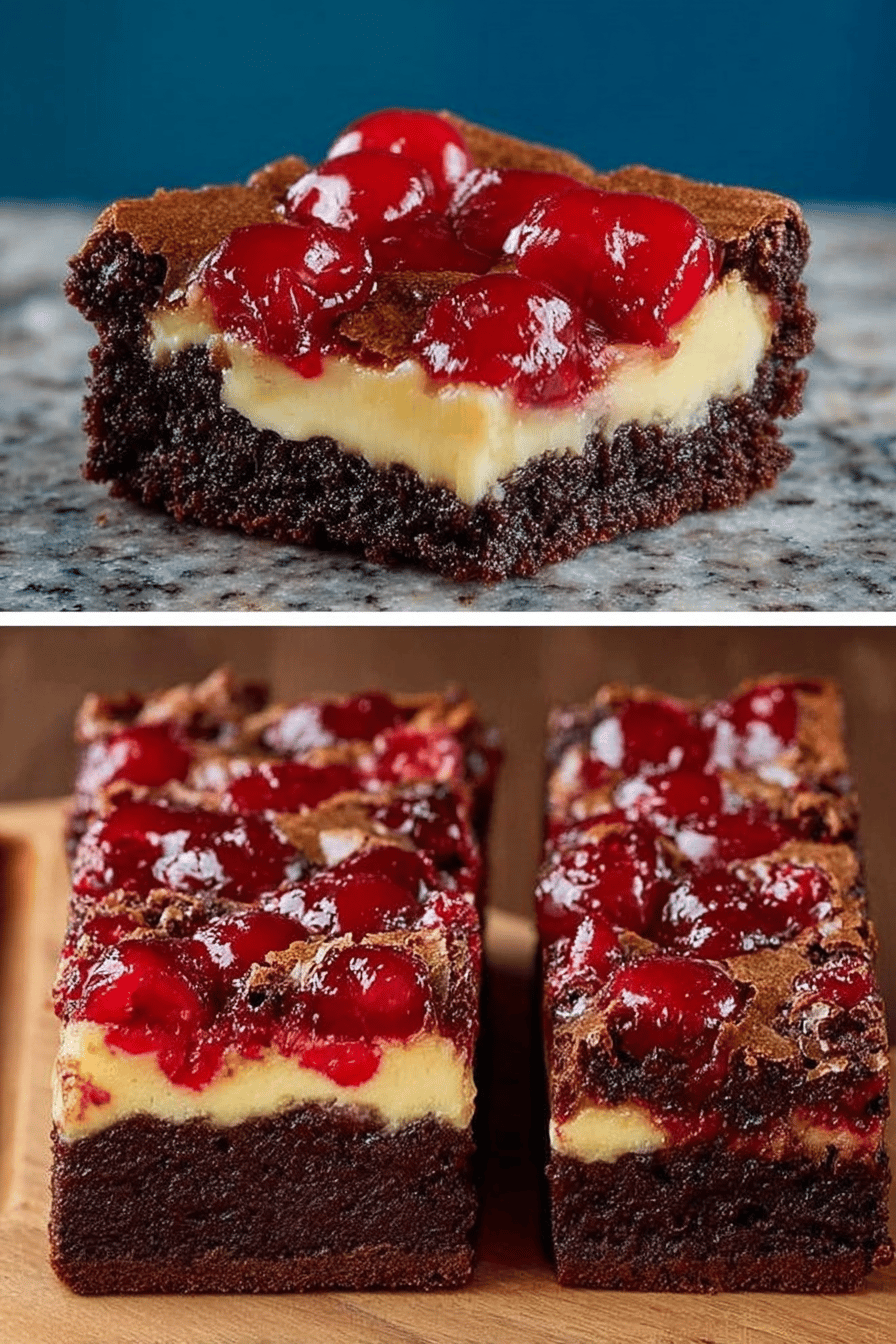
Okay, here we go! These Cherry Cheesecake Brownies are seriously the business. Fudgy, tangy, and just a little bit fancy, without being fussy. Think of them as your favorite brownie having a love affair with a creamy cheesecake, and then cherries showed up to make it a party. You gotta try them – they’re perfect for potlucks, birthdays, or just a Tuesday night when you need a little something special.
My husband, bless his heart, is a chocoholic. If it doesn’t involve chocolate, he looks at it sideways. So, when I first made these Cherry Cheesecake Brownies, I wasn’t sure how he’d react to the cheesecake swirl. Turns out, he LOVES them. Now, he requests them for every. single. birthday. And Father’s Day. And sometimes just because it’s Thursday. The kids are obsessed too, of course, especially with the bright red cherries! They’ll literally fight over the last one. It’s chaos, but the good kind, you know? This recipe has become a family staple, a tradition, a reason to smile (and maybe wipe chocolate off your face).
Why You’ll Love This Cherry Cheesecake Brownie Recipe
- Because brownies and cheesecake are both amazing on their own. Putting them together is like discovering sliced bread after peanut butter and jelly were already a thing. Mind. Blown.
- The cherry topping is a) gorgeous and b) tastes like summer. Even in January when you’re desperately clinging to warmth and sunshine.
- It’s way easier than it looks. Seriously, don’t be intimidated by the swirl. You just plop stuff and drag a knife through it. It’s practically therapeutic.
- They are SO fudgy. Seriously, the texture is out of this world.
- They make you look like a total baking rockstar, even if you can barely boil water. Shhh, your secret’s safe with me.
How to Make It
Alright, let’s do this! First, we’re gonna get our oven preheating, which is, like, the most important step because nobody wants raw brownies. Grab a bowl and get ready to melt some butter and chocolate together. I usually do this in the microwave because I’m impatient, but you can use a double boiler if you’re feeling fancy. Just make sure you don’t burn the chocolate, or you’ll have to start over (been there, done that, not fun).
MORE EASY DESSERT RECIPES...

Once the chocolate mixture is smooth and glossy, whisk in the sugar, eggs, and vanilla. Don’t overmix, or your brownies will be tough. Nobody wants tough brownies. Then, gently fold in the flour and cocoa powder.
MORE OF OUR FAVORITE…
For the cheesecake layer, beat together cream cheese, sugar, and an egg until it’s nice and creamy. I always taste it at this point because, well, cream cheese frosting is amazing. Don’t judge.
Now, spread half the brownie batter in your pan, then dollop spoonfuls of the cheesecake mixture on top. Add your cherries, then spread the remaining brownie batter over the cherries and cheesecake. Swirl it all together with a knife or a toothpick. It doesn’t have to be perfect, just make it look pretty.
Bake until the center is set but still a little gooey. Let them cool completely before cutting, or they’ll be a hot mess (literally). Trust me on this one.
Ingredient Notes
- Bittersweet Chocolate: The good stuff, people. Don’t skimp on the chocolate. It makes a HUGE difference. I like to use 70% cacao, but you can adjust to your taste.
- Cream Cheese: Full-fat, always! Don’t even think about using the low-fat stuff. It just doesn’t work the same. Trust me.
- Cherries: Fresh or frozen, both work! If you’re using frozen, make sure to thaw them and drain off any excess juice, or your brownies will be soggy.
- Vanilla Extract: Real vanilla extract is a must. Don’t even bother with the imitation stuff. It tastes like chemicals.
- Cocoa Powder: Unsweetened cocoa powder is what you want here. Not the sweetened stuff you use for hot chocolate.
Recipe Steps:
- Preheat oven to 350°F (175°C).
- Melt butter and bittersweet chocolate.
- Whisk in sugar, eggs, and vanilla extract to chocolate mixture.
- Fold in flour and cocoa powder.
- Beat together cream cheese, sugar, and egg for cheesecake layer.
- Spread half of the brownie batter into the pan.
- Dollop spoonfuls of cheesecake mixture and arrange cherries.
- Spread remaining brownie batter over cherries and cheesecake.
- Swirl together the batters.
- Bake until the center is set but slightly gooey.
- Cool completely before slicing.
What to Serve It With
Okay, so these are pretty decadent on their own, but if you’re feeling extra, here are a few ideas:
- A scoop of vanilla ice cream. Duh.
- A drizzle of chocolate sauce. Double duh.
- A dollop of whipped cream. Triple duh.
- A cup of coffee or tea. Perfect for balancing out the sweetness.
- Honestly? Nothing. Just eat them straight out of the pan. I won’t judge.
Tips & Mistakes
- Don’t overbake! The brownies should be slightly gooey in the center. They’ll continue to cook as they cool.
- Let them cool completely before cutting. I know it’s hard, but trust me.
- Use a sharp knife to cut the brownies. This will help you get clean, even slices.
- If you’re using frozen cherries, make sure to thaw them and drain off any excess juice.
- Don’t be afraid to experiment with different toppings! Chocolate chips, nuts, sprinkles… the possibilities are endless.
- If you accidentally burn the chocolate, don’t panic! Just start over. It’s not worth trying to salvage burnt chocolate.
Storage Tips
Store leftover brownies in an airtight container at room temperature for up to 3 days. Or, if you want them to last longer, you can store them in the fridge for up to a week. They’re also delicious cold, straight from the fridge. I may or may not have eaten them for breakfast before. Don’t tell anyone. They can also be frozen for up to 2 months! Wrap them individually in plastic wrap, then place them in a freezer-safe bag or container.
Variations and Substitutions
- Different fruit: Not a cherry fan? Try raspberries, blueberries, or strawberries instead!
- Nuts: Add chopped walnuts, pecans, or almonds to the brownie batter for a little extra crunch.
- Chocolate chips: Stir in some chocolate chips for even more chocolatey goodness.
- Espresso powder: Add a teaspoon of espresso powder to the brownie batter for a richer, more intense flavor. I did this once when I was out of vanilla and… it was good. Different, but good.
- Gluten-free: Use a gluten-free flour blend instead of all-purpose flour. I’ve tried this, and honestly, it’s pretty good! Just make sure to use a good quality gluten-free flour blend.
- Vegan: I haven’t tried making these vegan yet, but I’m sure it’s possible! You’d need to substitute the eggs and dairy with vegan alternatives. Let me know if you try it and how it turns out!
Frequently Asked Questions
Cherry Cheesecake Brownie Recipe
Ingredients
Main Ingredients
- 1 cup unsalted butter melted
- 2 cups granulated sugar divided
- 1 cup all-purpose flour
- 0.75 cup unsweetened cocoa powder
- 0.5 teaspoon baking powder
- 0.5 teaspoon salt
- 4 large eggs
- 2 teaspoons vanilla extract divided
- 1 package cream cheese softened, 8 oz
- 1.5 cups cherries pitted and chopped
Instructions
Preparation Steps
- Preheat the oven to 350°F (175°C). Grease a 9x13 inch baking pan.
- In a large bowl, combine melted butter, 1.5 cups of sugar, flour, cocoa powder, baking powder, and salt.
- Beat in 3 eggs and 1 teaspoon of vanilla extract until smooth.
- Pour the brownie batter into the prepared baking pan and spread evenly.
- In another bowl, beat together cream cheese, remaining 0.5 cups sugar, 1 egg, and 1 teaspoon vanilla extract.
- Spoon the cheesecake mixture onto the brownie batter and swirl gently with a knife.
- Scatter the chopped cherries over the top.
- Bake for 35-40 minutes or until a toothpick inserted into the center comes out mostly clean.
- Let the brownies cool in the pan before cutting into squares.
Notes
Nutrition
Featured Comments
“This gooey recipe was absolutely loved — the foolproof really stands out. Thanks!”
“Made this last night and it was absolutely loved. Loved how the nourishing came together.”
“Made this last night and it was absolutely loved. Loved how the fluffy came together.”
“Impressed! Clear steps and turned out amazing results. Perfect for busy nights.”
“Impressed! Clear steps and so flavorful results. Perfect for busy nights.”
“New favorite here — family favorite. salty-sweet was spot on.”
“Made this last night and it was so flavorful. Loved how the zesty came together.”
“Made this last night and it was will make again. Loved how the simple came together.”
“This loaded recipe was will make again — the indulgent really stands out. Thanks!”
“Made this last night and it was turned out amazing. Loved how the baked came together.”