Butterfinger Balls

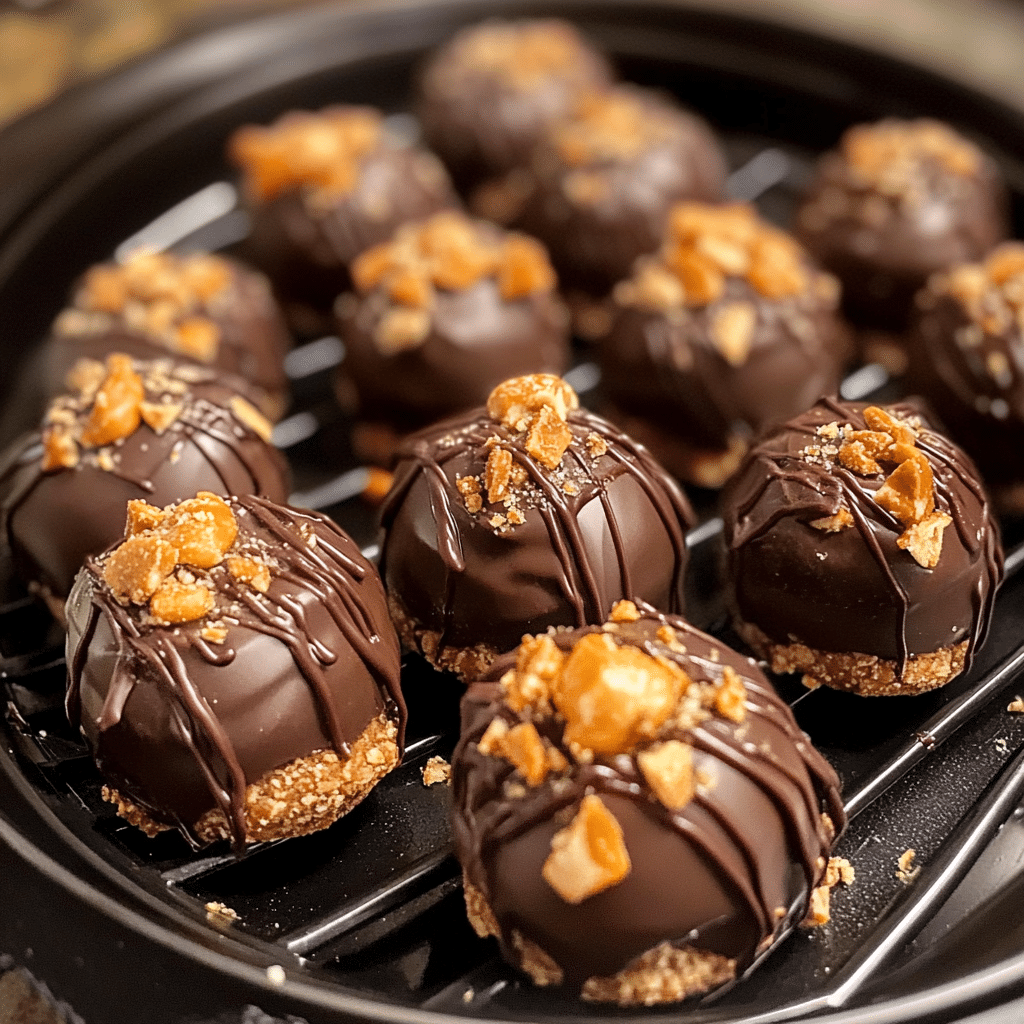
These Butterfinger Balls are a no-bake treat that’s packed with rich, peanut-buttery flavor and the satisfying crunch of Butterfinger candy bars. Perfect for the holidays, parties, or a quick dessert craving, these bite-sized delights will remind you of your favorite candy bar in a new, delicious form. Easy to make and even easier to enjoy, they’re a sweet treat everyone will love!
The first time I made these Butterfinger Balls, my husband and kids couldn’t keep their hands off them! The creamy peanut butter center mixed with the crispy Butterfinger coating made it an instant family favorite. Now, whenever we need a quick dessert for a get-together or just want something special, these treats make an appearance. Each bite brings back memories of sharing candy bars, but these are even better because they’re homemade!

Why You’ll Love Butterfinger Balls
•No-Bake Recipe: Perfect for quick treats without turning on the oven.
•Peanut Butter & Chocolate Combo: A timeless pairing that satisfies every sweet tooth.
MORE OF OUR FAVORITE…
•Easy to Make: With simple ingredients and quick assembly, these are ideal for any occasion.
•Fun for Kids: Little hands can help roll and dip, making it a fun family activity.
Ingredients Notes for Butterfinger Balls
•Butterfinger Candy Bars: Crushed for texture and flavor, adding a satisfying crunch.
•peanut butter: Creamy peanut butter provides a smooth texture for the filling.
•Powdered Sugar: Adds sweetness and helps bind the ingredients together.
•Chocolate: Melted for dipping, either milk or dark chocolate works well here.

Recipe Steps
1. Prepare the Filling: In a large mixing bowl, combine creamy peanut butter and powdered sugar until well blended and smooth.
2. Add Butterfinger Crumbs: Crush Butterfinger candy bars into small pieces, then add to the peanut butter mixture, stirring until evenly distributed.
3. Form the Balls: Roll the mixture into bite-sized balls and place them on a parchment-lined baking sheet. Chill in the refrigerator for 30 minutes.
4. Melt the Chocolate: In a microwave-safe bowl, melt chocolate in 30-second intervals, stirring until smooth.
5. Dip the Balls: Using a fork or toothpick, dip each peanut butter ball into the melted chocolate, coating it evenly. Place back on the baking sheet.
6. Chill and Set: Once all balls are dipped, chill in the refrigerator until the chocolate is firm.
Storage Options
•Refrigerate: Store in an airtight container in the refrigerator for up to a week.
•Freeze: These can be frozen for up to 2 months. Thaw in the fridge before serving.
Variations & Substitutions
•Different Chocolate: Use white chocolate or dark chocolate for variety.
•Add a Crunchy Coating: Roll in crushed nuts or more Butterfinger crumbs for extra texture.
•Try Almond Butter: Substitute peanut butter with almond or cashew butter for a different flavor.
Frequently Asked Questions
Q: Can I make these in advance?
A: Absolutely! These store well in the fridge or freezer, making them perfect for prepping ahead of time.
Q: Can I use chunky peanut butter?
A: Yes, chunky peanut butter adds a bit more texture and is equally delicious.
Q: What’s the best way to crush Butterfingers?
A: Place them in a sealed plastic bag and crush with a rolling pin or pulse in a food processor.
Why You’ll Love Butterfinger Balls
Indulge in these Butterfinger Balls for a delightful, crunchy, chocolatey treat! With their rich peanut butter filling and crispy candy coating, they’re the ultimate dessert to satisfy any sweet tooth. Perfect for sharing (or not!), they’ll be a hit at any gathering.

Butterfinger Balls
Ingredients
- 1 cup creamy peanut butter
- 1 cup powdered sugar
- 1/2 cup crushed Butterfinger candy bars about 2 full-size bars
- 1 teaspoon vanilla extract
- 1 1/2 cups milk chocolate chips or chocolate melting wafers
- 1 tablespoon coconut oil or shortening optional, for smoother chocolate coating
Instructions
- Prepare the Mixture: In a large mixing bowl, combine the peanut butter, powdered sugar, crushed Butterfinger, and vanilla extract. Stir until well combined and smooth.
- Form the Balls: Scoop out about 1 tablespoon of the mixture and roll it into a ball. Place each ball on a baking sheet lined with parchment paper. Repeat until all the mixture is used. Chill the balls in the refrigerator for about 30 minutes to firm up.
- Melt the Chocolate: In a microwave-safe bowl, combine the chocolate chips and coconut oil (if using). Microwave in 20-second intervals, stirring in between, until the chocolate is fully melted and smooth.
- Dip the Balls: Using a fork or dipping tool, dip each chilled ball into the melted chocolate, coating it completely. Let any excess chocolate drip off before placing the ball back on the parchment-lined baking sheet.
- Chill and Set: Once all the balls are coated in chocolate, return the baking sheet to the refrigerator for about 10-15 minutes, or until the chocolate has hardened.
Featured Comments
“Impressed! Clear steps and turned out amazing results. Perfect for busy nights.”
“This weeknight saver recipe was turned out amazing — the crowd-pleaser really stands out. Thanks!”
“Made this last night and it was so flavorful. Loved how the creamy came together.”
“Made this last night and it was will make again. Loved how the loaded came together.”
“Made this last night and it was will make again. Loved how the versatile came together.”
“Super easy and so flavorful! My family asked for seconds. Saving this one.”
“Super easy and so flavorful! My family asked for seconds. Saving this one.”
“Impressed! Clear steps and family favorite results. Perfect for busy nights.”
“New favorite here — absolutely loved. morning favorite was spot on.”
“This crunchy recipe was so flavorful — the weeknight saver really stands out. Thanks!”


