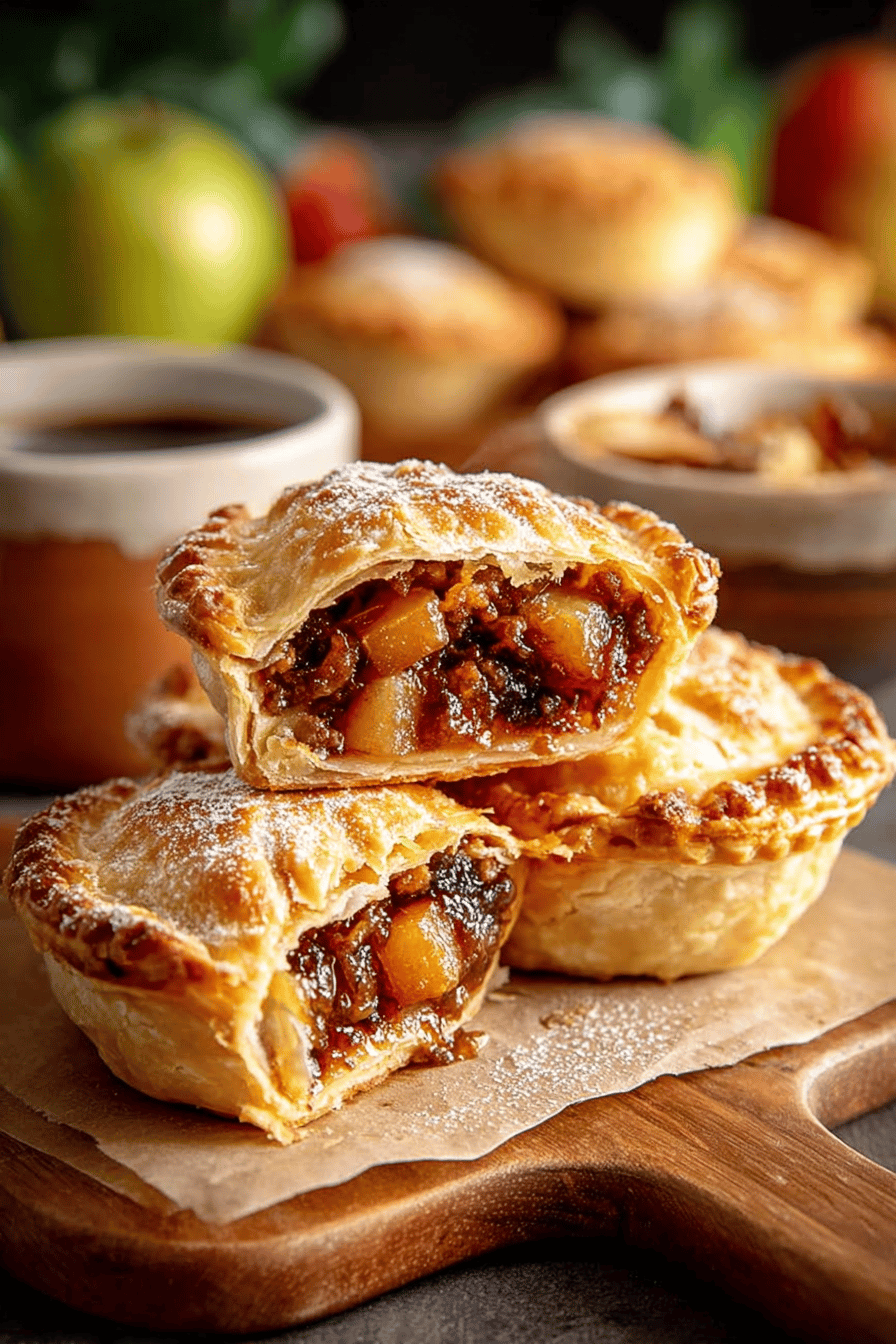
Easy Mince Hand Pies Recipe
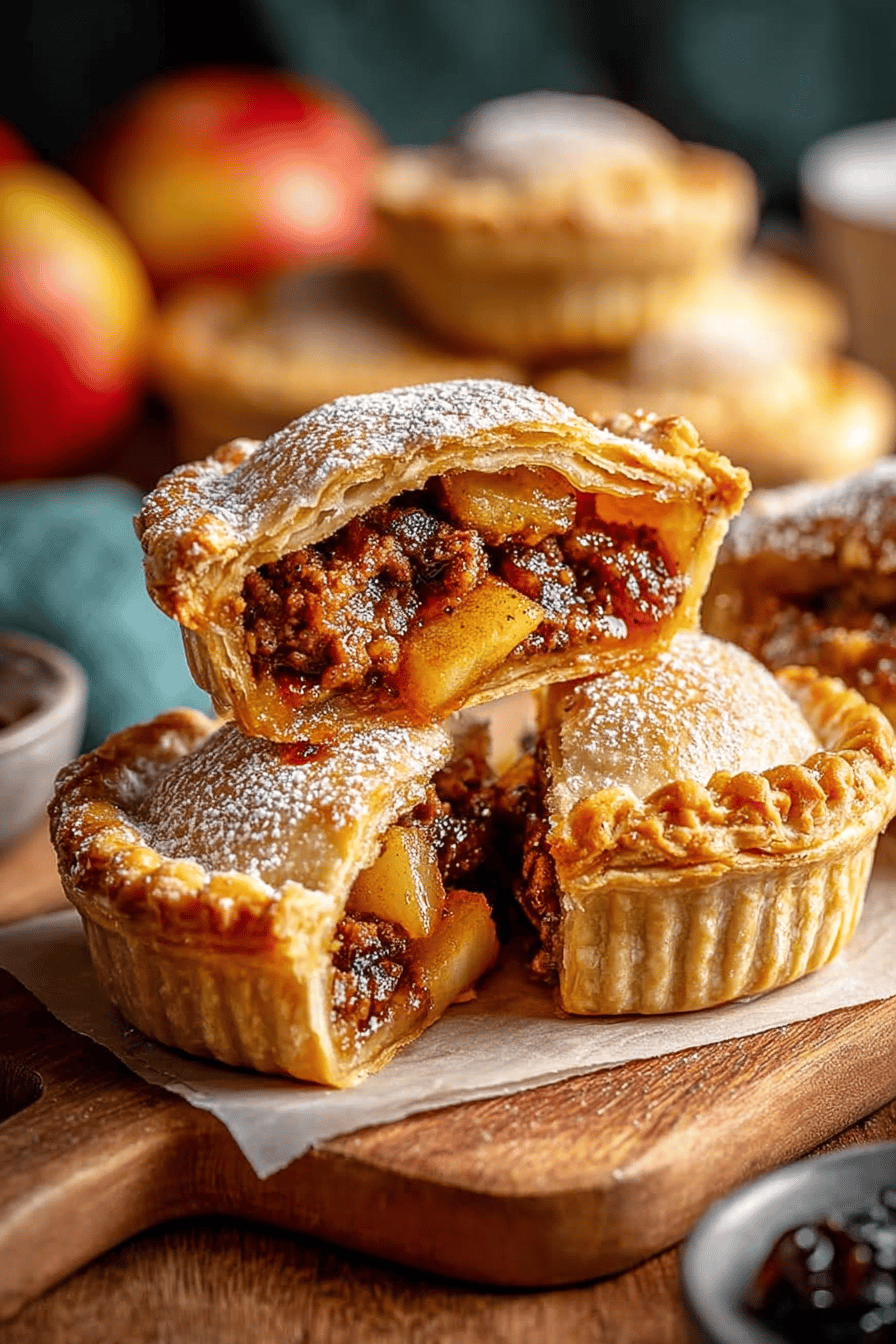
Easy Mince Hand Pies Recipe! These little guys are my secret weapon for, like, everything. Potlucks? Check. Last-minute dessert? Check. Husband-needs-a-pick-me-up-after-a-long-day? DOUBLE CHECK. They’re basically mini explosions of flavor, wrapped in flaky, buttery goodness. Seriously, you need these in your life.
My husband, bless his heart, is obsessed. He calls them “tiny pockets of happiness,” which is so corny, but also…kinda true? I remember one time, I made a double batch for a party, and he sneakily ate, like, half of them before anyone even arrived. I caught him red-handed, standing in the kitchen with a guilty grin and crumbs all over his face. I couldn’t even be mad because they are just THAT good. Since then, they’re a staple. Seriously, if these vanish from my house, I might have a mutiny on my hands!
Why You’ll Love This Easy Mince Hand Pies Recipe
- They’re ridiculously easy, even for a kitchen klutz like me. If I can make ’em, you can make ’em.
- They’re total crowd-pleasers. Seriously, watch them disappear. It’s kinda magical.
- The mincemeat filling is a flavor bomb! Sweet, spicy, fruity… it’s got it all.
- You can totally customize them! Add a little booze to the filling, use different spices, get creative!
- They’re just plain FUN to make. Especially if you get the kids involved (prepare for a little mess!).
How to Make It
Okay, so first things first, you gotta get your hands on some store-bought pie crust. I’m not gonna lie, I’m not a pie crust from-scratch kinda gal. The store-bought stuff works just fine, and honestly, who has the time? Let it thaw out a bit so it’s easy to work with.


While that’s happening, grab your mincemeat. Now, you can totally make your own mincemeat if you’re feeling ambitious, but I usually just buy a jar. It’s easier, and honestly, the store-bought stuff is pretty darn good. Give it a little stir, and if you’re feeling fancy, add a splash of brandy or rum. Nobody will complain, trust me.
MORE OF OUR FAVORITE…
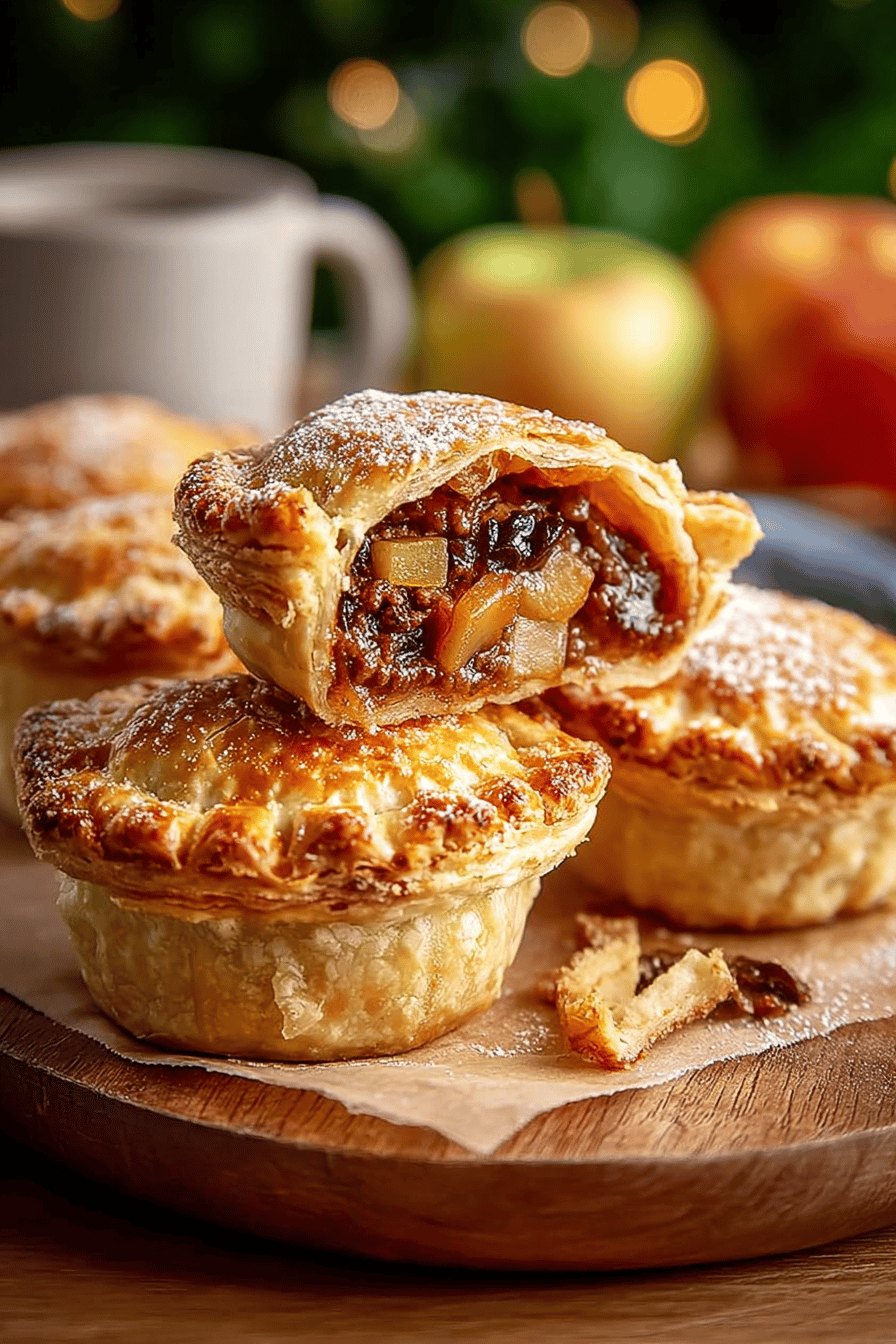
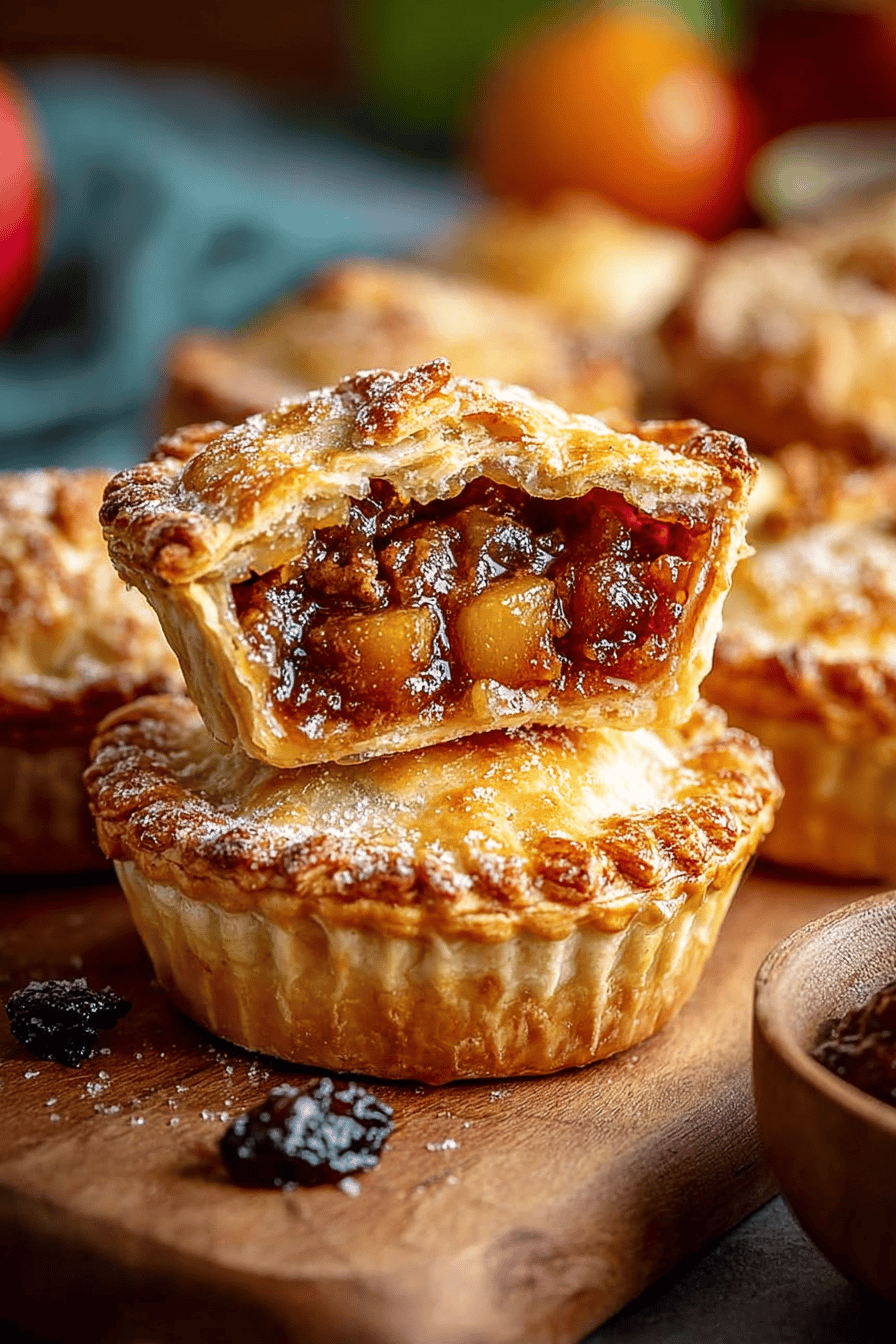
Now comes the fun part! Roll out your pie crust and use a cookie cutter or a glass to cut out circles. Spoon a little bit of mincemeat onto each circle, then fold it over and crimp the edges with a fork. This is where things get a little messy, but that’s okay! Imperfection is part of the charm, right?
Brush the tops with a little milk or egg wash (I usually just use whatever I have on hand) and sprinkle with a little sugar. Then, pop them in the oven and bake until they’re golden brown and bubbly.
Let them cool for a few minutes before you devour them, unless you want to burn your tongue off. I’ve done it. More than once.
Ingredient Notes
- Store-bought pie crust: Look, I’m all for homemade stuff when I have the time, but store-bought pie crust is a lifesaver. Just make sure it’s a good brand, okay? The cheap stuff can be a bit…cardboard-y.
- Mincemeat: This is the star of the show! You can find it in most grocery stores, usually near the jams and jellies. Or, if you’re feeling ambitious, you can make your own. But honestly, the store-bought stuff is pretty good.
- Brandy or Rum: This is totally optional, but it adds a nice little kick to the filling. If you’re not a fan of alcohol, you can skip it. Or, replace it with a little orange juice for a non-alcoholic boost.
- Milk or Egg Wash: This helps the pies get nice and golden brown. I usually just use a little milk because it’s what I usually have on hand. But if you have an egg, whisk it up with a little water and use that.
- Sugar: A little sprinkle of sugar on top adds a nice little sparkle and sweetness. You can use regular sugar, turbinado sugar, or even a little sprinkle of cinnamon sugar if you’re feeling fancy.
Recipe Steps:
- Thaw pie crust: Let store-bought pie crust thaw until workable.
- Prepare mincemeat: Stir mincemeat and add brandy or rum if desired.
- Cut pie circles: Roll out crust and cut into circles.
- Fill pies: Spoon mincemeat onto each circle.
- Fold and crimp: Fold circles over and crimp edges with a fork.
- Brush and sprinkle: Brush with milk or egg wash, sprinkle with sugar.
- Bake: Bake until golden brown.
- Cool: Let cool slightly before serving.
What to Serve It With
These little pies are amazing on their own, but if you’re feeling extra, serve them with a dollop of whipped cream or a scoop of vanilla ice cream. Or, if you’re like me, just eat them straight out of the oven, no judgment here.
Tips & Mistakes
- Don’t overfill the pies! Otherwise, the filling will ooze out and make a mess. A little goes a long way.
- Make sure to crimp the edges really well, otherwise, the pies will fall apart while baking.
- Keep an eye on them while they’re baking. Ovens can be finicky, and you don’t want them to burn.
- Don’t be afraid to get creative with the filling! Add different spices, dried fruits, or even a little chocolate.
- If your pie crust is sticking, sprinkle a little flour on your work surface.
Storage Tips
If you have any leftovers (which is a big “if” in my house), you can store them in an airtight container at room temperature for a couple of days. Or, you can pop them in the fridge for up to a week. Honestly, though, they’re best eaten fresh. I’ve been known to sneak one cold from the fridge for breakfast. Hey, no shame in my game!
Variations and Substitutions
Okay, so you’re out of brandy? No sweat. A little apple juice or even some strong brewed tea can sub in nicely. I once used prune juice because, well, it was there. Don’t recommend it, but you know, desperate times. If you don’t have pie crust, puff pastry works in a pinch, though it’ll be a little different. And if you’re feeling really wild, try adding some chopped nuts or dried cranberries to the mincemeat. I did that once and it was a total hit!
Frequently Asked Questions
Easy Mince Hand Pies Recipe
Ingredients
Main Ingredients
- 1.5 lb ground beef lean
- 1 cup onion finely chopped
- 2 cloves garlic minced
- 1 cup carrot grated
- 0.5 cup frozen peas thawed
- 2 tbsp tomato paste
- 2 tbsp Worcestershire sauce
- 1 tsp thyme dried
- 1 tsp salt or to taste
- 0.5 tsp black pepper freshly ground
- 2 rolls puff pastry thawed
- 1 egg beaten, for egg wash
Instructions
Preparation Steps
- Preheat the oven to 375°F (190°C).
- In a skillet over medium heat, cook the ground beef until browned. Drain excess fat.
- Add the onion, garlic, and carrot to the skillet. Cook for about 5 minutes until vegetables are softened.
- Stir in the peas, tomato paste, Worcestershire sauce, thyme, salt, and pepper. Cook for another 2 minutes. Remove from heat and let cool slightly.
- Roll out the puff pastry sheets and cut each into four squares.
- Place a spoonful of the meat mixture onto each pastry square. Fold and seal the edges with a fork.
- Brush the tops of the pies with the beaten egg.
- Bake in the preheated oven for 20-25 minutes or until golden brown.
Notes
Nutrition
Featured Comments
“This speedy recipe was absolutely loved — the comforting really stands out. Thanks!”
“New favorite here — absolutely loved. charred was spot on.”
“Super easy and absolutely loved! My family asked for seconds. Saving this one.”
“Made this last night and it was absolutely loved. Loved how the cheesy came together.”
“New favorite here — absolutely loved. colorful was spot on.”
“Impressed! Clear steps and absolutely loved results. Perfect for busy nights.”
“Made this last night and it was so flavorful. Loved how the crunchy came together.”
“This tasty recipe was so flavorful — the crunchy really stands out. Thanks!”
“New favorite here — family favorite. crispy crust was spot on.”
“Impressed! Clear steps and family favorite results. Perfect for busy nights.”