Cheesy Funeral Potatoes Recipe: A Comforting Classic

If you’re seeking a comforting side dish that brings warmth to the table and delight to your taste buds, look no further than this cheesy funeral potatoes recipe. With its creamy texture and golden, melty top layer, it’s a surefire crowd-pleaser that will become a staple at your family gatherings.
Growing up, this dish was a fixture at every family reunion and holiday dinner. I fondly remember my grandmother lovingly preparing it in her kitchen, the tantalizing smell enveloping the house. Everyone would eagerly anticipate that first savory bite, accompanied by laughter and storytelling around the dining table. It’s a recipe inherited and cherished by each generation, holding a special place in my heart and firmly in my culinary repertoire.
Why You’ll Love This Recipe
This cheesy delight is beloved for several reasons. It’s incredibly easy to make yet feels special, with a crispy, golden crust that reveals a creamy, potato-filled interior. Perfect for potlucks, family gatherings, or simply as a cozy night in, this dish is versatile and satisfying. Its rich, cheesy flavor ensures even the pickiest of eaters will ask for seconds.
Ingredients Notes


To create this dish, you’ll need humble, accessible ingredients such as russet potatoes, sharp cheddar cheese, sour cream, and a touch of butter. For an extra kick, consider adding a bit of diced onion or substituting Greek yogurt for sour cream for a lighter version. Always prefer using freshly grated cheese for optimal melting and flavor.
MORE OF OUR FAVORITE…

Recipe Steps
Step 1
Preheat your oven to 350°F (175°C). Begin by peeling and grating the russet potatoes, then soaking them briefly in cold water to remove excess starch.
Step 2
In a large bowl, combine the grated potatoes, sour cream, and half of your grated cheddar cheese. Season with salt and pepper.
Step 3
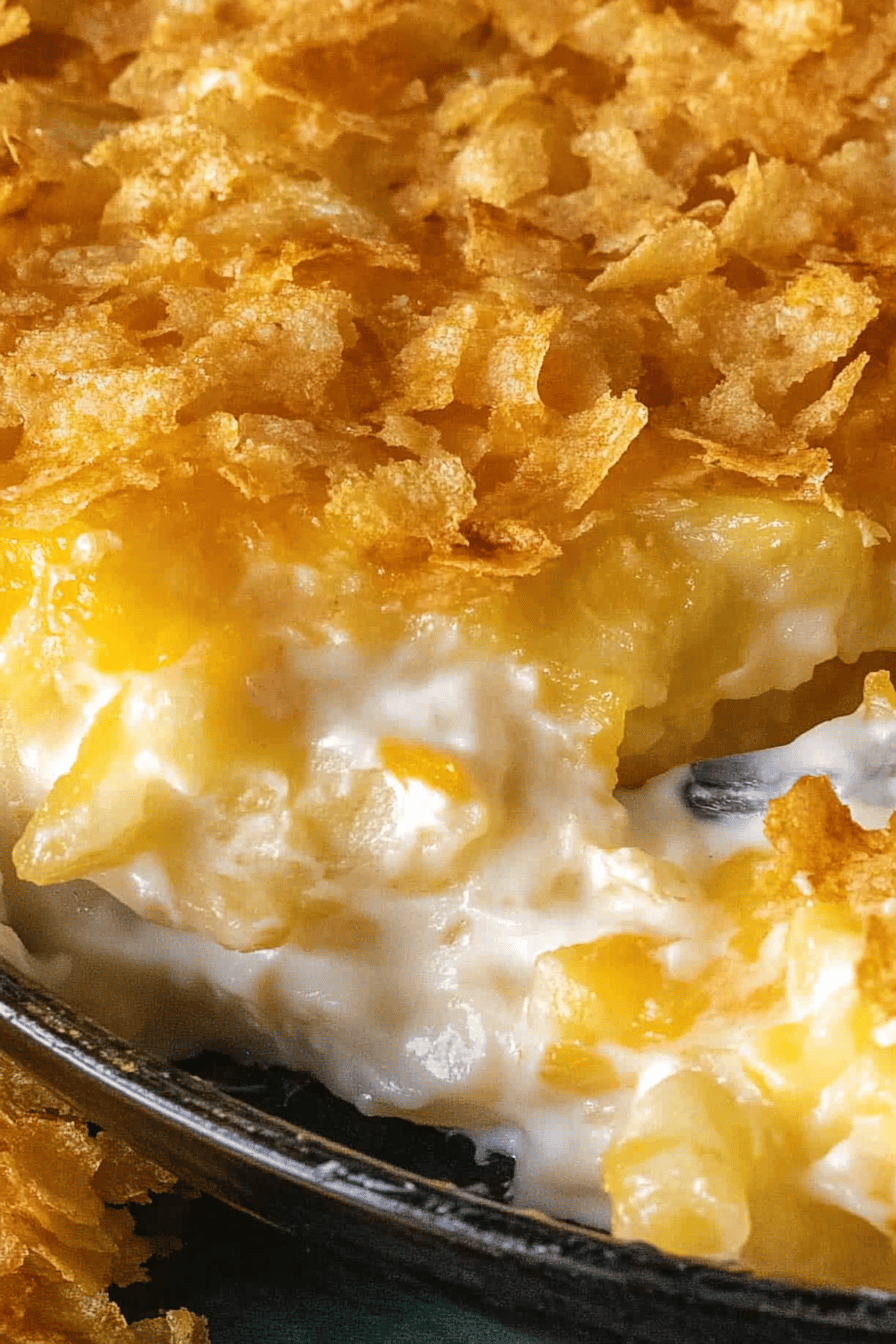
Transfer the mixture into a greased baking dish. Top with the remaining cheddar cheese. For a bit of crunch, add crushed cornflakes or breadcrumbs on top.
Step 4
Dot the surface with butter chunks. Bake in the oven for 45 minutes until the top turns golden and crispy.
Step 5
Let the dish sit for a few minutes before serving, allowing it to set. Garnish with fresh chives for a pop of color and flavor.
Storage Options
Store any leftovers in an airtight container in the refrigerator for up to 3 days. To reheat, cover with foil and warm in the oven at 350°F (175°C) until heated through. This dish also freezes well; portion into individual servings and freeze for up to 1 month.
Variations & Substitutions
For a gluten-free version, ensure you use gluten-free breadcrumbs on top. If you’re looking to lighten the dish, substitute low-fat cheese and yogurt for traditional ingredients. For a spicy twist, include diced jalapeños or a sprinkle of cayenne pepper.
Serving Suggestions
This dish pairs beautifully with roasted meats such as chicken or pork. Serve it alongside steamed vegetables for a balanced meal or take it to the next holiday potluck as a standout side.
Frequently Asked Questions
Can I make this dish ahead of time? Absolutely! Prepare the dish and cover it with plastic wrap. Refrigerate for up to 24 hours before baking. You may need to extend the baking time by 10-15 minutes if baking from cold.
Is it possible to use frozen potatoes? Yes, you can use frozen hash browns as a time-saving alternative. Ensure they’re thawed and drained of excess moisture before mixing with other ingredients.
What cheese works best for this recipe? Sharp cheddar is traditional and offers excellent flavor and meltability, but feel free to experiment with Monterey Jack or a blend of cheeses for different nuances.

This delightful recipe is sure to evoke fond memories and become a cherished tradition in your own home. Whether served at a family gathering or simply as a comforting dish on a cold day, these cheesy potatoes bring joy and satisfaction to any meal.
Cheesy Funeral Potatoes Recipe: A Comforting Classic
Ingredients
Main Ingredients
- 32 oz frozen shredded hash brown potatoes thawed
- 0.5 cup unsalted butter melted
- 1 can cream of chicken soup 10.5 oz can
- 2 cups sour cream
- 1.5 cups shredded cheddar cheese divided
- 0.5 cup chopped onion
- 1 teaspoon salt
- 0.5 teaspoon black pepper
- 2 cups crushed cornflakes
- 0.25 cup unsalted butter melted, for topping
Instructions
Preparation Steps
- Preheat oven to 350°F (175°C).
- In a large bowl, combine the thawed hash browns, melted butter, cream of chicken soup, sour cream, 1 cup of cheddar cheese, chopped onion, salt, and pepper.
- Spread the mixture evenly in a 9x13 inch baking dish.
- In a small bowl, combine the crushed cornflakes with 0.25 cup melted butter. Sprinkle this mixture over the potatoes.
- Top with the remaining 0.5 cup of cheddar cheese.
- Bake in the preheated oven for 45 minutes, until the top is golden and the casserole is bubbly.
Notes
Nutrition
Featured Comments
“Made this last night and it was so flavorful. Loved how the anytime came together.”
“New favorite here — will make again. flavorful was spot on.”
“This flavorful recipe was turned out amazing — the perfect pair really stands out. Thanks!”
“New favorite here — so flavorful. flavorful was spot on.”
“This perfect pair recipe was absolutely loved — the simple really stands out. Thanks!”
“New favorite here — so flavorful. perfect pair was spot on.”
“New favorite here — will make again. perfect pair was spot on.”
“Impressed! Clear steps and family favorite results. Perfect for busy nights.”
“New favorite here — turned out amazing. perfect pair was spot on.”
“Made this last night and it was absolutely loved. Loved how the simple came together.”