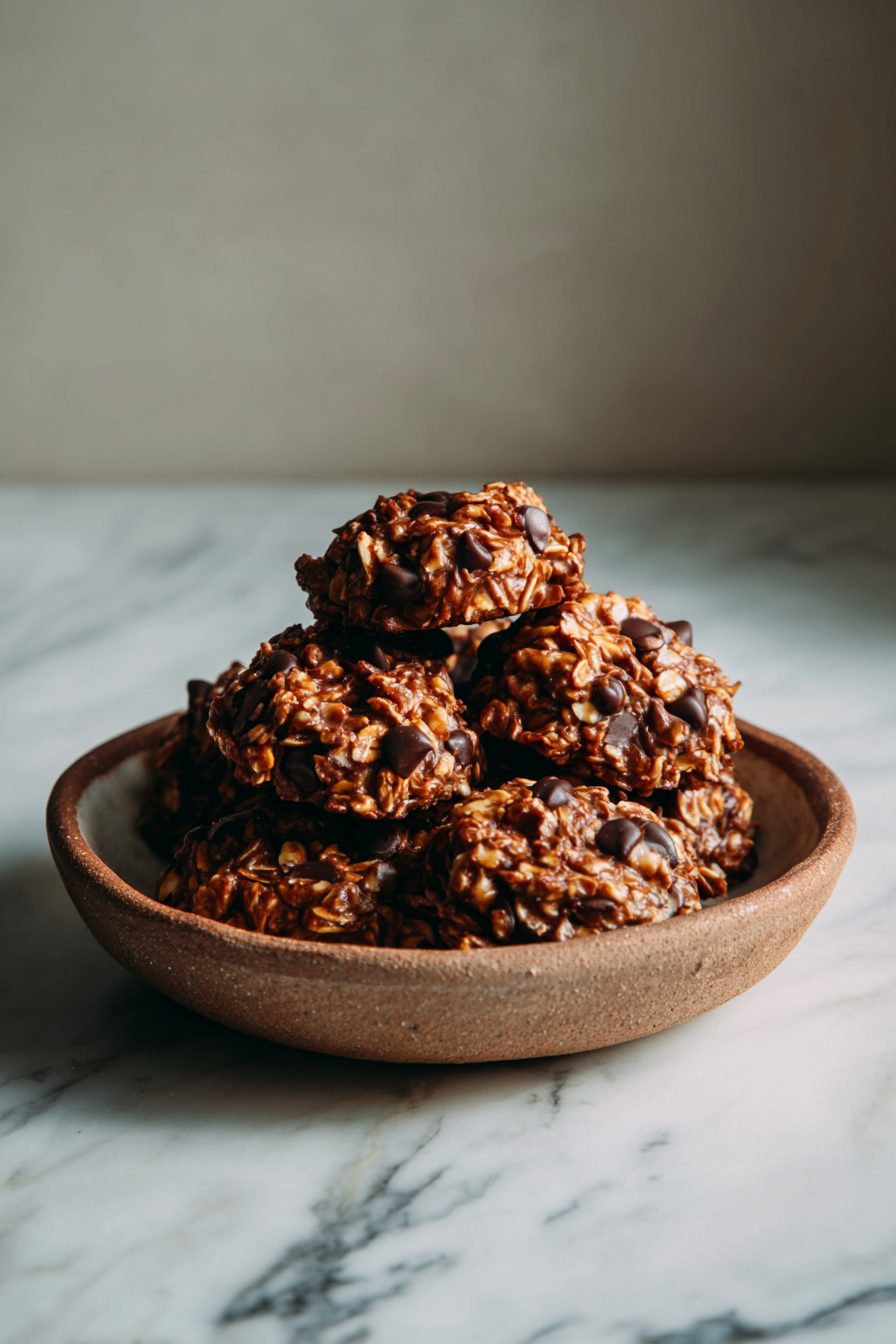
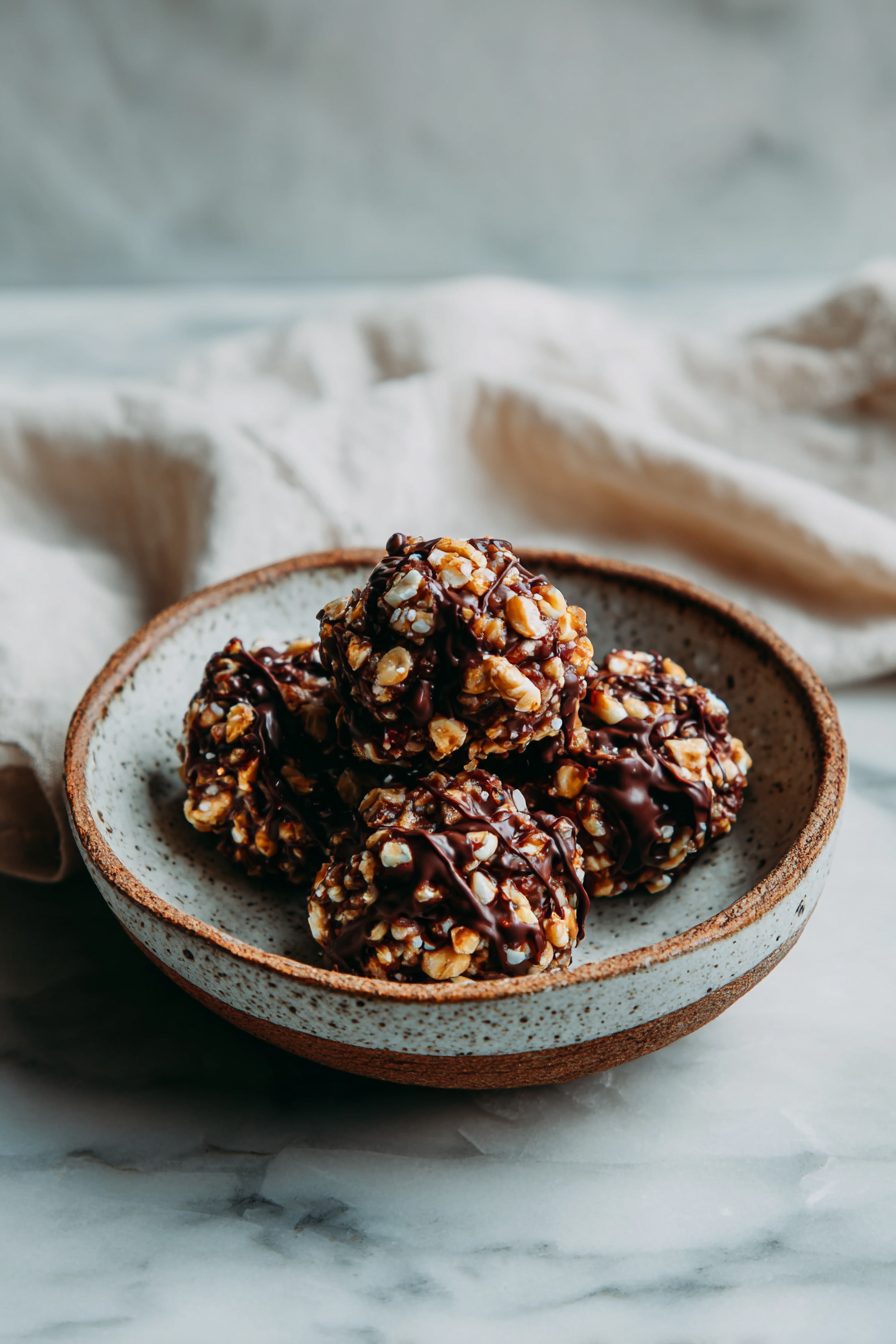
No-Bake Peanut Butter Crunch Cookies
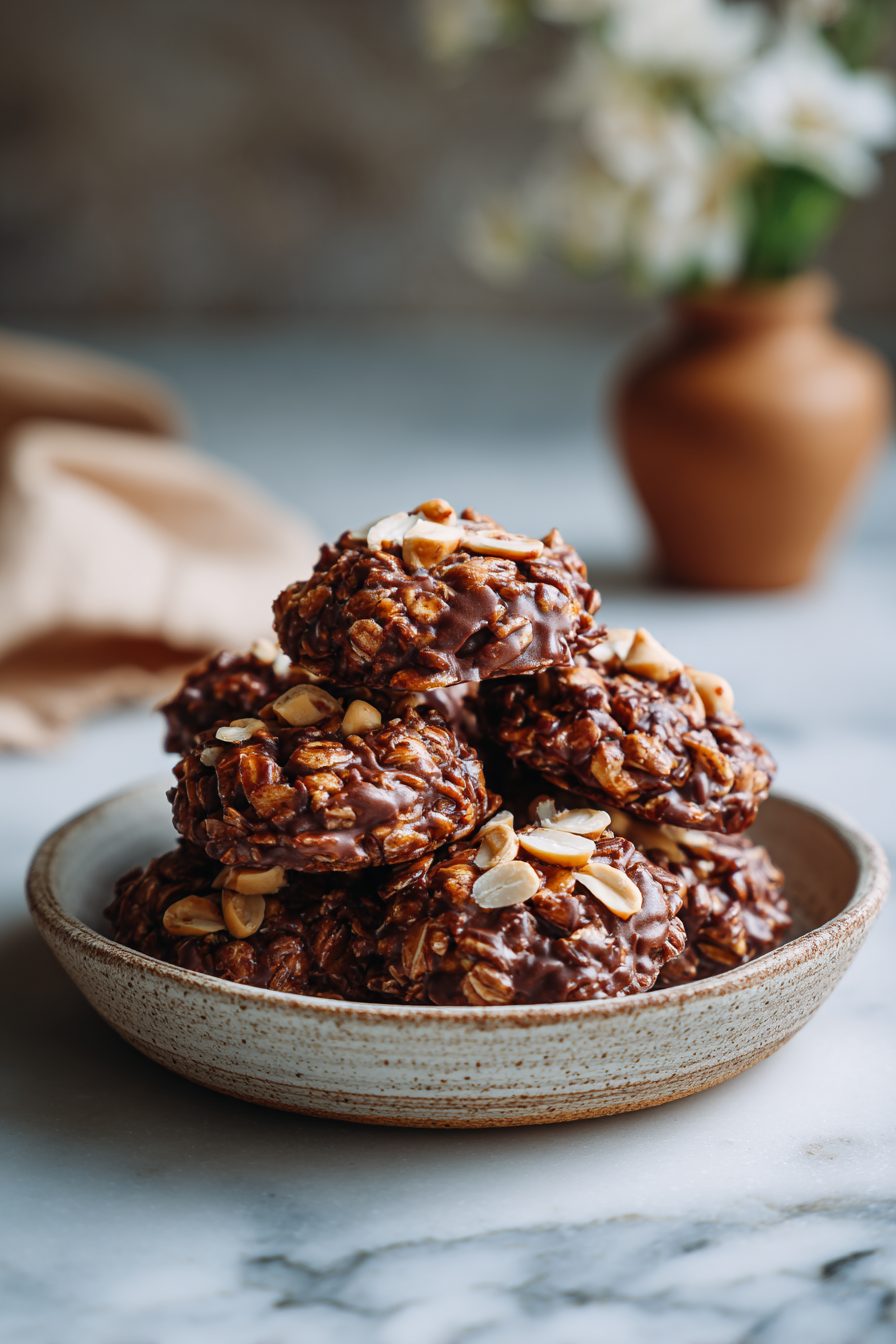
You know those recipes that feel like a tiny kitchen superpower? This is one of them: sticky, peanut-buttery, crunchy little no-bake cookies that come together in under 20 minutes and disappear even faster. They’re perfect when you want something nostalgic, not fussy, and definitely not requiring the oven in summer. They’re sweet, salty, a little grainy from the crunch addition, and honestly — wildly addictive.
My husband insists these are “better than candy,” which is a bold claim from a man who once ate a jar of pickles for dinner. The kids love the crunch (obviously), and I love that I can mix a batch while one kid argues about socks and the other practices interpretive dance with a wooden spoon. We call them emergency cookies, party cookies, breakfast sometimes — no judgment.
Why You’ll Love This No-Bake Peanut Butter Crunch Cookies
– Quick: no oven, no fuss, done in about 20 minutes.
– Flexible: swap the crunchy element or nut butter and still get a winner.
– Crowd-pleaser: salty-sweet, textural contrast — everyone asks for seconds.
– Kid-friendly prep: small humans can help drop the spoonfuls onto the tray.
– Zero weird ingredients: pantry staples mostly, so last-minute dessert is possible.
Kitchen Talk
These are the kind of cookies I make when I don’t want to think about perfect scoops or oven timing. I once doubled the batch and forgot about the second pot while answering a phone call — the peanut-butter-sugar syrup thickened into what looked like a science project, but a quick reheat fixed it. Also: if you use natural peanut butter, expect a looser mixture and a slightly softer cookie unless you chill them; that can be a feature, not a bug. I’ve tried them with honey instead of sugar syrup — delicious but a bit softer and chewier. Sometimes I throw in a handful of coconut because I’m feeling tropical and tired.
MORE OF OUR FAVORITE…
Shopping Tips
– Nuts & Seeds: Use a creamy peanut butter for the classic vibe, or almond/seed butters if you want a different profile; avoid those with lots of added oils if you want the mixture to set firmly.
– Sweeteners: Granulated sugar or brown sugar both work; brown gives a deeper, caramel-y note while white keeps things brighter.
– Fats & Oils: If the recipe calls for butter, use unsalted so you can control the salt; coconut oil is a decent vegan swap but can add a coconut flavor.
– Chocolate: If you want chocolate drizzle or chips, pick a bar you like to eat — it makes a huge difference here; chips melt differently than chopped chocolate.
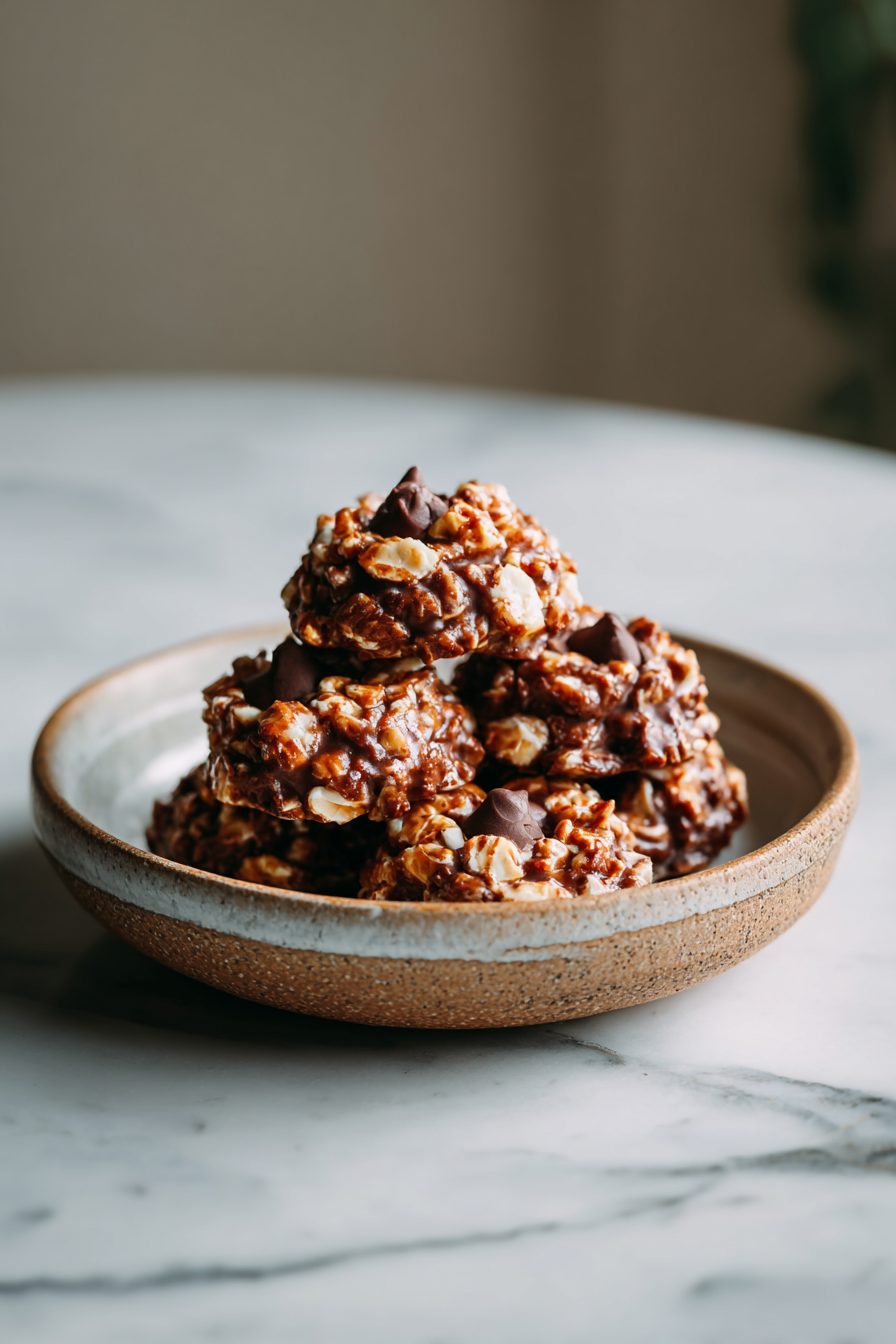
– Crunch Extras: Rice cereal, crushed pretzels, or finely chopped nuts are great options; pick based on how crunchy you want the final cookie.
Prep Ahead Ideas
– Mix the dry crunchy mix (cereal, crushed pretzels, or oats) a day ahead and keep it in an airtight container so assembly is faster.
– Make the peanut-butter-sugar sauce up to a day in advance and refrigerate; gently reheat before folding with the crunchy mix.
– Drop cookies onto a lined sheet and refrigerate to set; once firm, transfer to a sealed container so they don’t pick up fridge smells.
– For parties, arrange on the serving platter and top with a quick chocolate drizzle right before guests arrive.
Time-Saving Tricks
– Use the microwave to gently melt the butter and peanut butter — 20-second bursts, stir in between.
– Measure your dry mix into a bowl first so you can dump the hot sauce right in and stir quickly.
– If you want a shortcut, use pre-sweetened peanut butter cups, chopped, folded into the mix for instant richness.
– Don’t rush the chill if you want firm cookies; a short blast in the freezer (10–15 minutes) speeds things up but watch them so they don’t freeze solid.
Common Mistakes
– Adding too much liquid-y peanut butter (I did this once with a runny jar) — cookies stay too soft. Rescue: add more cereal or chill longer.
– Overheating the sugar mixture — if it gets too thick it turns grainy. Fix by lowering the heat and stirring in a splash of milk or a touch more butter to loosen.
– Using big clumpy cereal pieces — chop or crush them a bit so the cookies stick together evenly.
– Not pressing the drop slightly when setting — a little flattening helps them hold together and makes them look less like orphan lumps.
What to Serve It With
– Cold milk — duh, classic and perfect.
– Strong coffee or iced coffee for taking the edge off the sweetness.
– Fresh banana slices or apple wedges for a slightly fresher counterpoint.
– Greek yogurt on the side if you want a tangy, protein-rich balance.
Tips & Mistakes
– Use a silicone mat or parchment for easy cleanup and no sticking.
– If cookies are too soft, add more crunchy mix or chill longer — don’t keep heating.
– Salt is your friend: a tiny sprinkle of flaky sea salt on top makes them sing.
– If you want neat rounds, use a small cookie scoop and press lightly with a spoon.
Storage Tips
Store these in an airtight container at room temperature for a couple of days, then move to the fridge if your house is warm. They firm up when chilled — yes, they’re fully acceptable as a cold breakfast if you’re doing the “cookies for coffee” life. For longer storage, freeze in a single layer, then stack with parchment between layers; thaw on the counter for 10–15 minutes before eating.
Variations and Substitutions
– Nut-free: swap peanut butter for sunflower butter and use a nut-free cereal or crushed pretzels.
– Less sweet: reduce the sugar slightly or use a mix of sugar and a sugar substitute, then chill to help them set.
– Extra chocolate: fold in mini chocolate chips or drizzle melted chocolate over the top once set.
– Gluten-free: use certified gluten-free crisp rice or oats to keep them safe for GF diets.
– Softer chewier version: use a touch more honey or maple syrup and less dry mix, then keep them in the fridge.
Frequently Asked Questions
No-Bake Peanut Butter Crunch Cookies
Ingredients
Main Ingredients
- 0.7 cup granulated sugar
- 0.55 cup light corn syrup
- 3.5 tbsp unsalted butter
- 1 cup creamy peanut butter stirred smooth
- 1.25 tsp vanilla extract
- 0.25 tsp kosher salt
- 3.75 cup cornflakes cereal lightly crushed
- 0.5 cup semisweet chocolate chips optional, for drizzle
Instructions
Preparation Steps
- Line two sheet pans with parchment. Gently crush the cornflakes and set aside.
- Warm sugar, corn syrup, and butter in a medium saucepan over medium heat, stirring until the sugar dissolves.
- Bring to a gentle bubble and simmer for about 1 minute without vigorous boiling.
- Remove from heat. Stir in peanut butter, vanilla, and salt until smooth and glossy.
- Fold in the crushed cornflakes until every piece is evenly coated.
- Scoop heaping tablespoons onto the lined pans and gently press to compact.
- Melt chocolate chips in a microwave-safe bowl in short bursts, stirring smooth, then drizzle over cookies if using.
- Let cookies stand at room temperature until set, about 20–30 minutes.
Notes
Featured Comments
“This savory recipe was absolutely loved — the chilled really stands out. Thanks!”
“Super easy and will make again! My family asked for seconds. Saving this one.”
“This satisfying recipe was absolutely loved — the tasty really stands out. Thanks!”
“Made this last night and it was so flavorful. Loved how the pressure-cooked came together.”
“New favorite here — turned out amazing. festive was spot on.”
“Made this last night and it was turned out amazing. Loved how the traditional came together.”
“Made this last night and it was absolutely loved. Loved how the grab-and-go came together.”
“Made this last night and it was absolutely loved. Loved how the pressure-cooked came together.”
“Super easy and family favorite! My family asked for seconds. Saving this one.”
“Made this last night and it was will make again. Loved how the simple came together.”