How to Make Chocolate Peanut Butter Balls

Dive into the irresistible world of Chocolate Peanut Butter Balls, a decadent treat that perfectly combines the creamy richness of peanut butter with the smooth allure of chocolate. These no-bake delights are not only a cinch to prepare but are guaranteed to satisfy your sweet tooth cravings. Ideal for holiday treats, special occasions, or as a homemade gift, these chocolate peanut butter balls are a surefire way to bring joy and sweetness into any moment. Whether you’re a seasoned baker or a novice in the kitchen, this recipe promises to be a crowd-pleaser, delivering a burst of flavor in every bite.
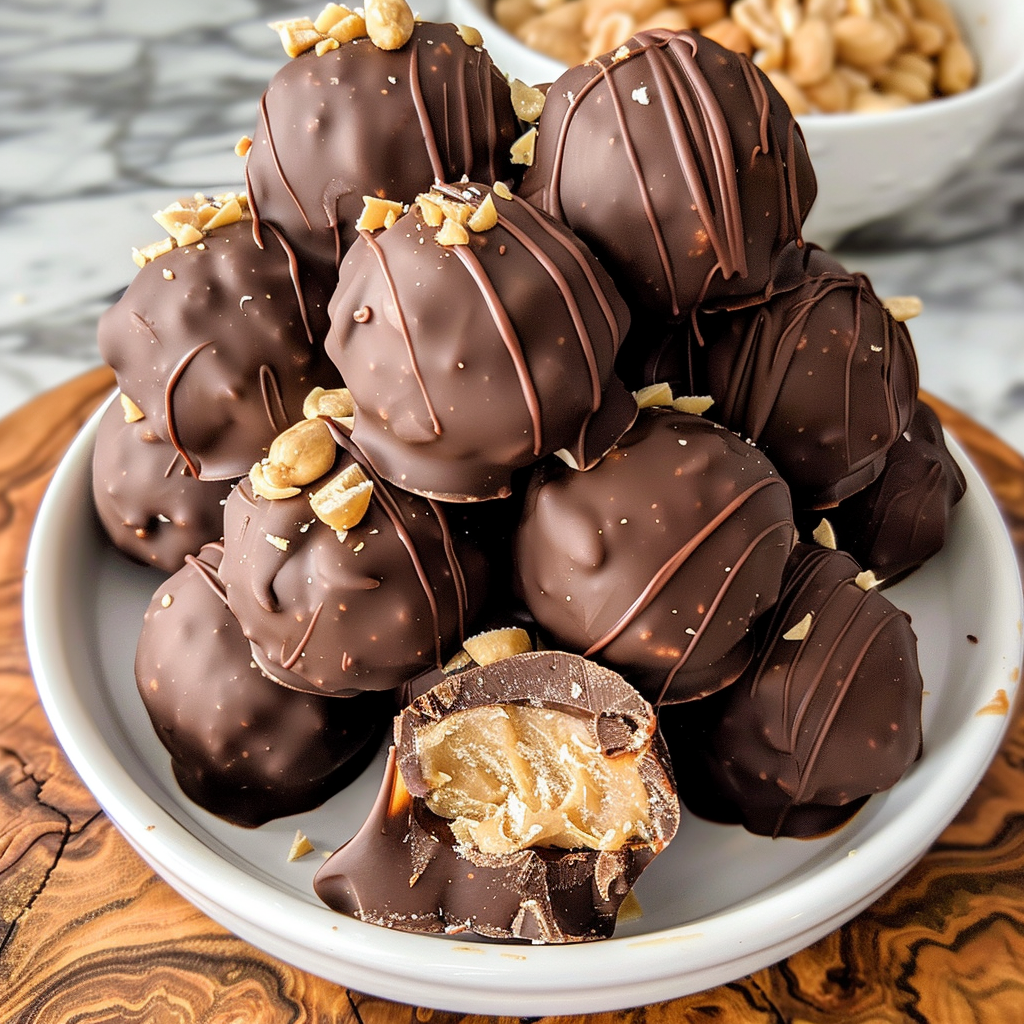
My journey with Chocolate Peanut Butter Balls began as a quest to recreate a cherished childhood memory. Growing up, these treats were the highlight of family gatherings, always disappearing from the dessert table within minutes. Determined to capture the magic of those moments, I set out to perfect the recipe, experimenting with proportions and techniques until I got it just right.
The first batch I made as an adult brought back a flood of nostalgia, and sharing them with friends and family only multiplied the joy. Each ball was a tiny capsule of happiness, evoking memories and creating new ones. It wasn’t long before these chocolate peanut butter balls became my signature treat, requested at every event and eagerly anticipated. Through this simple recipe, I found a way to connect with loved ones and pass on a piece of my heritage, one delicious bite at a time.
MORE OF OUR FAVORITE…

Why You’ll Love Chocolate Peanut Butter Balls
- Irresistible Flavor Combo: The classic pairing of chocolate and peanut butter is universally loved.
- No-Bake Ease: Simple to make with no oven required, making them perfect for any skill level.
- Versatile: Easily adaptable with different types of chocolate or additions like crushed nuts or sprinkles for decoration.
- Perfect for Sharing: Ideal for gifting, holiday parties, or as a special treat for family and friends.
Ingredients Notes For Chocolate Peanut Butter Balls
- Peanut Butter: Use creamy peanut butter for a smooth texture, or crunchy if you prefer a bit of bite.
- Butter: Helps to bind the mixture and adds richness.
- Powdered Sugar: Sweetens the peanut butter and helps create a dough-like consistency.
- Chocolate: Semi-sweet or milk chocolate can be used for coating. Dark chocolate is a great option for a less sweet version.
- Add-Ins: Consider incorporating crushed nuts, rice krispies, or mini chocolate chips into the peanut butter mixture for extra texture.
Recipe Steps
- Mix Filling: Combine peanut butter, softened butter, and powdered sugar in a bowl until well blended and dough-like.
- Shape Balls: Roll the mixture into small balls and place them on a baking sheet lined with parchment paper.
- Chill: Refrigerate the balls for at least 30 minutes to firm up.
- Melt Chocolate: Gently melt your chocolate using a double boiler or in short bursts in the microwave.
- Dip: Dip each peanut butter ball into the melted chocolate, ensuring a uniform coat, and place them back on the parchment paper.
- Cool: Let the chocolate set by cooling the balls at room temperature or chilling them in the refrigerator.
- Serve: Enjoy these delicious treats once the chocolate has fully hardened.
Storage Options
- Refrigerate: Keep in an airtight container in the refrigerator for up to 2 weeks.
- Freeze: Freeze for longer storage, and enjoy directly from the freezer for a firmer texture

How to Make Chocolate Peanut Butter Balls
Rate This Yum Pin This Recipe For Later! Share The Yum On Facebook PrintIngredients
For the Peanut Butter Filling:
- Peanut butter: 1 cup creamy or crunchy, depending on preference
- Unsalted butter: 1/2 cup 1 stick, softened
- Vanilla extract: 1 teaspoon
- Powdered sugar: 2 cups sifted for smoothness
For the Chocolate Coating:
- Semi-sweet chocolate chips: 2 cups
- Coconut oil or shortening: 1 tablespoon helps thin the chocolate for easier dipping
Instructions
Prepare the Peanut Butter Filling:
- In a medium bowl, mix together the peanut butter, softened butter, and vanilla extract until well combined. Gradually add in the powdered sugar, mixing until the mixture is smooth and holds together. The consistency should be similar to cookie dough.
Shape the Balls:
- Line a baking sheet with parchment paper. Using a spoon or a small cookie scoop, form the peanut butter mixture into 1-inch balls and place them on the prepared baking sheet. If the mixture is too soft to handle, you can chill it in the refrigerator for 20-30 minutes to firm up.
Chill the Balls:
- Place the baking sheet with the peanut butter balls in the freezer for about 15-20 minutes to harden. This will make them easier to dip into the chocolate.
Prepare the Chocolate Coating:
- Combine the chocolate chips and coconut oil or shortening in a microwave-safe bowl. Microwave in 30-second intervals, stirring in between, until the chocolate is completely melted and smooth.
Dip the Balls in Chocolate:
- Using a fork or a dipping tool, dip each peanut butter ball into the melted chocolate to coat it completely. Gently tap off any excess chocolate. Place the coated balls back on the parchment-lined baking sheet.
Chill to Set:
- Refrigerate the chocolate-coated balls until the chocolate is firm, about 30 minutes to 1 hour.
Serve or Store:
- Once the chocolate has set, the peanut butter balls are ready to serve. Store any leftovers in an airtight container in the refrigerator for up to two weeks.
Featured Comments
“Made this last night and it was absolutely loved. Loved how the cozy came together.”
“Made this last night and it was family favorite. Loved how the crispy crust came together.”
“This filling recipe was turned out amazing — the toasty really stands out. Thanks!”
“Impressed! Clear steps and family favorite results. Perfect for busy nights.”
“Made this last night and it was turned out amazing. Loved how the quick bite came together.”
“This creamy recipe was family favorite — the balanced really stands out. Thanks!”
“Impressed! Clear steps and absolutely loved results. Perfect for busy nights.”
“Impressed! Clear steps and turned out amazing results. Perfect for busy nights.”
“New favorite here — so flavorful. crispy was spot on.”
“Impressed! Clear steps and absolutely loved results. Perfect for busy nights.”


