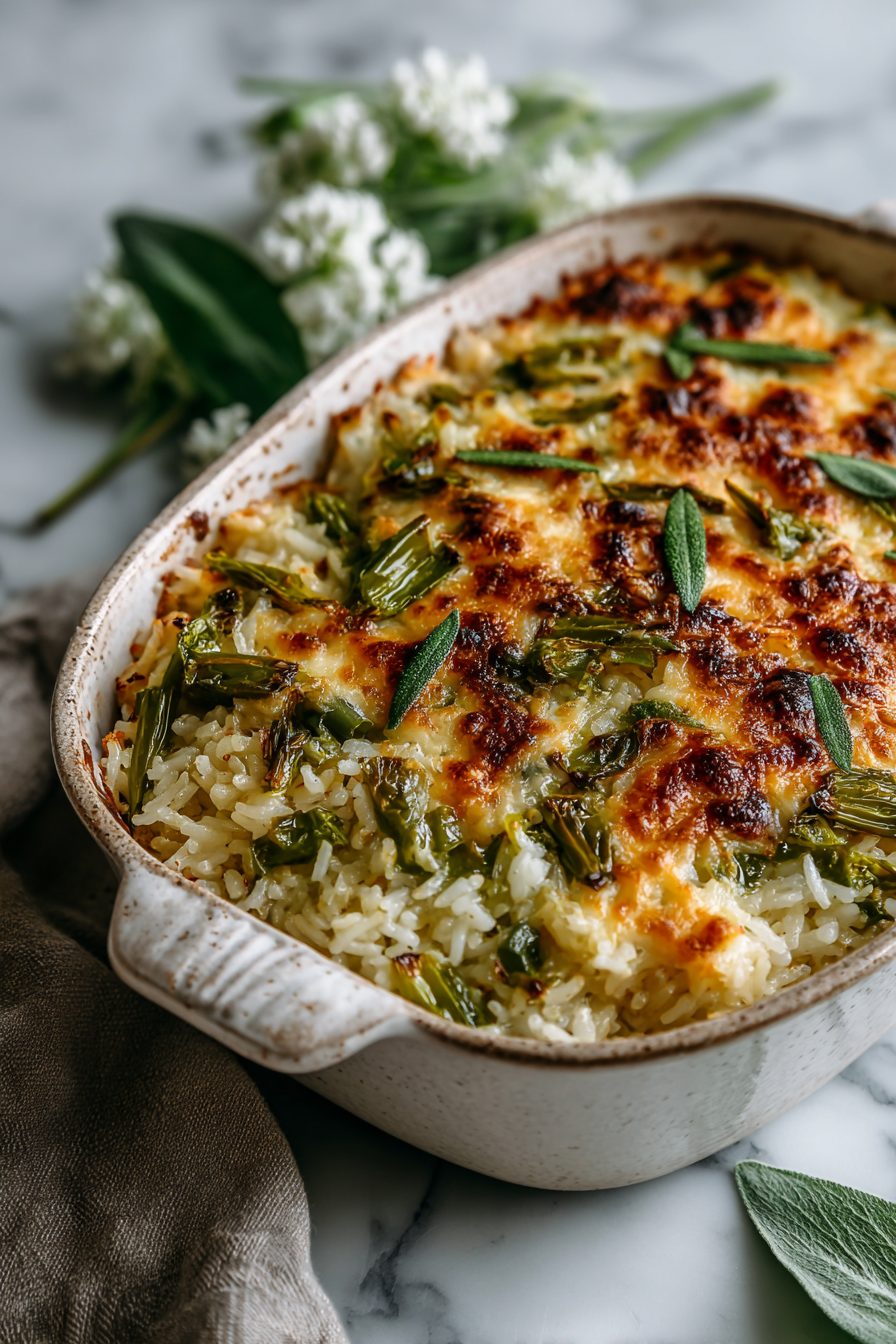
Cheesy Green Chile Rice Casserole Recipe

This is the casserole I make when everyone’s grumpy and the fridge is full of “almosts.” It’s creamy, a little spicy, and unapologetically cheesy—like mac and cheese’s chill cousin who brings green chiles to the party and knows how to light up a potluck. It’s rice folded into a rich, melty situation with roasted green chile warmth, and honestly, it tastes even better the next day when it’s cold and you eat it with a fork straight from the container while standing in the doorway of the fridge. Ask me how I know.
My husband calls this “the 911 dinner” because when I say, “We’re having the casserole,” he already has his plate out. The kids fight over the crispy corner pieces (that’s the good stuff), and last week my littlest said it tastes like nachos and a hug. One time I snuck in a handful of spinach and nobody noticed, which feels like a parenting win that should go on my resume. It’s become our weeknight white flag: throw it together, bake, and breathe.
Why You’ll Love This Cheesy Green Chile Rice Casserole Recipe
– It’s a fridge-cleaner hero—uses leftover rice and random cheese ends like a champ.
– Mild heat, big flavor: canned green chiles keep it cozy, not fiery.
– Kid-friendly but adult-approved (pepper jack for the grown-ups, mild jack for the littles).
– Zero fussy steps. Mix, bake, broil for golden edges, victory dance.
– Naturally gluten-free and easy to make vegetarian—or load it up with protein if you want.

Kitchen Talk
MORE EASY DINNER RECIPES...


Sometimes I use leftover rice from takeout and feel like a genius. Cold rice binds better and doesn’t go mushy, so if yours is fresh, I spread it on a sheet pan to cool while I hunt for the cheese grater I definitely put away (no I didn’t). I’ve made this with both mild and hot green chiles—mild for family dinner, hot when my brother comes over and wants to pretend he’s on a chili-eating show. One time I got wild and stirred in a spoonful of cream cheese and it turned outrageously silky; another time I subbed all Greek yogurt and it was a little tangier but still dreamy. If your cheese isn’t melting like you want, a quick broil at the end fixes everything and gives those toasty brown freckles on top. Also, yes, I’ve absolutely sprinkled crushed tortilla chips over the last five minutes of baking for crunch. Not sorry.
This Cheesy Green Chile Rice Casserole is cozy, melty comfort with a bright chile kick — easy to throw together and reliably crowd-pleasing. I loved the creamy sour cream-cheese base and the pop of green chiles; next time I’ll add a bit of cilantro and a squeeze of lime to lift the richness.
MORE OF OUR FAVORITE…
Shopping Tips
– Grains/Pasta: Long-grain white rice or jasmine keeps the casserole fluffy. Pre-cooked microwave pouches work great on wild weeknights.
– Canned Goods: Grab diced green chiles (mild or hot). Fire-roasted adds a smoky note; check heat level on the label so you don’t surprise the spice-sensitive.
– Cheese: Monterey Jack melts gorgeous; mix in sharp cheddar or a little pepper jack for oomph. Shred it yourself if you can—pre-shredded is fine, just melts slightly less smooth.
– Dairy: Sour cream or full-fat Greek yogurt both bring creamy tang. Whole milk makes it lush; low-fat works but is a bit less silky.
– Spices: A pinch of cumin + garlic/onion powder wakes everything up. Smoked paprika gives quiet campfire vibes.
– Fresh Herbs: Green onions or cilantro add brightness at the end; skip if your crisper drawer is a wasteland.
Prep Ahead Ideas
– Cook rice the day before and chill it—cold rice behaves beautifully in casseroles.
– Shred cheese and chop green onions ahead; stash in airtight containers or zip-top bags.
– Stir the filling together in the morning, cover, and refrigerate. At dinner, spread into the dish, top with cheese, bake, done.
– If you’re meal prepping, portion into smaller oven-safe containers so you can bake off only what you need midweek.

Time-Saving Tricks
– Use microwaveable rice pouches—no judgment, only dinner.
– Mix everything in the baking dish to skip washing another bowl.
– Pre-shredded cheese saves time; add a splash more dairy to help it melt.
– Hit broil for the last 1–2 minutes to get that browned top fast.
– Don’t rush the cool-down if your rice is steamy—five minutes spread on a pan prevents mush.
Common Mistakes
– Using steaming-hot rice can make it gummy. Let it cool a bit or spread it out for a quick chill.
– Under-seasoning. Rice is a flavor sponge—taste the mixture before it goes into the oven and adjust salt and spice.
– Overbaking until dry. Pull it when it’s bubbling at the edges; the carryover heat finishes the center.
– Cheese oil slick. Super-aged cheddar alone can separate—blend with a meltier cheese like jack to keep it creamy.
– I once forgot to drain a can of chiles and the casserole went a little soupy. Easy fix: bake a few extra minutes, then rest 10 minutes to set.
What to Serve It With
– A crunchy green salad with limey vinaigrette.
– Simple skillet corn with a squeeze of lime and chili powder.
– Charred broccoli or roasted bell peppers.
– Fried eggs on top for a lazy-brunch moment, or sliced grilled chicken if you want more protein.
Tips & Mistakes
– Use a 9×13 if you like more crispy edges; smaller pan for extra creamy center.
– Salt the rice mixture, not just the top—layered seasoning wins.
– If it looks dry before baking, add a splash of milk or dollop of sour cream and stir.
– Want heat? Add a chopped jalapeño or go half-and-half mild/hot chiles.
– If the top browns too fast, tent with foil and keep baking.
Storage Tips
Leftovers keep like a dream—3 to 4 days in the fridge, tightly covered. Reheat in the oven or microwave with a spoonful of milk stirred in to wake up the creaminess. It freezes surprisingly well in portions; thaw overnight, then bake until hot and bubbly. Also yes, cold bites straight from the container are elite breakfast behavior. Add a fried egg and you’re basically a brunch chef.
Variations and Substitutions
– Protein add-ins: Rotisserie chicken, crumbled cooked chorizo, or black beans turn it into a full meal.
– Veggie boosts: Corn, diced bell pepper, sautéed onions, or a handful of spinach disappear nicely.
– Heat control: Mild chiles for kids, hot for spice-lovers; a pinch of cayenne if you want sneaky heat.
– Dairy tweaks: Greek yogurt for tang; a spoon of cream cheese for extra lushness; lactose-free milk and cheese work fine.
– Grain swaps: Brown rice or quinoa both work—just cook them fully and cool first. Cauliflower rice is doable; sauté it to drive off moisture before mixing.
– Cheese mix-ups: Jack + cheddar is classic; smoked gouda adds depth; avoid all super-aged cheddar or it can get oily.
Frequently Asked Questions
Cheesy Green Chile Rice Casserole Recipe
Ingredients
Main Ingredients
- 4 cup cooked long-grain white rice
- 8 oz diced green chiles, drained
- 1.5 cup shredded Monterey Jack cheese divided
- 1 cup shredded sharp cheddar cheese divided
- 1 cup sour cream
- 4 oz cream cheese, softened
- 2 tbsp unsalted butter
- 0.75 cup finely chopped yellow onion
- 2 tsp minced garlic
- 1 tsp ground cumin
- 1 tsp kosher salt to taste
- 0.5 tsp black pepper
- 0.25 cup low-sodium chicken broth or water
- 1 tbsp fresh lime juice
- 2 tbsp chopped cilantro for garnish
Instructions
Preparation Steps
- Heat oven to 350°F and grease a 9x13-inch baking dish.
- Melt butter in a skillet over medium heat. Soften onion until translucent, about 5 minutes.
- Stir in garlic and cumin. Cook until fragrant, 30 seconds. Remove from heat.
- Whisk sour cream, cream cheese, broth, and lime juice in a large bowl until smooth.
- Fold in cooked rice, green chiles, sautéed onions, salt, pepper, and half of each cheese.
- Spread mixture in the dish. Top with remaining cheeses.
- Bake until hot and bubbling with lightly browned spots, 30–35 minutes.
- Rest 10 minutes. Sprinkle with cilantro and serve warm.
Notes
Featured Comments
“Super easy and turned out amazing! My family asked for seconds. Saving this one.”
“This fresh recipe was so flavorful — the buttery really stands out. Thanks!”
“Made this last night and it was absolutely loved. Loved how the al dente came together.”
“Made this last night and it was family favorite. Loved how the fruity came together.”
“New favorite here — turned out amazing. flavorful was spot on.”
“New favorite here — turned out amazing. weeknight winner was spot on.”
“Impressed! Clear steps and will make again results. Perfect for busy nights.”
“This balanced recipe was so flavorful — the comforting really stands out. Thanks!”
“Made this last night and it was absolutely loved. Loved how the zesty came together.”
“Super easy and so flavorful! My family asked for seconds. Saving this one.”