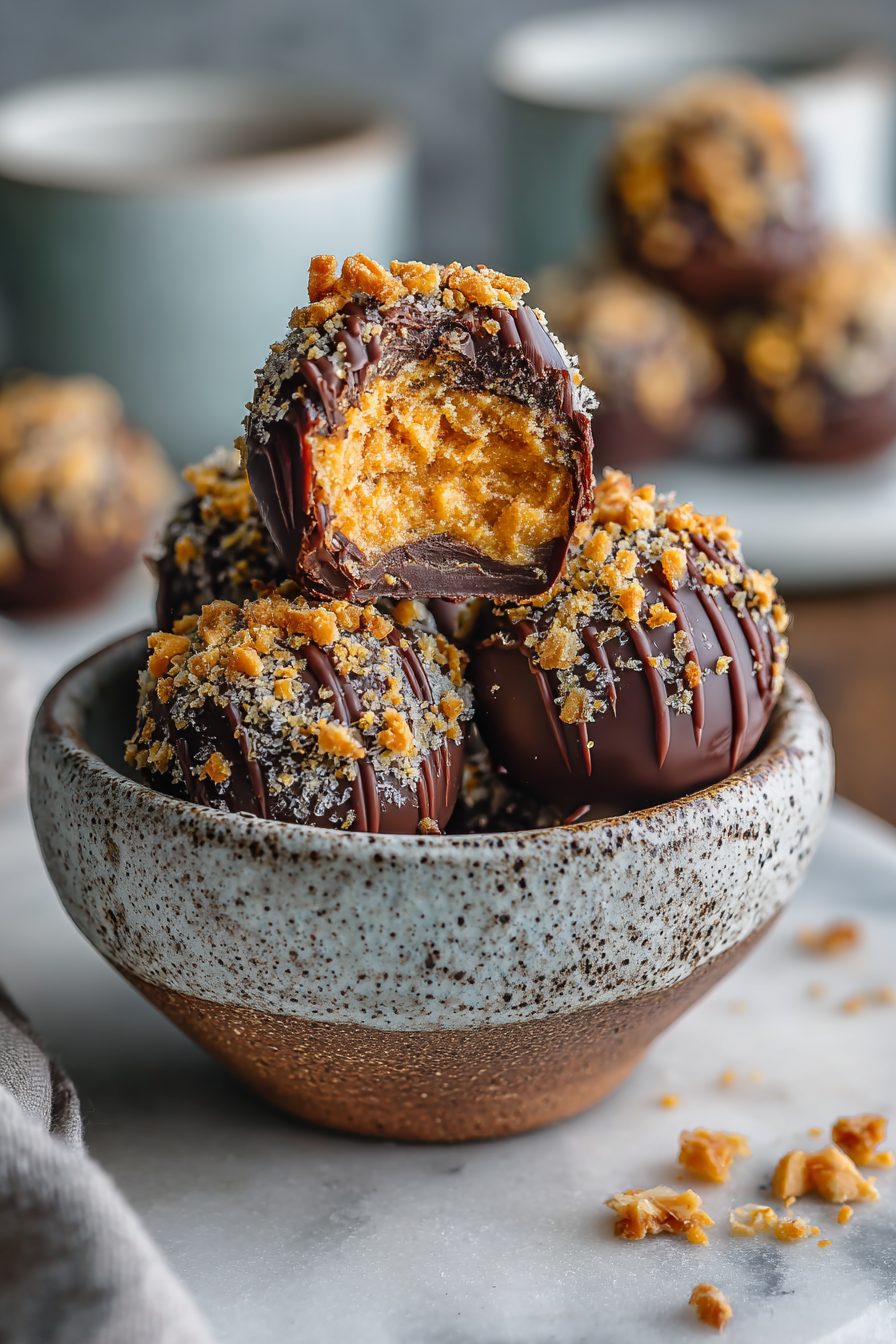
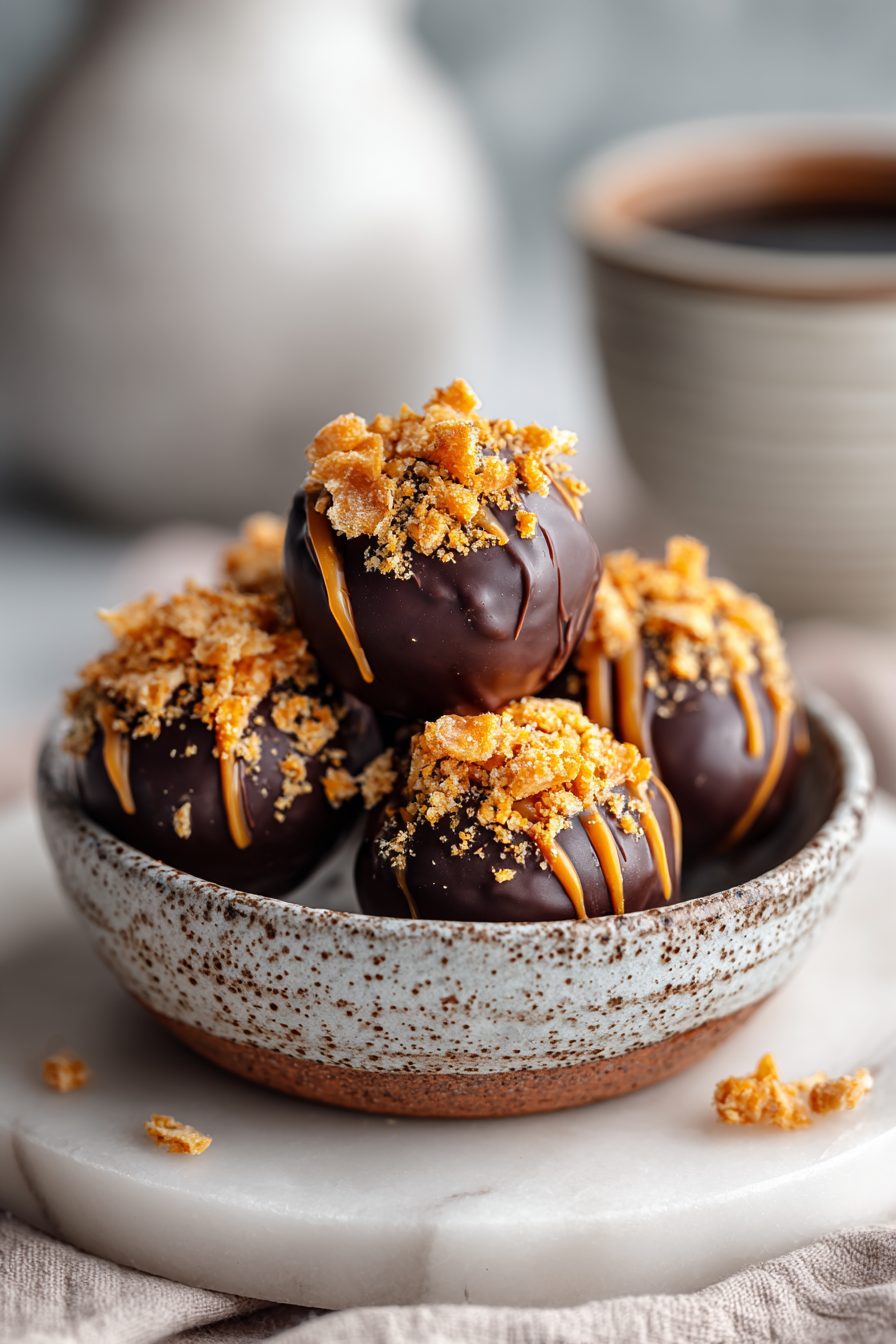
Easy Butterfinger Truffles
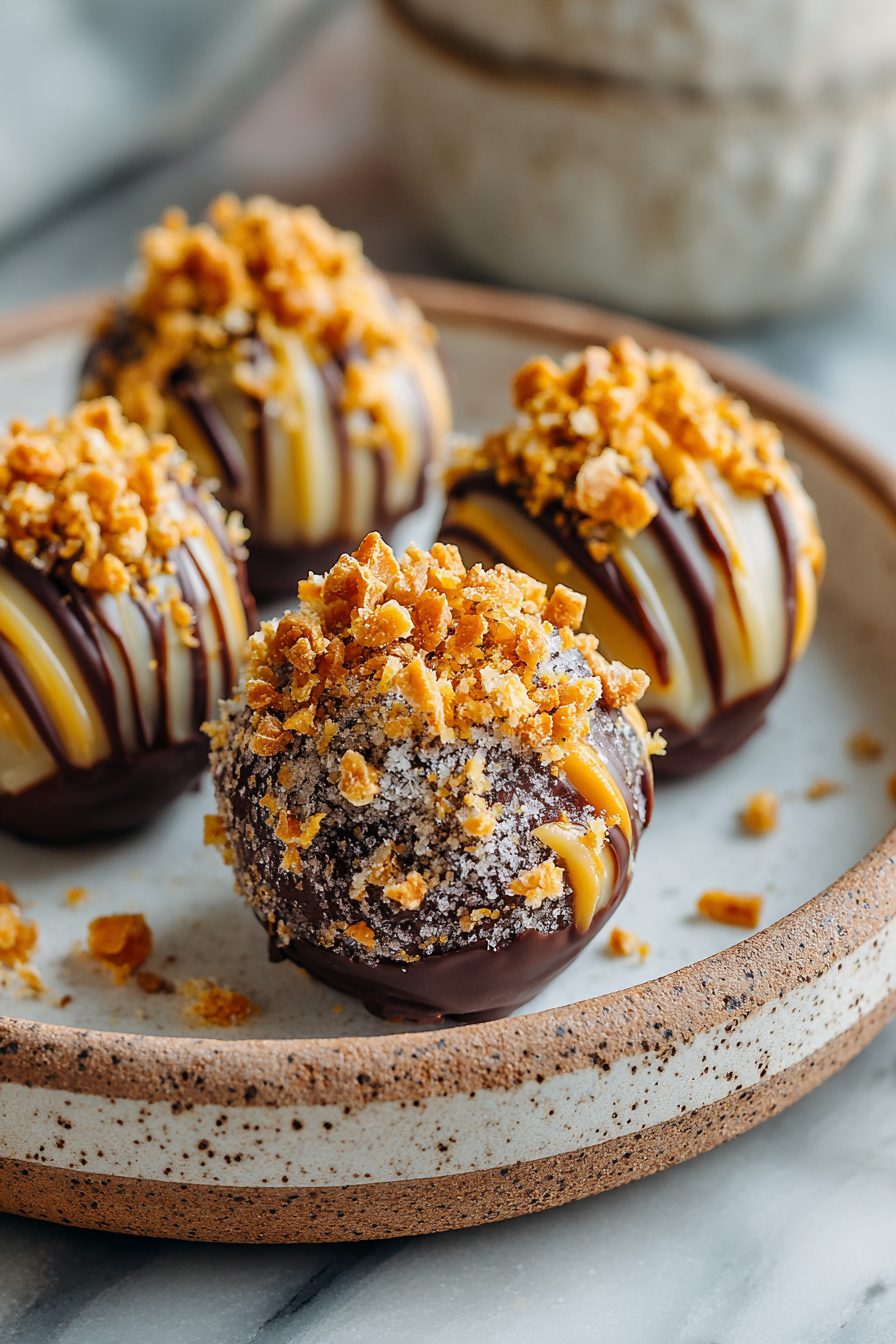
Shattery chocolate shell, soft peanut-buttery middle, crunchy candy crackle—these little Butterfinger truffles are pure, unapologetic joy. No oven, minimal dishes, and they taste like you cheated and swung by a fancy confection shop in your pajamas. It’s the kind of dessert that makes everyone irrationally optimistic about life (and also a little sticky).
The first time I made these, I set them on the table “just to test” and my husband did that suspiciously casual hover like, I’m not about to eat six, you are. Our kiddo called them “peanut butter snowballs wearing chocolate coats,” and honestly, that’s canon now. They’ve become our default party bribe, road-trip snack, and oh-no-we-need-a-dessert-in-an-hour miracle. The batch never survives the weekend. I pretend to be upset; I am not.
Why You’ll Love This Easy Butterfinger Truffles
– You don’t have to bake. Bless.
– They taste like a candy shop truffle but require zero culinary bravado.
– Crunchy-smooth situation: creamy middle, crispy candy bits, snappy chocolate shell.
– They freeze beautifully—hide some for “future you.”
– Ridiculously customizable: milk, dark, extra crunch, extra drizzle, no rules.
Kitchen Talk
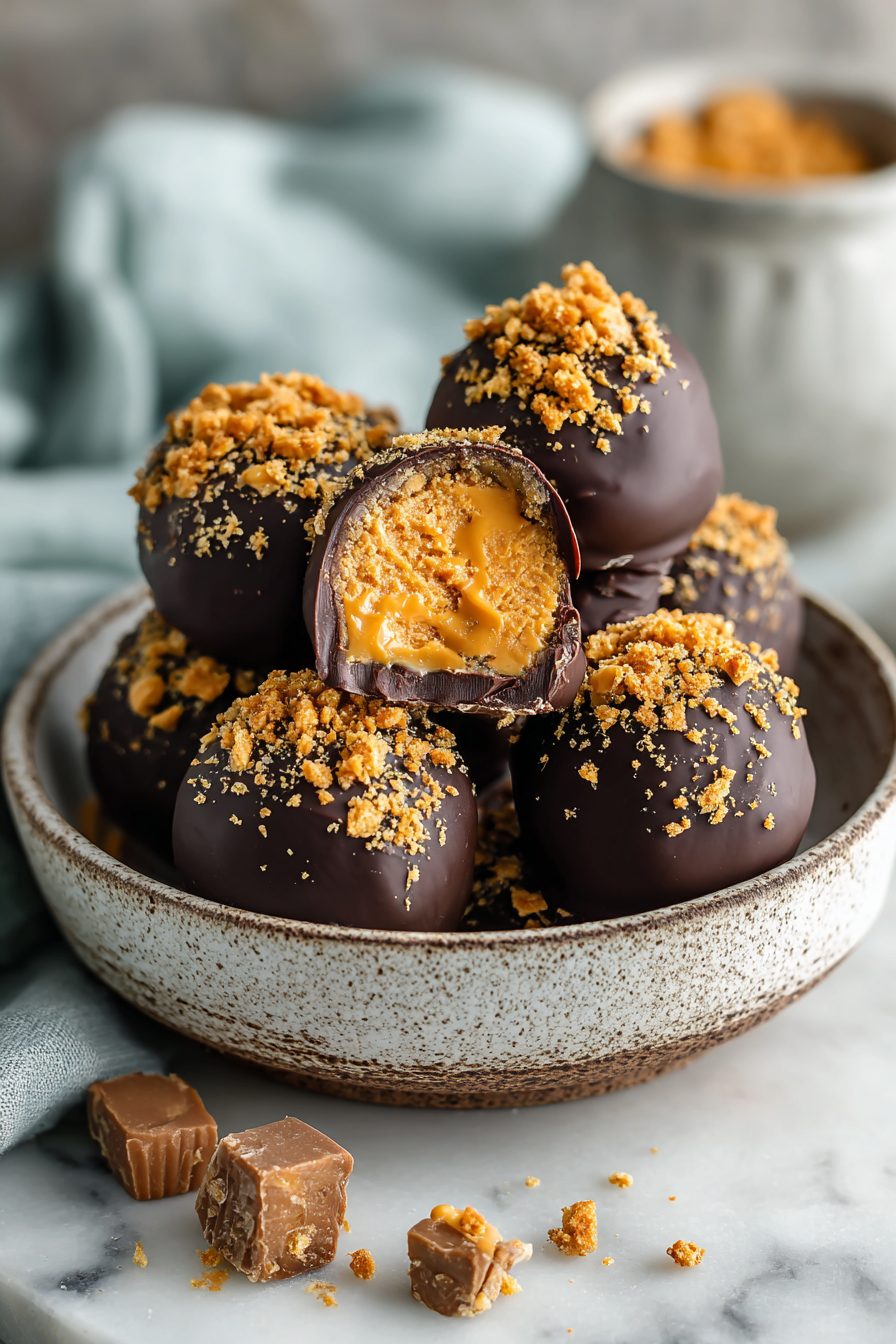
I’ve made these both ways: with cream cheese for that classic truffle vibe and with a spoonful of peanut butter when the cream cheese mysteriously disappears (looking at you, late-night bagel phase). Both work. The cream cheese batch is extra smooth and truffle-y; the PB batch is more candy bar energy. One time I got cocky and skipped chilling before dipping—big mistake. I basically baptized warm chocolate in truffle goo, and it got… swirly. Still delicious. Very ugly.
MORE OF OUR FAVORITE…
Another quirk: crush the candy bars more than you think. Big chunks are fun, but pea-size gives you an even texture and less cracking in the chocolate shell. I’ve used melting wafers, chopped bars, and chocolate chips. Wafers are the easiest. Chips need a tiny kiss of oil to thin out. Also, a fork with two tines bent outward is my janky dipping tool. It works.
Shopping Tips
– Specialty Item: Grab Butterfinger bars in fun-size or full-size; fresh ones snap cleanly and aren’t waxy. Stale bars won’t give that loud crunch.
– Dairy: Use block-style cream cheese, not the whipped tub—less moisture, firmer truffles. Full-fat sets best.
– Chocolate: Melting wafers or couverture chocolate make the smoothest coating. If using chips, add a little neutral or coconut oil to loosen.
– Nuts & Seeds: If you swap in peanut butter, grab a no-stir creamy style so the mixture isn’t greasy or runny.
– Fats & Oils: A teaspoon of refined coconut oil or neutral oil helps chocolate melt silky and dip without clumping.
– Budget Swaps: Almond bark or store-brand melting chocolate is totally fine for big batches; save splurgy bars for drizzling.
Prep Ahead Ideas
– Crush the candy bars and mix the filling a day ahead, then chill the bowl so it scoops like a dream the next day.
– Roll the truffles and freeze on a lined sheet until firm; stash in a lidded container with parchment between layers.
– Day-of, melt chocolate and dip straight from the freezer. Morning: roll and chill. Evening: dip, drizzle, victory.
Time-Saving Tricks
– Food processor = candy rubble in seconds. No processor? Toss bars in a zip bag and whack with a rolling pin. Therapy.
– Use a small cookie scoop for speed and uniform size. It also keeps hands warmer and the mixture firmer.
– Microwave chocolate in short bursts and stir more than you melt. The stirring does the heavy lifting.
– Don’t rush the chill. A quick freeze before dipping saves you from melty fingerprints and sliding centers.
Common Mistakes
– Overheating chocolate. It seizes into a grainy tantrum. If it happens, stir in a tiny bit of warm oil and whisk gently back to smooth.
– Filling too soft. If your mixture slumps, chill longer or fold in extra crushed candy/cracker crumbs until it holds a scoop.
– Thick, gloppy coating. Your chocolate is too cool or too thick—re-warm gently or thin with a little oil.
– Condensation drama. Dipped frozen truffles can sweat. Let them sit a few minutes after dipping before sprinkling crumbs, or the topping slides right off. Learned the sticky way.
What to Serve It With
– Coffee, obviously. Hot, iced, or that half cup you forgot in the microwave.
– A salty board—pretzels, roasted nuts, and truffles make a great little dessert snack plate.
– Vanilla ice cream sundae with chopped truffle sprinkles on top.
– Cold milk or oat milk for kid joy and cookie-jar nostalgia.
Tips & Mistakes
– Chill the mixture until it scoops cleanly; if it sticks to the scoop, it needs more fridge time.
– Line everything. Parchment saves your sanity.
– Use two forks for dipping and tapping off excess; a drizzle covers any bald spots.
– If the shell cracks, patch with a warm spoonful of chocolate and pretend it was intentional.
– Sprinkle crushed candy right after dipping so it actually sticks.
Storage Tips
Fridge: airtight container, parchment between layers, and they’ll stay snappy for several days. Freezer: absolutely—pop them in a bag and thaw a few minutes before eating, or go full goblin and eat them cold and rock-hard. Breakfast truffle? I’m not your mom. They’re dangerously great straight from the freezer.
Variations and Substitutions
– Swap chocolate: milk for classic candy-bar vibes, dark for grown-up drama, white for sweet and showy. Drizzle contrast chocolate for flair.
– Cream cheese vs. peanut butter: cream cheese gives truffle texture; peanut butter leans candy. Both work—just chill longer with PB.
– Add-ins: a pinch of salt, a splash of vanilla, or a handful of finely crushed graham crackers to firm up a soft mix.
– Other candy bars: Snickers or Crunch bars change the whole personality but still delicious. It’s a choose-your-own chaos.
– Peanut-free: try crushed crispy rice cereal and butterscotch chips for a Butterfinger-adjacent vibe. Not the same, still dreamy.
Frequently Asked Questions
Easy Butterfinger Truffles
Ingredients
Main Ingredients
- 0.66 cup powdered sugar
- 0.66 cup creamy peanut butter
- 5 oz cream cheese, softened
- 1 tsp vanilla extract
- 0.13 tsp fine salt
- 1.25 cup crunchy peanut candy bars, finely crushed for the filling
- 11 oz semisweet chocolate chips
- 2 tsp refined coconut oil helps the chocolate set shiny
- 0.25 cup extra crushed peanut candy for topping
Instructions
Preparation Steps
- Line a rimmed baking sheet with parchment and clear space in the fridge and freezer.
- Beat peanut butter and softened cream cheese until completely smooth.
- Mix in powdered sugar, vanilla, and salt until creamy and thick.
- Fold in 1 1/4 cups crushed peanut candy, saving the remaining 1/4 cup for topping.
- Chill the mixture 20–30 minutes until firm enough to scoop.
- Scoop 1-tablespoon portions and roll into balls. Freeze 10 minutes to set.
- Melt chocolate chips with coconut oil in 20–30 second microwave bursts, stirring until glossy.
- Dip chilled balls into the melted chocolate, letting excess drip off. Set on the lined sheet.
- Sprinkle with reserved crushed candy and refrigerate until the chocolate firms, about 10–15 minutes.
Notes
Featured Comments
“Impressed! Clear steps and absolutely loved results. Perfect for busy nights.”
“Impressed! Clear steps and absolutely loved results. Perfect for busy nights.”
“This lighter recipe was family favorite — the anytime really stands out. Thanks!”
“Super easy and so flavorful! My family asked for seconds. Saving this one.”
“New favorite here — absolutely loved. guilt-free was spot on.”
“Impressed! Clear steps and so flavorful results. Perfect for busy nights.”
“Made this last night and it was turned out amazing. Loved how the clean came together.”
“New favorite here — will make again. quick bite was spot on.”
“New favorite here — will make again. quick was spot on.”
“Impressed! Clear steps and so flavorful results. Perfect for busy nights.”