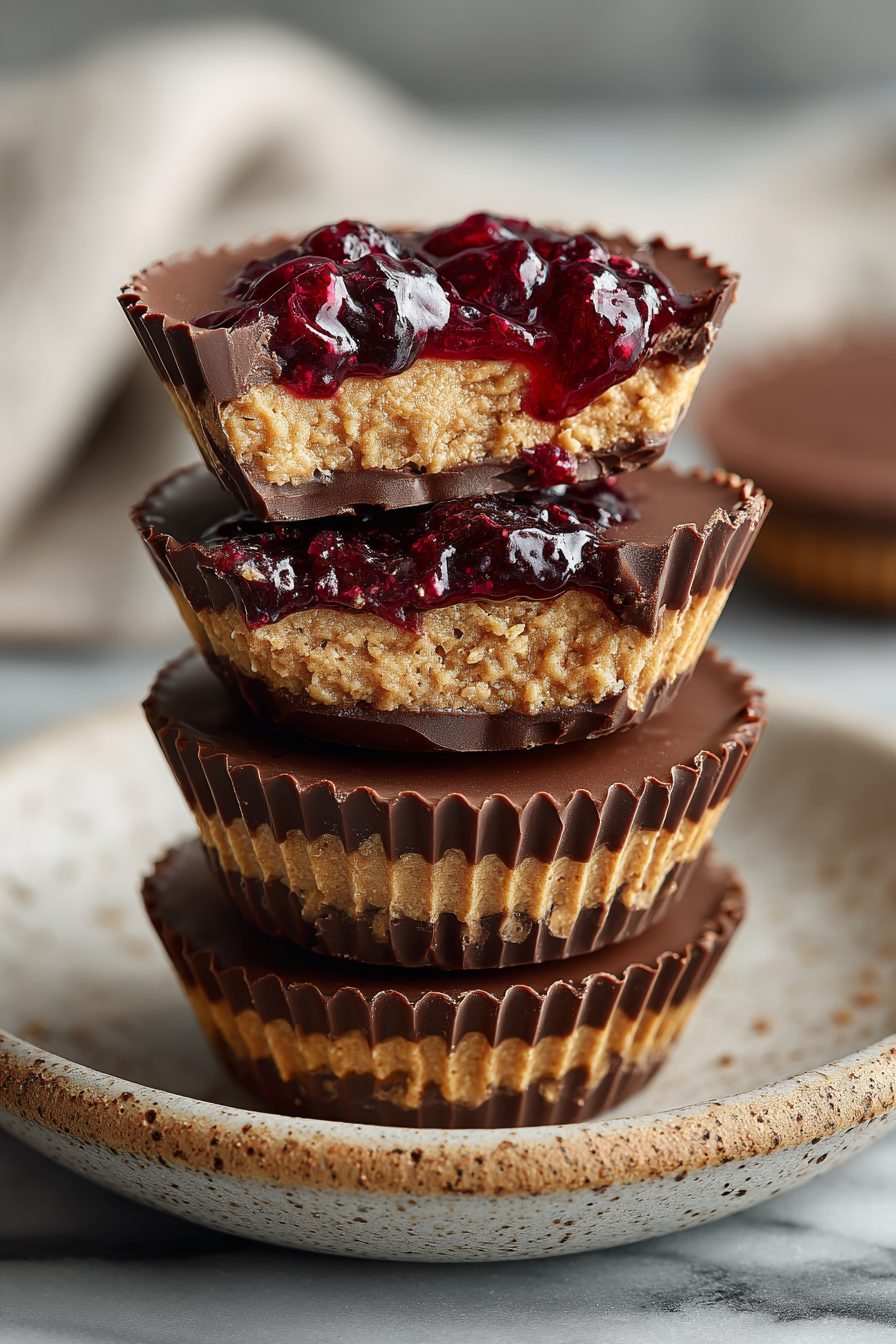
Easy Peanut Butter and Jelly Chocolate Cups
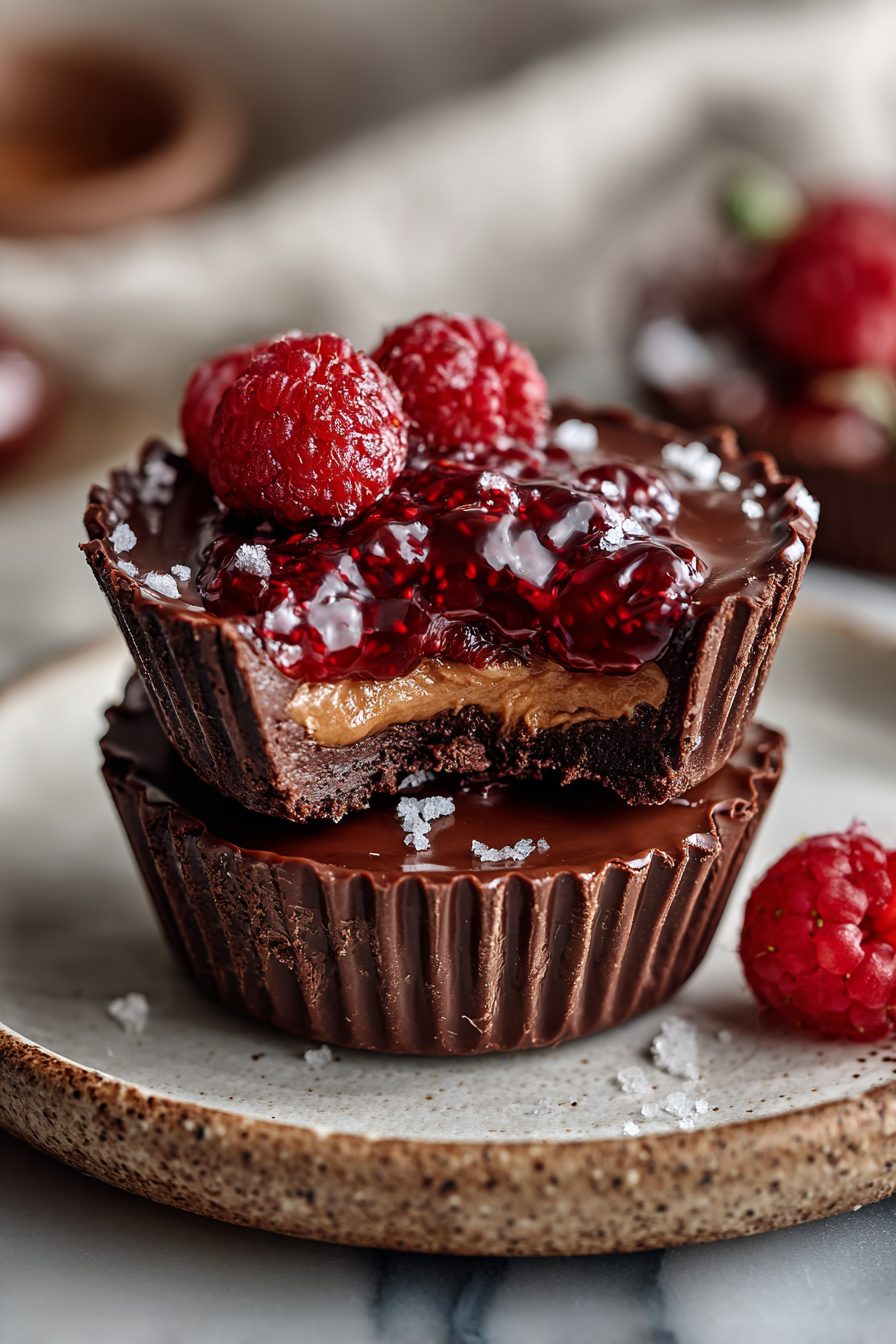
I know — peanut butter and jelly is classic lunchbox stuff, but wrapped in chocolate? That’s childhood nostalgia gone gourmet and a little bit messy, and I am here for it. These Easy Peanut Butter and Jelly Chocolate Cups are tiny, satisfying, slightly ridiculous desserts that hit sweet, salty, creamy, and fruity in one bite.
My tiny family eats these like they’re therapy. My husband hides them in the back of the freezer and pretends he’s not the one who ate half the tray in one sitting; my kid thinks they are magical “grown-up Oreos.” This recipe turned into our lazy-weekend tradition: make a tray, watch a dumb movie, and fight over the last cup. Once I messed up the layering and ended up with a peanut butter–jelly chocolate swirl — accidental masterpiece. True story.
Why You’ll Love This Easy Peanut Butter and Jelly Chocolate Cups
– Tiny portions that feel indulgent but don’t take a million years.
– No baking, minimal equipment, zero fancy technique — meltdown + chill = success.
– Scales up for a party or down for a midnight snack raid.
– Feels nostalgic and weirdly sophisticated at the same time.
Kitchen Talk
MORE EASY DESSERT RECIPES...


These are the kind of treats you can assemble while the kettle boils. I like to set up a little assembly line: chocolate melts in one bowl, peanut butter gets loosened in another, jam is spoon-ready. The first time I tried to “fancy” them with a perfect swirl, the swirl looked like a toddler’s fingerprint — and honestly, it was better. Also, if your peanut butter is too stiff, microwave it for a few seconds; if your jam is too runny, blot it on a paper towel before dolloping. Little hacks like that make the process faster and less precious.
These Easy Peanut Butter and Jelly Chocolate Cups are such a nostalgic and delicious treat! The recipe is straightforward with just a few ingredients, and I loved how the salty peanut butter paired perfectly with the sweet jelly inside a smooth chocolate shell. Definitely a fun and quick dessert to make when you want something homemade but simple.
MORE OF OUR FAVORITE…
Shopping Tips
– Chocolate: Use a good melting chocolate or chocolate chips labeled for melting; avoid bars that seize easily. Dark or milk both work — dark cuts the sweetness.
– Nuts & Seeds: Pick a creamy peanut butter for the best texture; natural oils are fine but stir well so it’s smooth and spreadable.
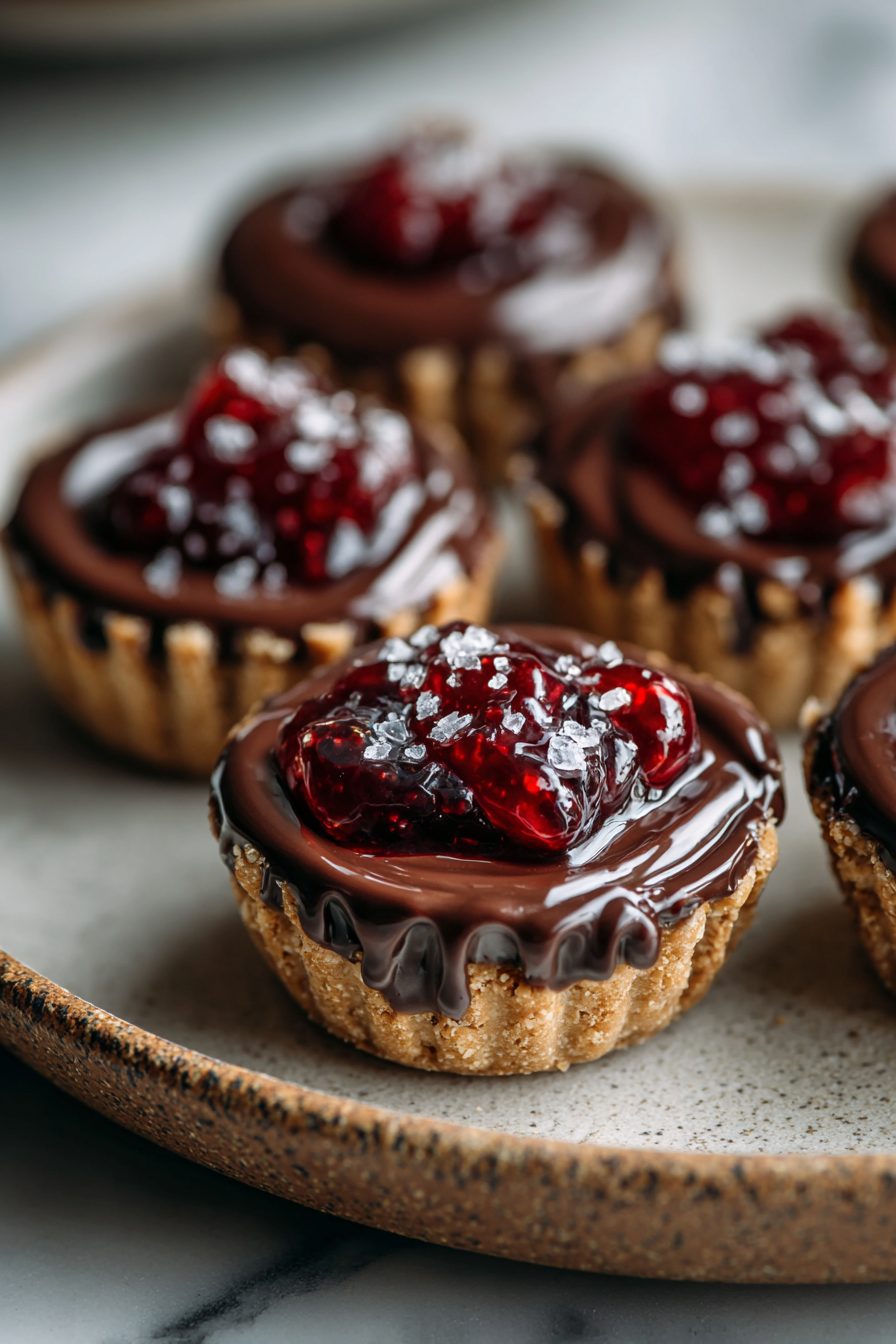
– Fruit: Choose a jam or jelly you actually love — grape and strawberry are classic, but raspberry or cherry bring a nicer tart pop.
– Sweeteners: If you want a touch less sugar, go for a slightly less sweet chocolate or a lower-sugar jam; taste as you go.
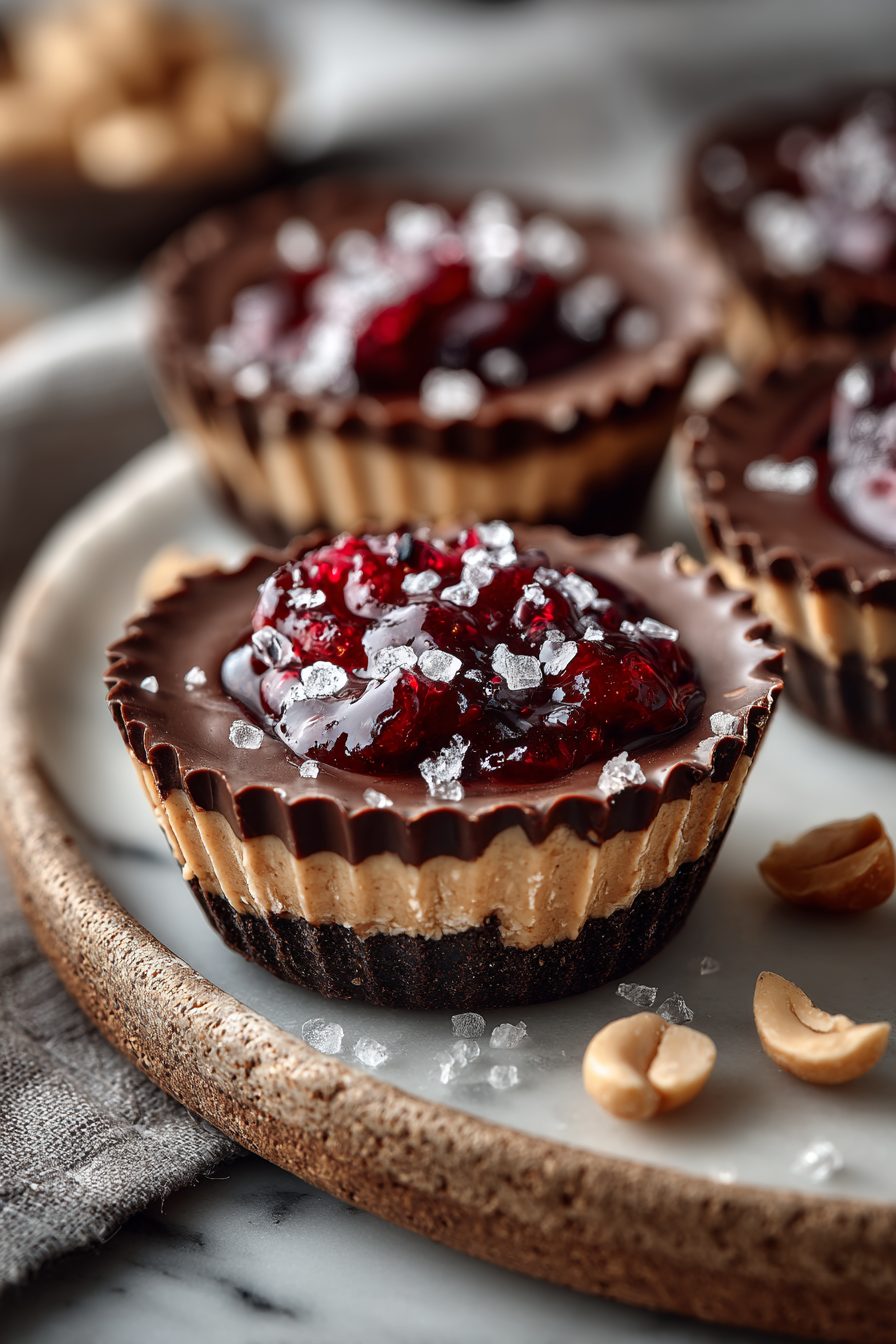
– Specialty Item: If you want to jazz them up, grab flaky sea salt or crunchy peanut butter to sprinkle on top — totally optional but very adult.
Prep Ahead Ideas
– Make the peanut butter layer the day before: stir it and store it in an airtight container so it’s smooth and ready to spoon.
– Pre-portion jam into small ramekins or zip bags with the corner snipped — less mess when you’re assembling.
– Keep melted chocolate warm over a tiny heat source (or zap briefly) in the evening so you can finish cups after dinner for dessert.
Time-Saving Tricks
– Use microwave-safe bowls to melt chocolate in short bursts; stirring between bursts prevents burning.
– Buy a squeeze-bottle for jam or use a zip-top bag with a tiny corner cut — faster, neater dollops.
– Don’t fuss with tempering unless you care about glossy chocolate; a quick melt-and-chill works great for home treats.
– When not rushing, let the cups chill fully so the layers set cleanly — patience pays here.
Common Mistakes
– Overheating chocolate: I did this once and it went grainy — rescue it by adding a bit of neutral oil and stirring, or start fresh with another batch.
– Using rock-hard peanut butter: leads to lumpy fillings; loosen it up with brief microwaving and stir until smooth.
– Too much jam: makes the bottom soggy or slides through the layer; a small dollop is all you need.
– Skimping on chill time: tried to eat them too soon and they collapsed — wait for them to set.
What to Serve It With
– A mug of strong coffee or espresso for an adult sweet-salty pairing.
– A scoop of vanilla ice cream for full dessert vibes.
– Fresh berries to cut the richness and add brightness.
– Crumbled cookies or graham crackers on the side for extra crunch.
Tips & Mistakes
– Use room-temperature peanut butter — it spreads and layers smoothly.
– Dab excess jam on the rim with a paper towel to avoid sticky fingers.
– If chocolate blooms (white-ish streaks) it’s safe to eat; it just looks sloppy.
– Don’t overfill the cups — leave a little chocolate edge so they pop out easier.
Storage Tips
Keep these cups in a sealed container in the fridge for a week, or freeze for longer stash-ability. They’re great straight from the fridge (fudgy and firm) or at room temp (creamier). No shame in eating one for breakfast with coffee — I won’t tell.
Variations and Substitutions
– Swap peanut butter for almond or cashew butter if you want a different nut profile; sunflower seed butter works for nut-free homes.
– Try different jams: tangy raspberry changes the whole game, while apricot is mellow and grown-up.
– For a crunchy surprise, mix in a little crushed pretzel or crunchy peanut sprinkle on top.
– Want less sugar? Use a darker chocolate and a reduced-sugar jam, but keep a small balance — too bitter without the fruity lift.
Frequently Asked Questions
Easy Peanut Butter and Jelly Chocolate Cups
Ingredients
Main Ingredients
- 1.5 cup semi-sweet chocolate chips or use dark chocolate chips
- 2 tsp coconut oil helps the chocolate set smoothly
- 0.75 cup creamy peanut butter
- 2.5 tbsp powdered sugar sweetens and firms the peanut butter
- 0.5 tsp vanilla extract
- 0.13 tsp fine sea salt
- 0.33 cup seedless raspberry or strawberry jam use your favorite jelly or jam
- 2 tbsp roasted peanuts, chopped optional, for topping
Instructions
Preparation Steps
- Line a 12-cup mini muffin pan with paper liners.
- Melt chocolate chips with coconut oil in a microwave-safe bowl, heating in 20–30 second bursts and stirring until smooth.
- Spoon about 1 teaspoon melted chocolate into each liner and tilt or tap to coat the bottom. Chill 5 minutes to set slightly.
- Stir together peanut butter, powdered sugar, vanilla, and salt until thick and spreadable.
- Portion a rounded teaspoon of peanut butter mixture onto each chocolate base and gently flatten.
- Add a small dollop of jam on top of the peanut butter in each cup.
- Cover each cup with enough melted chocolate to seal, then tap the pan to level. Sprinkle peanuts on top if using.
- Chill until firm, about 15–20 minutes. Serve or store covered in the fridge.
Notes
Featured Comments
“New favorite here — so flavorful. fruity was spot on.”
“Super easy and will make again! My family asked for seconds. Saving this one.”
“This fizzy recipe was turned out amazing — the bite-sized really stands out. Thanks!”
“Super easy and will make again! My family asked for seconds. Saving this one.”
“Super easy and turned out amazing! My family asked for seconds. Saving this one.”
“Impressed! Clear steps and turned out amazing results. Perfect for busy nights.”
“Made this last night and it was turned out amazing. Loved how the energizing came together.”
“Super easy and so flavorful! My family asked for seconds. Saving this one.”
“Super easy and turned out amazing! My family asked for seconds. Saving this one.”
“Super easy and absolutely loved! My family asked for seconds. Saving this one.”